
Before any trip, every RV owner asks themselves if their RV ready to go. But there’s another question that is equally important: Is your RV ready to stop? The size and weight of an RV puts a lot of stress on the components of its factory-installed brake system. But factory-installed brakes are designed to meet basic requirements under normal driving conditions. That means, pretty flat highways going pretty normal speeds — without much account for that deer that suddenly decides to cross traffic.
Further, more demanding driving conditions such as steep grades or high speed driving can drastically reduce RV braking system performance. You’ll often have to apply the brakes sooner because of decreased stopping power. And in these situations, you’ll definitely notice a change in your tow vehicle’s handling.
Both of these things can result in jangled nerves and hazardous situations. But you don’t have to settle for a less-safe status quo. Here are three RV brake system upgrades that can significantly enhance your RV’s stopping power and handling — in addition to your peace of mind.
First, a Reminder: Service Your RV Brakes
Servicing your RV brakes on a regular basis is an essential part of RV maintenance. It should be done at least once per year, depending on how many miles you put on your RV per year. That said, many RVers forget about their brakes. (At least, until something goes terribly wrong.) Aside from the obvious safety concerns here, it costs a lot more to repair brakes than it does to do routine maintenance. Here’s what a RV brake system service entail:
- Replacing wheel bearings (yearly).
- Checking condition of rotors, and brake pads (every six months) — replacing disc brake pads that have worn down to 3/16 of an inch and rotating disc brake rotors and replace if they appear worn or thin.
- Checking and servicing drum brakes — adjusting drum brakes every 3,000 miles; checking for deep grooves, hard spots, or burned spots (if you see any of these things, you may need to turn, regrind or replace the drums); checking drum brake shoes and magnets; and cleaning the drum with brake cleaner and a stiff-bristled brush.
- Checking and refilling brake hydraulic fluid as needed — replacing brake fluid if looks contaminated by water.
- Adjusting the electric brake controller as needed.
Most RV technicians and RV dealer service departments offer brake servicing packages. However, you can save yourself considerable money by doing this job yourself. ot only that, but brake service tasks are a fairly DIY project for anyone with rudimentary mechanical skills and the right tools.
The Top RV Brake System Upgrades
1. Dexter Nev-R-Adjust Self-Adjusting Drum Brakes
Becoming Brake-Adjustment Free
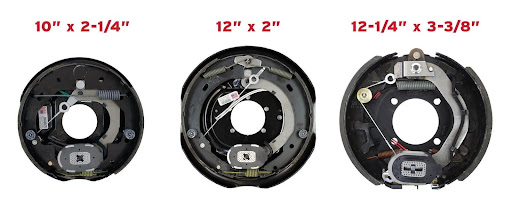
Factory installed trailer drum brakes need to be adjusted every 3,000 miles. If this seems like a hassle to you, it could be worth replacing your old drum brakes with self-adjusting brakes. Dexter Nev-R-Adjust drum brakes offer shorter stopping distances without doing any repetitive, time consuming manual adjustments.
Features and Benefits
- Never have to be adjusted
- Easy installation without any specialized tools
- Maintains optimum brake adjustment to reduce stopping distances by up to 50 percent
- Staying on the road longer with less downtime for maintenance
- Brakes retrofit onto existing axles
- Manufactured in the USA
Specs
- Brake sizes: 7 inches to 12 ¼ inches x 5 inches
- Trailer weight capacity: 2,200 pounds – 8,000 pounds
- Available with parking brake option
- Price on DexterAxle.com: $164.56 (7-inch) – $631.68 (12-inch)
2. Kodiak Disc Brake Kit
Going All-In on a Disc Brake Conversion

If you want the best brake performance without all the hassles involved in drum brake maintenance, you’ll want to consider changing out your drum brakes for disc brakes. Because of their design, disc brakes aren’t as prone to overheating as drum brakes are under challenging conditions like high speeds or steep grades. Not only do they offer better performance under all conditions, but disc brakes also have very low maintenance needs. (That means you never have to clean debris out of them, and you don’t need to adjust them every 3,000 miles.)
Upgrading Your RV to Disc Brakes
Upgrading your RV to disc brakes is definitely not plug-and-play. This RV braking system upgrade includes running brake lines and adding a hydraulic brake actuator as well as installing the disc brakes themselves. That said, it’s a job that anyone with intermediate to advanced mechanical skills can do. The Kodiak disc brake kit offers a way to get Kodiak disc brake’s legendary braking performance in a DIY format.
Features and Benefits
- Slip-over rotor design
- Vented design to disperse heat
- Designed to greatly increase disc brake rotor life
- Shorter stopping distances
- No downtime for brake adjustments
- No overheating
- Made with rust-resistant stainless steel
Specs
- 5-lug kit for trailers up to 3,500 pounds
- 6-lug kit for trailers up to 6,000 pounds
- 8-lug kit for trailers up to 7,000 pounds
- Material: Stainless steel
- For wheels that are 14 inchesor greater
- Each kit includes:
- Kodiak stainless steel calipers with preinstalled stainless steel backed brake pads
- Stainless steel Kodiak slide pin caliper bolts
- Stainless steel coated slip on caliper mounting brackets
- Stainless steel slip over kodiak rotors
- Instruction manual with instructions
- Price range for kits from KodiakTrailerBrakes.com: $517.32 – $2,380.61 depending on weight capacity
3. Hydrastar Electric Over Hydraulic Trailer-Mounted Brake Actuator
Enhancing Stopping Power and Handling
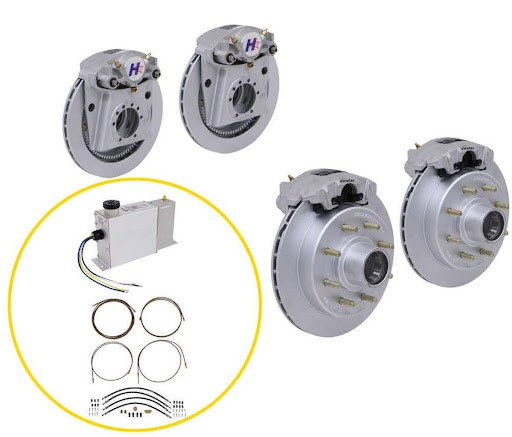
Navigating hilly terrain or having to do an emergency stop can be nerve-wracking when you’re towing a heavy RV. The Hydrastar disc brake kit with electric over hydraulic trailer-mounted brake actuator is designed to allow you to stop confidently, whether you’re making your way down the side of a steep canyon or stopping at an impromptu moose crosswalk. Hydrastar disc brakes work quickly to give you the stopping power and control you need in any braking situation that comes up. The hydraulic actuator provides immediate response time and works seamlessly with most in-cab brake controllers. This upgrade offers a hub/rotor assembly that ensures reliable performance.\
Features and Benefits
- Greatly improved stopping power
- Rust-resistant and highly durable
- Better heat dissipation means less overheating
- Suitable for tandem setup on 7,000-pound axles
- Lower maintenance than traditional drum brakes
- Easier to work on than traditional drum brakes
- Work seamlessly with in cab brake controller
- 2-year limited warranty
- Color-coded, heavy duty 12-gauge wire for easy and quick install
- Complies with CFR-393 Federal Braking Requirements and meets all department of transportation regulations
- Durable, sealed, fully enclosed housing case to easily withstand the environmental and road demands
- No plastic components
- Made in USA
Specs
- 5-lug kit for 3,000 pound axles
- 6-lug kit for 6,000+ pound tandem axles
- 8-lug kit for 7,000+ pound tandem axles
- Case materials: Anodized extruded aluminum
- Kit includes: Brake lines, fittings, all required hardware, installation manual with instructions
- Price at HydrastarUSA.com: Prices vary based on lug kit and weight
Investing in Your RV Brake System Is an Investment in Your Safety
RV brakes are one of those things you shouldn’t have to think about when you’re out on the road. That said, servicing your RV brakes regularly is one of the best ways to ensure that they work whenever you need them. For that reason, it’s a good idea to check the operating manual that came with your RV for your RV manufacturer’s recommended brake service schedule.
However, even if you’ve been on top of your RV’s brake maintenance, upgrading your RV braking system can make the difference between stressful braking and handling and being able to stop confidently when you need to. While these upgrades aren’t always inexpensive, they can be a bargain when it comes to the peace of mind that comes with safe travels — especially knowing that you’re protecting what matters.
Leave a Reply