Maxing out multiuse spaces is an essential part of the RV game. RVs have limited space, but in small RVs in particular, making the most of it is paramount. All of which is why RV models of all sizes frequently come equipped with Lagun tables. (Last year I saw several nicely placed in the Grech RV models I reviewed.) These tables can be mounted on any solid, vertical surface, instantly creating a dining or work area in the RV. But when you need the space for something else, a Lagun table quickly disassembles for storage. Quick and easy. Well, that is unless you have never installed, assembled, or dissembled a Lagun table before. In that case, it may be a riddle wrapped in a mystery inside an enigma. So, if you’re new to this multiuse solution, you may find yourself wondering how to install a Lagun table.
If that’s you, don’t worry. Those of use who have mastered how to install a Lagun table remember being in your shoes. (Only too well.) So, let’s dive in and get you spun up with everything you need to know about this great — if initially mercurial — product.
The Lagun Table: A Short Introduction
As mentioned, one of the virtues of a Lagun tabletop is that it can seamlessly swivel and adjust to meet whatever need you happen to have. This lets you easily move it out of the way when you need space, but you’re not ready to disassemble it yet. However, when you want a stable work surface or you’re ready to travel, the tabletop can be easily locked in place with a handle.
Lagun tables afford you the ability to create a dining area or an adjustable work surface that can be raised or lowered as needed. Upgrading your RV with a Lagun table to your RV (if it doesn’t come with one) lets you have a space that normally serves as a sleeping or lounge area become a comfortable dining table or functional work surface.
Another big advantage of this style of table is that with no pedestal, there’s more leg room under the table. In addition, when it’s time to hit the road, you have the options of locking it in place, or quickly dismantling and storing it for travel.
Versatility of Function, Improvement of Ergonomics
While this table could easily be considered a must-have for van conversions or small trailers, its versatile design allows it to be used with the existing tabletop in any RV. This makes it easier to get into or out of the dinette seating area. If you’re one of the many campers who use your RV dinette as a work surface, you’ll know that working at a computer on a RV dining table can cause neck and/or shoulder pain. That’s because most RV dinettes are designed low. One of the best features of a Lagun table is that it’s so versatile. Its vertical height is adjustable to whatever height feels best for you. This in itself can help reduce ergonomics related pain.
Lagun table installation requires minimal skills, a measuring tape, a carpenter’s level and a cordless drill. The mounting bracket can be installed on any solid vertical surface that’s five/eighths of an inch or thicker to support the weight of the leg assembly, table, plus anything you put on the table. The Lagun leg assembly comes in several lengths. It’s important to decide which leg length will work best for your intended use before you order your Lagun kit. The mounting bracket is 7 inches high. You must have at least one inch of the leg tightened onto the bracket to ensure stability.
Lagun doesn’t include a table top with the table leg kit. However, you can use any lightweight but sturdy table top up to 30 inches by 40inches on the standard table leg kit — or up to 24 inches by 36 inches if you choose the folding leg kit. This leaves a lot of options. If you have woodworking tools, skills, and patience, it’s easy to make your own custom tabletop. That being said, a cutting board or prefabricated table top offers a simple solution for anyone who doesn’t want to make their own table top. Many RVers have found that a large wood cutting board work.
While the kit comes with detailed instructions, these are the steps for wall-mounted bracket installation.
Step-by-Step Installation
Choose a solid vertical surface to install the bracket. Be sure there is enough clearance to allow for vertical adjustment of the leg. You may need to use a spacer to allow for clearance of dinette cushions, et cetera. (Note: The bracket is seven inches high. You must have at least one inch of the slotted leg groove tightened onto the bracket for a stable system.)
Hold the mounting bracket in place on the vertical mounting surface, using a level to ensure it’s perfectly vertical (90 degrees) to the floor. Mark your drilling points.
Drill four holes for included 5/16-inch bolts into surface
Holding the mounting bracket securely in place, install the bolts.
Install the table top on the table mounting plate.
How to Set Up the Lagun Table
Setting up a Lagun table for the first time ever can be tricky. Always loosen the handles before connecting, disassembling, swiveling or adjusting the table.
Step-by-Step Setup
Install the table top on the horizontal arm and tighten the handle clockwise.
Now slide the table leg into the mounting bracket and adjust the height to where you want it.
Place the horizontal arm with the table top on it onto the pivot on top of the leg and adjust it to where it will work for you. If you’re not traveling anywhere, you might want to leave the handle in the loosened position to allow the table to swivel. The handle that allows the table to swivel should always be tightened for travel to avoid damage.
It’s important not to over-tighten the plastic handles or they can break or seize. You want the handles to be snug, but not tight.
How to Disassemble a Lagun Table
All handles on the Lagun table turn counter-clockwise to loosen. Disassembly is a simple matter of reversing the steps above.
Step-by-Step Disassembly
Loosen the table top handle by turning it counterclockwise to release it from the horizontal arm. Remove the table top and place it in a safe place.
Loosen the handle that connects the horizontal arm to its pivot point at the top of the leg assembly.
Turn the handle at the bottom of table leg counter-clockwise to remove the leg assembly from the mounting bracket.
The Lagun table is now ready to be stored in a cabinet, on a bed, or wherever works best for your space.
Conclusion
Adding a Lagun table is an easy way to create a multifunctional living space in your RV. It’s also easy to use the table in different areas of the RV, by installing a mounting bracket wherever you want to use it. This is a practical upgrade you’ll be glad you added.
Winter RV camping offers a ton of benefits for both winter sports enthusiasts and those who just want to get away and enjoy serenity amidst epically beautiful landscapes. However, the importance of being well-prepared can’t be overstated when it comes to camping in frigid temperatures. That’s because if you aren’t prepared, cold weather can bring very serious health risks. One of these is frostbite. This critical condition happens when your skin freezes in sub-freezing temperatures. So, having a handle on frostbite 101 is a big deal for four-season RVers.
In this guide, we’ll get you spun up on what frostbite is, how to treat it, and — most wisely —how to prevent it. Because, let’s face it, you’re not braving the winter’s brutal nature to simply sit inside your RV. Because you’re “up there,” you’re also likely going to be “out there” — seeing things other campers are missing.
What Is Frostbite?
The term “frostbite” describes an injury that happens when exposed or unprotected skin is frozen by sub-zero temperatures. As injuries go, it’s a serious one. And that’s not only because it’s extremely painful. As a matter of fact, in the worst cases of frostbite can result in a loss of tissue and the amputation of affected body parts. Frostbite affects insufficiently unprotected skin including:
Ears
Nose
Lips
Cheeks
Fingers
Toes
And it’s not just exposed extremities that can be affected. If temperatures dip below freezing, frostbite can occur on covered, exposed, or wet skin. So, a big part of frostbite 101 is keeping an eye on those danger areas. Let’s talk more about that.
Recognizing Frostbite Symptoms
Frostbite most frequently affects toes, fingertips, and the outer edges of ears. The first signs of frostbite are color changes to affected areas. It’s important to know the visual signs so you can let your fellow campers know they have it. Affected patients don’t feel it at first because the condition numbs the affected skin until they’re in a warmer environment. That’s when they start to feel pins and needles, itching, pain, and/or the weird “waxy” sensation that’s unique to frostbite.
Here’s the complete list of frostbite symptoms to watch for:
Patches of skin in shades of red, white, blue, gray, purple or yellow, depending on how severe the frostbite is (It should be noted that color changes can be difficult to see on people with darker skin.)
Numbness
Cold, hard, waxy-looking skin
Clumsiness due to numbness or joint stiffness
Pain
Blistering after rewarming
Identifying the 3 Stages of Frostbite
Frostbite doesn’t just suddenly freeze your skin solid. Instead, it affects exposed skin and underprotected extremities in stages.
1. Frostnip
At this stage, affected skin will be reddish and will start to feel numb or tingly.
2. Mild to Moderate Frostbite
Also called superficial frostbite, this is when skin color changes slightly and can start to feel warmish, even though it’s well on the way to freezing. The affected area will sting, burn and swell as it’s rewarmed. In addition, there might be blistering as skin rewarms.
3. Deep Frostbite
As more layers of skin freeze, frostbite symptoms become more severe. Frozen areas lose color, turning white or blue-gray. Rewarming may produce large blood blisters. At this stage, skin cells die off, causing skin to turn black and hard as they do so.
Administering First Aid for Frostbite
It’s crucial to treat frostbite in its earliest stages to help prevent tissue death and loss. That means if you or someone else is experiencing numbness, tingling, skin color changes, or any other signs of frostbite, you need to start treatment immediately.
Here’s what you should do:
Get into a warm place.
Remove any wet clothing or footwear.
Remove jewelry from affected areas.
Warm the affected area by soaking in warm water (100- to 105-degrees) until it starts to feel warm. It’s important not to apply heat at this stage. Applying heat from a hairdryer, heating pad, or other appliance (even at the frostnip stage) can cause intense pain and may lead to further tissue damage in frostbitten skin. Warming areas affected by frostbite should always be slow and progressive.
Never rub affected areas.
Loosely bandage affected areas with sterile dressings.
Separate affected fingers and toes by placing sterile gauze pads between them.
Offer non-prescription pain relievers.
Seek professional medical care as soon as possible.
Smoking and drinking alcohol can cause changes to blood circulation. Therefore, both should always be avoided when recovering from frostbite.
The Best Course of All: Preventing Frostbite
Fortunately, it’s easy to prevent frostbite — especially if you have an RV. Frostbite 101 all starts with some basic, common-sense fundamentals what to do.
1. Dress for the weather.
Avoid tight clothing
Dress in layers of moisture wicking materials topped with a waterproof hooded jacket to stay dry and conserve body heat.
Waterproof mittens can keep hands warmer than gloves, especially if you layer gloves underneath them.
Use pocket hand warmers in gloves and (where possible) inside boots.
Wear a knit hat that can be pulled over your ears.If it’s really cold out, use the hood of your jacket to protect your head and neck.
Keep track of how long you’re outdoors using a timer if necessary.
Stay indoors (with that furnace cranked up!) or by the campfire for up to 30 minutes.
3. Avoid alcohol if you plan on venturing into the cold.
Drinking alcohol or smoking should be avoided if you plan to be outside in cold weather.
As mentioned earlier, drinking can cause changes in your blood circulation, which is important to stay warm.
The Importance of Frostbite 101
Frostbite is a serious condition — one that’s well worth avoiding. That being said, each year, hundreds of outdoor enthusiasts have parts of their ears, fingers and toes amputated because they didn’t properly prepare for frigid temperatures. It’s also worth knowing that the risk of frostbite increases when the wind chill falls below negative 27 degrees Celsius. (That’s negative 17 degrees Fahrenheit for my American friends.) Taking the precautions against frostbite mentioned in this article will help you reduce the risk while you enjoy all the wonders of a winter getaway.
Canada is known as “the Great White North” for a good reason. Much of this beautiful country is covered under a blanket of snow from November to May. Winter camping in Canada demands a level of preparedness and sense of adventure that RVers won’t need any other time of year. That’s because although preparation makes RV living better any time of year, a Canadian winter can kill you if you aren’t properly prepared.
The Two Big Mistakes People Make
Mistake No. 1 – Not Driving Away from Bad Conditions
The first mistake people make is staying in Canada where winter weather often features blizzards and temperatures get as cold as 40 degrees below zero. (Especially when there are warmer destinations in the south.) When you think about it, one of the best things about an RV is that it has wheels. That means you can drive it or tow it to warm places like Florida, Texas, California or Arizona, where you can avoid winter altogether. This, of course, is know as snowbirding.
Mistake No. 2 – Assuming It’s Just Too Cold to RV
Alternatively, the second mistake when RVing in Canada is thinking that you can’t RV in Canada in winter because it’s too cold. The truth is frigid winter temperatures aren’t the norm on Canada’s southwest coast. This area is renowned for its mild, rainy winter climate. Not only that, but the further west you go, the milder the climate is. For example, in Victoria, British Columbia, the average winter temperature hovers around 9 degrees Celsius in the winter months. (That’s 48 degrees Fahrenheit my American friends.) That’s as warm as Canada get in winter.
As a matter of fact, Vancouver Island (as far west as you can go in Canada) offers a mild climate that has made it a popular destination for Canadian snowbirds. But warmer winter temperatures aren’t all that Vancouver Island offers. Snowbirds love this 285 mile long island for its lush rainforests, incredible wildlife viewing, and pristine sandy beaches.
However, there are still lots of reasons why people choose to RV in the Great White North in winter. Many Canadian snowbirds, who normally head south for winter, may delay their annual migration south until the Canadian dollar increases in value. But with that being said, many skiers, snowboarders, and other winter sport enthusiasts, find having a cozy “chalet on wheels” very practical. And then there’s the diehard camping fanatics, who enthusiastically brave the elements, to enjoy the peaceful and bug-free atmosphere of winter camping in Canada. Other RVers use their RVs as affordable accommodation at remote job sites. Or as a portable guest cottage. Or as a full-time home on wheels.
With the right RV, the right equipment,and a lot of preparation, RV camping can be an easy, affordable and fun winter activity, wherever you happen to be in Canada.
So, are you ready to discover everything you need to know about winter camping in Canada? Let’s dig in!
What to Pack for RV Camping in Winter
If you’re going winter camping in Canada, there are some items that are essential to have for both comfort and survival. This list includes basic items you need to have, but you’ll want to add to it according to your own specific needs.
Cold-Weather Clothing
Dressing in layers is the most important part of staying warm when it’s cold out. You’ll need a base layer, a mid layer, and an outer layer. Each clothing layer will help trap and retain body heat to keep you warm and toasty. Merino wool is the best choice for your base layer, and every layer on top of that should be wool or synthetic. Your outer layer can be a puffy down or synthetic jacket.
For most of Canada, you’ll need to have a hood that has adjustable cords. Moisture absorbing materials should always be avoided since moisture keeps you cool. That means don’t pack cotton clothing (like T-Shirts and jeans) because cotton absorbs moisture instead of wicking it away. Here’s what each camper in your party will need.
Here are our recommendations for essential gear you’ll want to have with you when you camp in winter. This is by no means an exhaustive list, but it has all the essentials specifically geared for winter camping.
A hand held hair dryer or heat gun to thaw frozen pipes.
Portable fire pit
Fuel for portable fire pit
Tire chains for RV or tow vehicle drive axle wheels and trailer
Choose the Right RV for Winter Camping
Winter camping in Canada’s winter temperatures is demanding. Unless you’re camping around Victoria, you’ll want to have a four-season RV. Four-season RVs have specific features which help to ensure you stay cozy while enjoying amenities that include running water in the bathroom and kitchen. Many features of an all-weather camper typically include:
Snow tires or tire chains help provide traction on roads made slippery by snow and ice. If you plan to drive your rig anywhere in Canada in winter, you should have them. The mountainous province of British Columbia requires all vehicles to have snow tires between October 1 and April 30. Also, tire chains are a legal requirement in the province of British Columbia for vehicles over 16,000 pounds during those same months.
Prevent Water from Freezing in Your RV
Some RVers who camp in colder temperatures winterize their water system and carry bottled water onboard. The question that begs to be asked is: “Where’s the fun in that?” After all, the reason most of us have an RV is to have all the comforts of home with us. The truth is, there are things you can do to keep water flowing in your RV, even when it’s cold outside.
Wrap city water connection with heated pipe insulation.
Connect to city water using a heated water hose.
Use RV skirting to keep the temperature under the RV above freezing .
Add tank heating pads to exposed holding tanks.
Use an RV sewage hose heater to prevent sewage from freezing and forming the dreaded poopsicle.
If you’re camping where there’s no city water connection, keep your freshwater tank full so that it’s less likely to freeze.
Employ RV Skirting
Your RV will stay a lot warmer in winter if you use some form of RV skirting to block cold air and wind from getting underneath your RV. There are different ways to do this and it doesn’t have to cost a lot. RV skirting can be custom made or constructed of insulating boards. Here are the top ways to skirt an RV.
Insulated vinyl RV skirting is a fantastic option for RVers who park in one spot for several months over winter and then travel in the RV when it’s warm out. That’s because it can be rolled up and stored in basement cabinets when you travel. However, vinyl RV skirting is usually installed using snaps or twist locks that require drilling into the exterior cladding of your RV.
The best skirting is custom fitted to your specific RV make, model, and year, but you can also buy a custom made DIY RV skirting kit online to do the installation yourself. Here are three companies that custom make RV skirting.
EZ Snap Direct. Custom, no-drill DIY RV skirting that installs using no-drill snaps.
RV Skirting.com.Custom RV skirting with a patented nail-down strap system.
Air Skirts are insulating air bags that resemble giant cigar tubes. They are made to fit snugly underneath RVs of varying dimensions. They’re an easy DIY because you simply put them in place and inflate them using an air compressor. Like custom vinyl skirting, Air Skirts can be a fantastic, portable option for those who spend winter in one place and travel in the warmer months.
DIY RV Skirting (~ $100-$500)
It’s easy to make your own RV skirting from insulating foam board, plywood, Reflectix bubble insulation, or any combination of these. This DIY upgrade requires little skill, other than measuring and cutting. Some building supply retailers even offer onsite material cutting services, so you don’t need your own saw or blade.
Prioritize a Great RV Heating System
No matter where you RV in the Great White North, you’ll want to have an operational RV heating system. It’s a good idea to service your RV furnace and propane system before winter hits. This means cleaning the furnace itself as well as air ducts and using a manometer to ensure there are no propane leaks.
You’ll also want to have lots of propane on hand and a means to keep propane bottles warm enough to keep the propane from freezing. If you RV in Canada, you owe it to yourself to invest in an RV propane bottle blanket that will keep your propane evaporating (and flowing) even in the coldest weather.
Why Consider Winter Camping in Canada
Winter RVing in Canada can be a lot of fun and very rewarding. However, like everything else in life, preparation is key here. When it comes to RVing in cold temperatures, this includes having a four-season RV equipped with snow tires. It’s also important to have the right gear with you, so you can stay comfy and cozy.
If you’ve been on the lookout for an RV, you’ve probably noticed that each model is rated for three or four seasons. A three-season camper is meant to be used in the relatively mild temperatures spring, summer, and fall. These RVs are built to be winterized and stored for the coldest part of the year. But a four-season RV is a different animal.
If a camper is rated as a four-season RV, it means that it is meant to be used all year long, anytime you want to go camping. These all-weather campers give you the freedom to take off and embrace the RV lifestyle whenever you want. (And, in embracing winter camping, you’ll discover things other campers will never experience.)
So, let’s take a look at the elements you need to examine if you’re looking to purchase a four-season RV that you can rely on year-round.
Key Features to Pay Attention to in a Four-Season RV
The point of having an RV is to have access to the amenities and comforts of home, wherever you go. A four-season RV provides a cozy retreat when it’s cold out. (And, let us not forget, a cool oasis when it’s scorching outside.) In addition, all-weather campers offer running water for washing dishes, showers, and flushing the toilet.
Plumbing and holding tanks on four-season RVs are usually protected by an enclosed underbelly that also houses furnace ducting. When this isn’t possible (due to the design of the RV), plumbing is protected with heat tape and insulation and holding tanks that have heating pads. It’s all about keeping the water flowing even in sub-zero temperatures. Let’s take a deeper dive into all the ways an all-weather camper lets you enjoy all the comforts and conveniences of RV living, no matter what season it is. Ultimately, these are the things you need to ask about, research, and compare when buying a four-season RV.
Ask About the Insulation’s R-Rating and Layers
Four-season RVs have heavier duty insulation to retain heat inside the RV and keep exterior temperatures outside the RV. An R-value lets you know how well insulation performs. Logically, the higher the R-value,the better the insulation resists heat transfer. Most four-season RVs have insulation that’s rated R6 or more in the walls. However, the highest R-value insulation is found in the roof and beneath floors. Insulation values in the roof of the RV can be anywhere between R-10 and R-20. Floors in an all-weather camper are often insulated with layers of different insulation materials that add up to an R-value of 10 or more.
There are a lot of variables between makes and models RVs when it comes to insulation materials. For example, four-season campers usually use expanded polystyrene in their sidewalls because it has an R-value of 6-7. For comparison, with few exceptions, the sidewalls of three-season RVs are insulated with extruded polystyrene foam block insulation. This type of insulation has an R-value of R-4 to R-5. However, some RV manufacturers combine two or three layers of insulation in the ceiling, sidewalls and floor of their four-season RVs to provide even better insulation. (Hint, hint! So, R-level and layers of insulation are something to ask about.)
Check the Type of Double-Pane or Thermal Window
Four-season campers designed for all weather use always have double-pane/thermal-pane/thermo-pane windows installed. However, while dual-pane windows in residential homes can make a big difference in temperature transfer, this isn’t necessarily the case in RVs. That’s because double pane windows for RVs are constructed differently than the ones made for residential homes.
You’re probably aware that the thermal pane windows used in your home are made with two glass panes that have a layer of argon or other gas sandwiched between them. The layer of gas is what helps to reduce heat transfer and helps give the window an R-value of around 2. By comparison, a single pane window has an R-value of about 0.9.
In most RVs, thermal-pane windows have two panes of glass, but don’t have the insulating layer of gas between them. Instead, the two panes may be bonded directly to one another, or may have a layer of ordinary air separating them. In most cases, these windows offer an R-value of between 1.6 and 2, making them marginally better at reducing heat transfer than single pane RV windows.
With that being said, thermal windows made for high-end diesel pushers and all-season fifth wheels often come with residential style thermal pane windows. Therefore, it’s a good idea to ask about dual-pane window construction methods when you’re shopping for an all season camper (and their R-ratings). Whatever the case, you’ll be able to greatly reduce heat transfer from windows with the use of Reflectix or bubble wrap on windows to create an insulating layer of air between the interior and exterior of the RV. Additionally, you can add even more R-value to your RV windows by keeping window treatments drawn when it’s hot or cold outside.
Find Out If the Underbelly in Enclosed — and What Heats the Heaters
A true four-season RV offers insulated hatches on its basement doors and and enclosed underbelly. In addition, a true four-season camper will have furnace ducting that runs through its enclosed underbelly to help protect holding tanks and prevent pipes from freezing. Nothing is exposed here. The water pump may be inside the RV or else in an insulated basement cabinet to keep it from freezing. In addition, waste tank valves are concealed in a basement cabinet because no one ever wants to deal with a frozen tank valve. (Trust me.)
There are a lot of campers marketed as four-season RVs that don’t have enclosed underbellies. Instead, they have heating pads on holding tanks. They may also offer heat tape and/or insulation around plumbing lines. The problem with this system is that it uses a lot of 120-volt electricity and requires you to be plugged into shore power. So, it’s not much use when you’re up on the ski hill or ice fishing on a quiet lake. Aside from that, heating pads may offer little protection for exposed tanks when temperatures drop below -10 degrees Fahrenheit and there’s an even colder wind chill factor.
Look at the Total Package — Both Heating and Cooling Systems
The best insulation package won’t help if you don’t have a furnace and air conditioner. If an RV doesn’t have a good heating and cooling system, the interior temperature will quickly resemble the outdoor temperature. The interior of a four-season RV stays comfortable no matter what the weather is like outside.
Almost all four-season RVs offer a propane or diesel furnace. In addition, some RVs also offer a cozy electric fireplace that can be used when the RV is plugged into shore power. Larger RVs may have a heat strip or heat pump as part of the air conditioner.
Heat pumps can warm up the interior temperature of the RV when you want to conserve propane. Because they’re powered by electricity, heat pumps give you a heating alternative. They can go to work even if you run out of propane. However, there are drawbacks to heat pumps.
The heat they create is usually pumped through ceiling ducts, cooling it as it travels.
RV heat pumps don’t work when the temperature is less than 45 degrees Fahrenheit.
The RV has to be plugged into 30-amp or 50-amp power.
Some high end motorhomes may offer hydronic heating systems, like AquaHot, that run tubing containing potable water into heat exchangers that disperse heated air. It’s not unlike the way a residential boiler system works. This system also runs water to faucets and appliances. So, it acts as a built-in on demand hot water heater too. Hydronic heating systems can use different combinations of the vehicle’s own surplus engine heat, on-board fuel, and/or AC shore power.
Don’t Neglect the A/C
Of course, all-weather camping doesn’t just refer to camping in cold temperatures. So, four-season campers also have between one and three air conditioning units installed to keep the interior of the RV at a comfortable temperature on scorching summer days. Air conditioners are rated as 13,500 Btus or 15,000 Btus. Either way, they’re power intensive. Most require either hooking up to shore power or a generator to meet their power needs. However, Class B RVs have a less power intensive option when it comes to air conditioning.
Class B RVs are sometimes equipped with 12-volt air conditioners. These run off any decent sized lithium-ion battery pack. Dometic’s offerings include the RTX2000, which they say can provide up to 6,383 Btus of cooling energy. That’s enough to let most van lifers sleep comfortably through the night, even whenever and wherever temperatures soar.
Final Thoughts on Four-Season RVs
Four-season RVs are perfect for anyone who wants to enjoy all the comforts and conveniences of RV camping all year round. A true four-season RV offers great insulation to help maintain comfortable interior temperatures. If you’re shopping for an RV, consider how you plan to use it. A fireplace will be a waste of space if you plan to be off-grid most of the time. An enclosed underbelly and insulated storage bays are a must for keeping tanks and plumbing from freezing in cold temperatures.
For most RVers, instinct would tell us that furry family members are almost a mandatory part of RVing. And, unsurprisingly, the numbers back that up. A recent Go RVing survey found that 68 percent of RVers bring one or more pets on their RV adventures. (Also, not surprising: 92 percent of pet loving RVers share their RV with at least one dog.) As it turns out, RV life just wouldn’t have the same appeal if we had to leave our four-legged friends at home, no matter what time of year it is. After all, our dogs love to be part of whatever we do. (That is, as long as it doesn’t involve a bath.) And all that is great when the weather is nice. But what about when it get’s cold? Winter RVing with pets presents some notable challenges, so we wanted to share a wintery safety guide for RV pets — to keep everyone warm and cozy.
Winter Factors to Consider for Furry Friends
In the RV life, there will come a time when we have to leave our pets in the RV for an extended period. You know, because we need to go out and do “people things.” For example, we might want to take part in winter activities like skiing. Or it might be time to restock the groceries. Whatever we’re doing, it’s important to know that RVs rapidly revert to whatever the outside temperature when the furnace is off.
Depending on the outside temperature, it can get too cold for some pets really fast. Small dogs and short haired dogs are especially susceptible to hypothermia, a potentially deadly condition that results from the core temperature dropping just a few degrees. Regulating RV temperatures when you aren’t home is a must to keep pets comfortable and safe.
So, how can you best do that? Let’s walk through this winter guide for RV pets. It’s intended to give you everything you need to know to keep your pet warm and cozy — even when you’re not there.
First, a Few Rules for Leaving Your Pet Alone in an RV
There are some basics about leaving you pet in an RV. (Forgive me if you already know these, but I have to make sure.) These rules apply whether it is cold or not, and they’re foundational for everything else we’ll discuss.
Avoid leaving your pet in the RV for extended periods.
Tire your pet out with a walk aor play session before you leave the RV.
Never use a space heater in the RV when you aren’t there.
Use a Wi-Fi or Bluetooth-capable temperature monitor to keep an eye on the temperature in the RV.
If you have to be away for more than a few hours, have someone check on your pet every two to three hours and offer them a potty break.
Follow This Winter Safety Guide for RV Pets
Bundle Those Pups Up
Dog sweaters and jackets aren’t just a fashion statement. Some dogs need the extra layer of warmth to be comfortable and safe when temperatures drop. Puppies are also especially susceptible to hypothermia. However, if your four-legged furbuddy is less than 30 pounds (or has a short coat), he or she’ll probably appreciate some extra help staying warm. This is especially true for dogs with short legs such as dachshunds, basset hounds, and corgis because their low slung bodies are close to the cold ground. Here are some examples of dog breeds that need a little extra help staying warm. (But this list could be longer.)
Breeds Especially Susceptible to the Cold
All toy dog breeds
Poodle (all sizes)
Shih Tzu
Doodle
German shorthaired pointer
Pointer
Boxer
English bulldog
American Staffordshire terrier
American bullies
Greyhound
Whippet
Lurcher
Basset hound
Daschund
Jack Russell terrier
West Highland white terrier
Dobermann pinscher
Raise Pet Beds Up Off the Floor
Unless they’re heated, RV floors can get really cold. This is true even if you use RV skirting and insulation. Cold air can find its way into pet beds that are directly on the floor. To help ensure your pet stays comfy and cozy, raise his bed up onto a couch or chair. He’ll love you for this. If you’re completely against allowing your pet onto RV furniture, a portable raised dog bed could be a perfect alternative.
Watch for Signs Of Hypothermia
Hypothermia occurs when the body’s temperature goes below 98 degrees Fahrenheit. When the body gets this cold, internal organs begin to shut down, with the likely result of death. Since organ shut-down and death can happen very fast in dogs and cats. It’s vital to begin treatment of hypothermia ASAP.
Normal body temperature for dogs and cats ranges from 98 degrees and 102 degrees Fahrenheit. However, If your pet is lethargic, shivering, doesn’t have much of an appetite, and has been exposed to cold temperatures, you should suspect hypothermia. Focus on life-saving first treatment immediately. If you happen to have a rectal thermometer in your pet first aid kit, you can take your pet’s temperature after treatment is initiated.
Perform Hypothermia First Aid
No matter what the species, hypothermia treatment is all about warming up the core body temperature. However, this needs to be done gradually. Too much heat can cause superficial blood vessels to dilate, resulting in shock. Therefore, avoid the use of excessive heat from heating pads or other appliances when you’re warming up your pet.
Move your pet to a warm environment.
Bundle your pet in warm blankets You can use an electric blanket set on the lowest setting if you have one. If you have a hot water bottle, wrap it in a towel and bundle it in the blankets (not in contact with your pet) as well.
Seek veterinary attention as soon as possible.
Final Tips for Safe Winter RVing with Pets
It’s probably worth saying that if you’re pet is going to stay warm in your RV then … you need to prepare your RV for winter and avoid common winter RVing blunders. But here’s an additional checklist to walk through.
Use a Reflectix or bubble wrap and draw window coverings to help insulate windows.
Install RV skirting to conserve warm air under the RV while keeping cold air out.
Ensure you have an adequate propane supply to keep your RV furnace running.
Leave the propane furnace on when you leave the RV.
Space heaters present a real fire hazard in RVs. Never leave an electric space heater on when you aren’t there to supervise it.
Include your pet in your plans wherever possible.
Boarding your pet at a kennel or enroll him in doggy daycare if you must be away for an extended period.
Where do you want to go? That’s the only issue Jayco wants you to have with the luxurious Precept 31UL. This road-trip-ready RV was built in response to extensive customer feedback. The 2025 Jayco Precept 31 UL starts with a bold floorplan and adds everything you need for safe, comfortable road trips — with family or without.
This smaller Class A is designed to give you a premium driving and handling experience, one that even those who are new to driving a larger vehicle will enjoy. Navigating most state parks or grocery store parking lots won’t be a problem in the Precept 31UL due to its nimble size and its JRide Plus handling system.
So, let’s get this review on the road and have a look at this brand-new offering from Jayco.
At a Glance: Precept 31UL
If you’re looking for a great Class A motorhome for under $225,000, the Jayco Precept 31UL is a great value at $219,265. The Precept 31UL has a lot going for it, which is why I have rated it at four and half out of five. To start with, it’s a nimble, powerful beast that would be genuinely fun to cruise down the highway in. It has a living area that features a TV on a televator that rises above the four-seat dinette. It’s just fun to press a button and have a TV that pops up, seemingly out of nowhere.
But that’s just the beginning of a spectacular amenities package here. We’ll get more into that later. Instead let’s talk about safety features. The Precept has a smoke detector, propane leak detector, and a carbon monoxide alarm.
However, one safety feature that it does lack is a second door for egress. I’ll give Jayco credit for an emergency egress window, but given that the majority of people buying Class As are over 50 years old (and probably not as mobile as they once were), climbing out a window in an emergency egress may be slow going at best. It would make better sense to add a second door somewhere on the RV. (Perhaps on the driver’s side.)
Check the Specs
Sleeping capacity: 6
GVWR: 22,000 pounds
GCWR: 24,000 pounds
Exterior length: 33 feet
Exterior height: 12 feet 10 inches
Exterior width: 8 feet 5 inches
Fresh/Gray/Black: 72/40/50 gallons
Fuel tank: 80 gallons
Propane (on board): 56 pounds
Awning: 16 feet
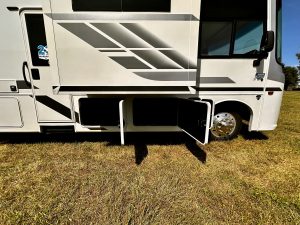
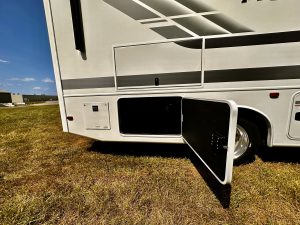
Exterior cargo capacity: 108 feet of storage
Features We Love
On the Exterior
2- to 3-year warranty on everything in the motorhome
New front cap with LED headlights lights and accent lights
Bilsteen steering stabilizer
JRide Plus handling
Quiet ride technology (in a smaller Class A — what?!)
Koni FSB shocks to improve ride and reduce body roll
22.5-inch tires
22,000-pound Ford F53 chassis 7.3 liter engine
120-inch windshield with 32-inch wipers for great visibility
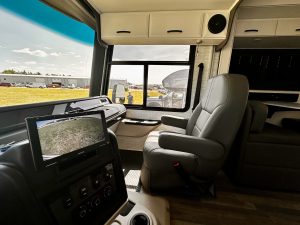
Backup camera and side cameras
108 feet of storage in exterior storage bays
Side-mounted, slam-latch doors on exterior storage bays
200-watt solar panel on roof
6000-watt Yamaha generator
Walkable fiberglass roof
Built-in ladder
Vacuum-bonded laminated materials used in exterior walls that have been vacuum pressed with 144 tons of pressure for 16 to 18 minutes (so that delamination becomes impossible)
Cage-around catalytic converter to deter theft
On the Interior
Big camera/navigation monitor screen
Plush, comfortable, and power-adjustable driver and passenger captain’s chairs
Pull-out passenger-side desk
Firefly total control system with app controls all functions remotely
Winegard Wi-Fo booster and 4G mobile hotspot on roof
15,000-Btu-ducted air conditioner with heat pump at front and 13,000-Btu AC with heat pump in bedroom area
50-amp power cord
Sirius-XM prepped
Windows have residential-style wood trim and day night shades
JBL sound bar
Big farmhouse-style sink with flexible rubber faucet
Three-burner gas stove
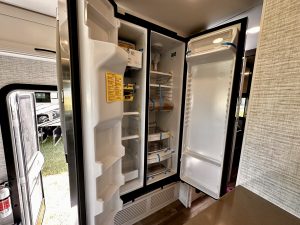
21-cubic-foot fridge/freezer with French doors and water dispenser
Solid-surface countertops
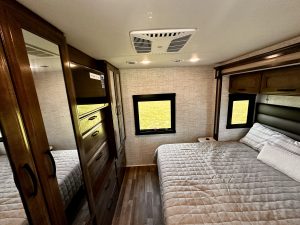
King bed with CPAP ready nightstand on each side
Roomy shower
Nightstands with wireless charging pads and USB ports
Cassette blinds that are super easy to deploy
Lippert 4000 series windows
Solid hardwood cabinets
Front seats swivel and have a shared cocktail table
Outside shower for rinsing dirty people and dogs
24-inch TV in master bedroom
Power theater seats with USB ports
40-inch TV on a lift system next to dinette
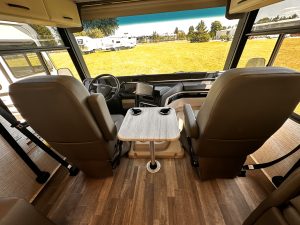
Got to love this cockpit! It’s extremely comfortable and is loaded with safety features that make driving a Class A easier.
Benefits
Luxurious Class A experience for under $225,000
Small enough to navigate campgrounds easily and get into most campsites
Gas chassis will be less expensive to maintain/repair than a diesel
No tag axle or air brakes
Mid-sized but well designed so it’s easy, fun, and intuitive to drive
Cockpit is well laid out with everything within easy reach
Backup camera makes backing into campsites a breeze
Insulated for a quiet drive
Front seats swivel to add extra seating
Boondocking ready with big storage tanks and a generator that’s plumbed to the gas tank.
Efficient 10-gallon water heater replaces up to 30 gallons of hot water per hour
Loads of exterior and interior cabinet storage space lets you have it all with you
Window seals are protected from sun damage
Residential feeling tinted windows offer privacy
Roll-down shades in cockpit area make it easy to block out the sun and enjoy privacy
Pull-out passenger side desk allows passenger to work from the road
Televator TV stores out of the way when not in use
Sink cover converts sink into counter space and/or hides dirty dishes
Power theater seats are perfectly positioned for watching 40-inch TV
Well insulated for winter camping
Comes with a winterization package
Powder room allows guests to use the toilet and sink without going into the main bedroom area
Challenges
TV in the living area will be difficult to watch from the dinette
So comfortable and easy to drive that it might be hard to stop traveling
Best For
Couples or families that want to take extended road trips/vacations in a luxurious Class A that doesn’t break the bank
Couples or families that want to use it for weekend trips
Key Areas That RV Trader Reviews
RV Trader asked RV shoppers what was most important to them in their RV buying process. Potential buyers — like you — helped us to identify a list of six key areas that camping and travel enthusiasts always look at when they’re searching for the perfect RV: sleeping space, bathroom, living area, four-season capabilities, and storage space.
The RV Trader team then got to work providing you with an honest and unbiased evaluations. And that’s where I come in. I’m Lynne Fedorick, RV expert and enthusiast. I provide an honest look at RVs from an RV industry insider perspective. That way, you can learn the good, the bad, and the intriguing about any RVs I review. I inspect each RV with the buyer’s perspective at the forefront. And I always evaluate those six key areas that buyers have told us that they have in mind.
So, that said, let’s take a closer look at the 2025 Jayco Precept 31UL.
Sleeping Space
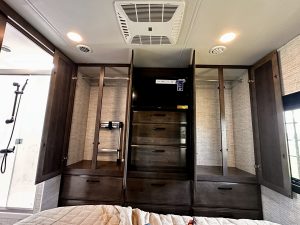
In the master bedroom, there’s a fantastic king bed with CPAP=ready night stands on either side. Wireless chargers and USB ports for electronic devices help keep you connected. Storage cabinets above the bed, storage underneath, and a massive wardrobe on the opposite wall help ensure that you can bring all your necessities with you wherever you decide to go.
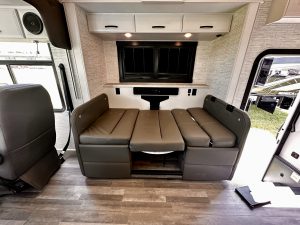
The Precept 31UL also has a power drop-down bunk in the living area, which gives overnight guests a comfortable queen size bed that is rated for 750 pounds. In addition, the legless dinette folds into a comfortable sleeping area for two. There are also storage benches underneath that could hold bedding or guest luggage.
Great look here at the master bedroom. Note too the cabinets and television opposite the king-size bed.
Note the CPAP-ready nightstands found on both sides of the bed. Above the bed, there is overhead storage.
The power drop-down bunk is a queen, and, as you can see here, descends over the cockpit.
The dinette converts to give you two additional sleeping spaces.
Bathroom
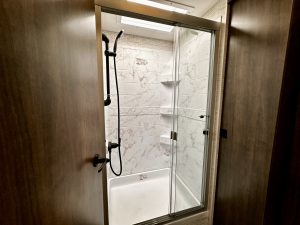
The bathroom in the Precept 31UL gives you either one or two comfortable spaces, depending on how you configure it. The bathroom has a powder room with a vanity sink and porcelain toilet behind a wide door located across from a spacious glass-enclosed shower. The door can be opened across the hallway to create one big open bathroom with a shower.
The shower is definitely roomy enough that anyone under 6 foot 4 inches will have plenty of headroom. Ample storage space for towels, toiletries, and toilet paper is available in hardwood vanity cabinets and drawers. There’s plenty of space for smaller items in the oversized medicine cabinet above the vanity.
Light from the bathroom window is reflected by the mirrors on the medicine cabinet, creating the illusion of a big space in what might otherwise seem like a very cozy little half bath. Privacy from the outside shouldn’t be a problem. Both privacy glass and a dark window shade work with the height of the RV to help maintain both modesty and privacy (and everyone’s composure).
The powder room is lovely and private. It also connects with the shower when the bathroom door is open.
The door, when open, creates a larger single space for the split bath by connecting the shower with the powder room.
Nice view of this tall and spacious shower.
I’m not real tall, but there is a lot of head space in the shower.
Living Area
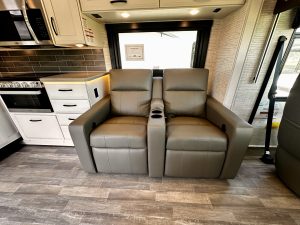
Jayco offers a choice of either a sofa bed or theater seats. The model I reviewed had power-adjustable, reclining twin theater seats with cup holders and USB ports for charging devices. The theater seats are right across from the TV. This works perfectly for cozy nights with a good movie and a big bowl of fresh popcorn.
The cushy driver and captains’ chairs spin to join the living area and have good vantage points for watching TV too. Both of these power adjustable chairs can share a snack table/work surface that can be set up to use when needed. Campers on the queen bunk also get a view of the TV.
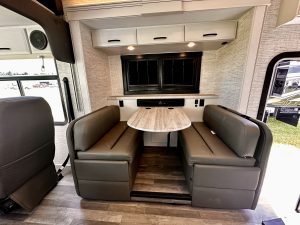
The legless dinette features a 38-inch-by-70-inch table and can seat up to four people comfortably. I love that the upholstery Jayco chose for the Precept 31UL living area is family- and dog-friendly. That’s because it’s both stain- and spill-tested. And it’s resistant to both.
A 16-foot awning provides a sheltered outdoor living area complete with an entertainment center that includes outside speakers and a 40-inch LED HD smart TV mounted on a swivel bracket for viewing from multiple angles. An outdoor LPG connection for an outdoor grill or fireplace eliminates the need to bring a portable tank along.
As you can see, the captains’ chairs in the cockpit blend in naturally with the living area. A table gives them some surface area, and they swivel toward the interior of the cabin.
These twin theater seats recline and have cup holders and USB ports. Jayco, however, also gives owners a sofa bed option.
This legless dinette can seat four comfortably. (And yes, there is storage under the bench.)
Nice view of the super-easy cassette blinds. The televator is also located here.
Kitchen
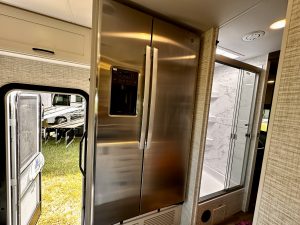
The L-shaped kitchen in the Precept 31UL has a surprising amount of both counter space and storage. It’s an impressively efficient little kitchen with a super-efficient work triangle. The 21-cubic-foot, 12-volt refrigerator/freezer is located on the wall opposite to the kitchen sink, so you can take produce from the refrigerator, take a step to wash it in the sink and then turn prepare it for cooking on the three-burner gas cooktop, in the microwave, or in the RV-size gas oven. I love the innovative long flexible rubber spout on the kitchen faucet as an alternative to the pull-down faucets used in most RVs.
Food, dishes, utensils, and cooking tools could all be stored within easy reach in plenty of solid hardwood cabinets and drawers.
A surprising amount of storage space, counter space, and cooking space in the Precept 31UL. WIth its L-shape, it also makes an effect work triangle with the fridge.
The farmhouse-style sink has a flexible rubber spout.
The 12-volt fridge/freezer is opposite to the kitchen, which makes it very efficient for access while cooking.
Here’s what 21 cubic feet of cold storage looks like.
Four-Season Capabilities
The Precept 31UL is definitely four-season capable. Having said that, a Class A would not be my first choice of RV for navigating challenging surfaces like snowy mountain roads. This RV has lots of all-weather amenities to get you through the heat of summer and chilly winter temperatures. Jayco responded to customer suggestions by adding extra insulation to keep both hot and cold weather out of the RV. Inside, two ducted air conditioners with heat strips move cool or warm air around inside. The heat strip is especially handy for quickly taking the chill off on fall or winter mornings. If it’s really chilly you can use the 30,000-Btu gas furnace to get the interior of the Precept 31UL nice and cozy.
Outside, tank valves are in an enclosed compartment and heating pads on holding tanks help to keep everything flowing when temperatures drop below 32 degrees.
Storage Space
This little Class A boasts an impressive amount of storage. Storage starts with lots of exterior passthrough storage. Outside, cabinet storage bays open with hassle-free, side-mounted doors with keyed alike locks. Side-mounted doors let you store and access everything in the cabinets easily.
Inside, the Precept 31UL has storage throughout. Both the living area and cockpit get overhead cabinets that could allow easy access to board games or road trip snacks. There’s also lots of cabinet and drawer space in the kitchen, bathroom, and bedroom. Lift up the king bed, and you’ll find a respectable amount of storage underneath. I was surprised that there aren’t any struts under the bed to keep it in place while items are stored or removed. Having to lift and hold a bed to access stored items can be pretty annoying.
The dinette bench seats also provide storage for bedding or other items underneath. Other than the lack of struts under the king bed, I was really impressed with how Jayco fit so much storage into this mid-size Class A.
The Precept 31UL has 108 feet of exterior cargo capacity.
Always happy to find passthrough storage.
A look at the storage under the dinette bench.
Lots of storage space in the master bedroom — both closet and drawer space.
Closing Notes on the Precept 31UL
The Jayco Precept 31UL is a fun RV that’s clearly designed for carefree road trips or extended camping vacations. Inside and outside, the aesthetic is fun, lighthearted, and ready for adventure. Jayco’s kept everything in the cockpit convenient and within easy reach and given this RV features like easy handling, sway control, and beefy 22-inch tires. All of this adds up to an RV that promises to be so intuitive and fun to drive that you just might have a hard time going back home.
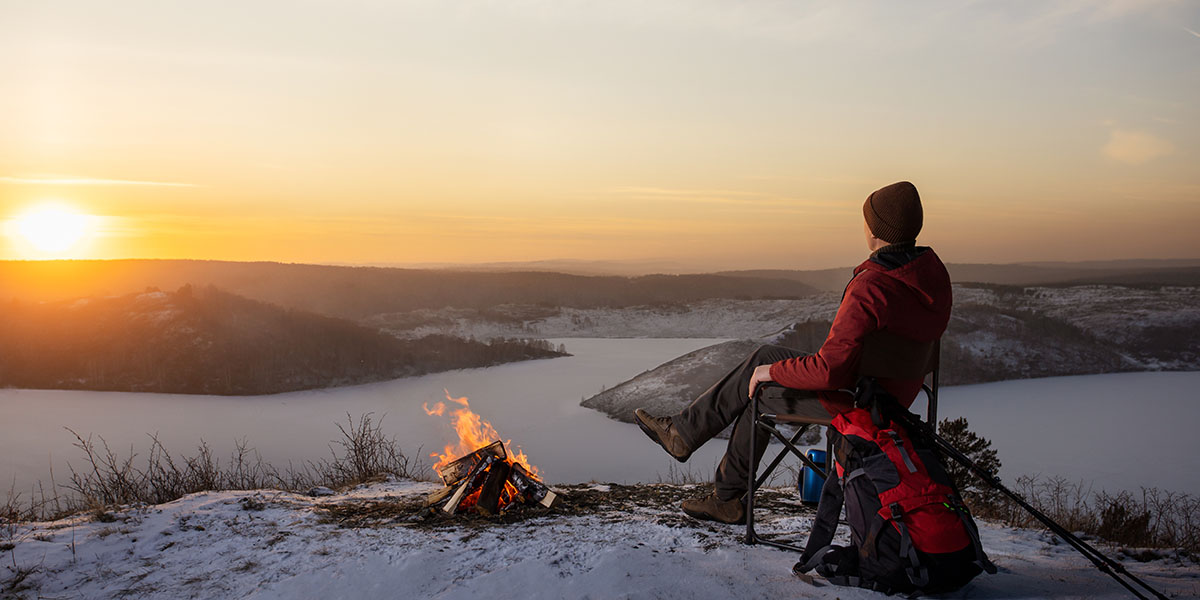
When I began all-weather camping many years ago, one of the most important discoveries I made was that winter camping can be so rewarding. Don’t get me wrong: Spring, summer and fall each have their own merits when it comes to camping. But I had always avoided camping in winter — mainly because it’s so cold. (Trust me, I live in Canada.) With some degree of wisdom, I’d always avoided temperatures that could result in hypothermia.
Yet somehow, one snowy December evening, I found myself cozying up to a campfire in a campsite in the mountains accompanied by three of my best friends. We had chosen this campsite right beside a snow-covered lake. The half-a-dozen other sites were empty along the frozen shore. That magical evening would change the way I looked at camping forever. There wasn’t much talking at all between us. The four of us mainly just sat in awe, sipping hot buttered rum from enamel cups while we gazed past the fire at a spectacular view beneath a twinkling blanket of stars.
That night, there was a magnificent full moon that hung just above the top of the mountains beyond the lake. Moonlight was reflected everywhere, making the snow glitter like tiny diamonds across the lake and on the branches of the tall hemlock trees that surrounded us. The whole scene was magical. As the night progressed, coyotes yipped back and forth to one another in a cacophony that came from no particular place. It was a symphony that seemed to echo all around us. It felt like we were witnessing a private show in an epic natural theater.
Warming Up to Winter Camping
Well, that was the moment that I decided to add winter to my list of camping seasons. I’ve long since abandoned the spartan freedom of tent camping for the luxurious comfort of an RV. However, I still make a point of camping in some peaceful place every winter. I’m still smitten with the one-on-one connection I get with nature when the campground is devoid of human activity. In this article, I’ll share some of the extraordinary things you might discover while all-weather camping, beyond the mere thrill of braving the elements.
Cool Things Winter Campers Will Learn
1. The peace and serenity are breathtaking.
Who camps in the winter? Nearly no one. That means you’ll probably get an entire campground to yourself. Without noise from other campers, you’ll get to hear a symphony of natural sounds that you’ll probably miss in a busy summer campground. However, when there’s snow on the ground, there’s a magical hush over the landscape. It’s a peaceful serenity that can be hard to find any other time of year due to the sound deadening qualities of snow
2. Bugs have vanished from the scene.
One of the best parts about winter camping is the complete absence of mosquitos, ticks, or any other insects or creepy crawlies. Being able to camp without having to deal with bugs is a good reason to camp in winter in itself.
3. Wildlife abounds, but bears disappear
With no humans around, deer, elk, moose, raccoons, wolves, mink, weasels and many bird species come out of hiding. Birds are often more visible than at other times of the year because of the lack of foliage on the trees. Additionally, ne of the best parts about winter camping with regard to wildlife, is that many bears will have disappeared to spend winter in hibernation. As campers, we love bears. But they do have a habit of becoming a nuisance if there is food anywhere nearby.
4. More stars become remarkably visible.
In winter, the skies are especially crisp and clear. This is partly due to a lack of smoke from wildfires and other pollutants, as well as a lack of light pollution. That means more stars become visible. And the result is skies that are blanketed in stars over camping areas.
If you camp in Canada, and you’re really lucky, you might see the aurora borealis (otherwise known as the Northern Lights) lighting the sky with their brilliant bands of chartreuse, magenta, and violet. If you’re wondering where the best spot to observe this spectacular phenomenon, check out the NOAA aurora forecast.
5. Winter activities add to the fun.
An oft-neglected fact is that winter camping features as many fun activities as summer does. While not a complete list by any stretch of the imagination, here’s are a few activities that I recommend: winter hiking, snowshoeing, cross country skiing, building a snow fort, ice fishing, birdwatching and wildlife viewing, and just cozying up to a warm campfire with a hot beverage.
6. The challenge creates a sense of accomplishment.
There’s no denying that camping in winter can give you a sense of accomplishment offered at no other time of year. Among fellow campers who may be wary of winter camping (like I once was), you’ll also earn bragging rights and a little bit of camper clout. But really, the big reward is getting to enjoy a side of the natural world that very few other humans have experienced.
7. Awareness of your environment increases.
A few degrees can make the difference between having an amazing experience and spending a miserable night in the woods. Before you go camping, it’s vital to check the highs, the lows, and the windchill as well as what the chances for precipitation are. Cold-weather camping can be unforgiving and getting caught in a cold snap or winter storm could be deadly.
Be prepared for freezing rain or snow. If it snows while you’re camping, driving home on snow-covered roads might be difficult or impossible. If you’re camping in a mountainous area, you’ll also want to check the avalanche risk before you. You should also consider bringing an avalanche beacon if you’re camping in the mountains, just in case. Even though you might not be heading into an area where the avalanche risk is high, the risk level can change unexpectedly. An avalanche beacon helps searchers locate you in the event that you get buried by an avalanche and is considered essential gear for winter backcountry activities.
8. Specialized cold-weather gear really matters.
Unlike camping in spring, summer or fall, winter camping requires you to have gear that will keep you warm when it’s extremely cold out. It’s a good idea to consider the temperature you’ll be camping in. You’ll need to bring winter-rated gear that will keep you safe, warm and dry below that temperature. You’ll need to have a waterproof tent that can withstand wind and snow if you plan to leave the RV and get into the elements. Other must-haves for winter camping are a winter-rated sleeping pad and sleeping bag.
Also, if you’re camping in a snow-covered area, it’s a good plan to bring snowshoes for getting around on top of the snow instead of sinking into it. Also, don’t forget to attend to your RV’s winter condition, especially the seals.
9. Dressing in layers is the best way to keep warm.
Dressing in layers is the best way to stay warm in winter. When done properly, this method of dressing both keeps warm and helps to prevent sweat from soaking through your base layer and chilling you. Here’s the cold weather clothing layering system that I recommend:
Moisture wicking synthetic t-shirt (never cotton)
Merino long underwear with long sleeve shirt (never cotton)
Avoid sweating and getting chilled by removing layers when you’re doing a vigorous activity that warms you up. It’s also good preparation to bring an extra base layer
10. Being well-prepared has higher stakes.
Unlike camping at other times of the year, winter camping demands that you be well prepared. Failure to do so can lead to injury and death. But besides that, you’ll want to be warm and comfortable. Here are a few things you’ll need.
Warm clothing including winter footwear
Food
Water
A means to warm your food
A lighter or ferro to start a fire
Firewood
Axe or saw
Camping knife
Tent
Tarps and rope
Sleeping bag
Sleeping pad
At least one other person for safety
A GPS locator (such as a Garmin inReach Mini)
11. Some campgrounds are still open.
Many campgrounds close for the season due to winter weather. However, you’ll still find some fantastic places to camp. Three apps for finding winter camping near you are:
Bring plenty of food, water and a stocked first aid kit.
Be prepared to have patience building a campfire.
Fluff up your sleeping bag before getting into it. Loft is what gives a sleeping bag its insulating properties, So fluffing it up helps it to keep you warm.
Sleep with your face out of the sleeping bag to avoid soaking your sleeping bag with moisture from your breath.
Final Thoughts on Winter Camping
Extending your camping season to include the winter months can offer a unique experience that very few other people get to enjoy. Good planning and preparation is key for winter camping — especially as you consider your routes. To be honest, it’s a little more work than camping at any other time of year. But you’ll probably find that the rewards of winter camping are well worth your efforts.
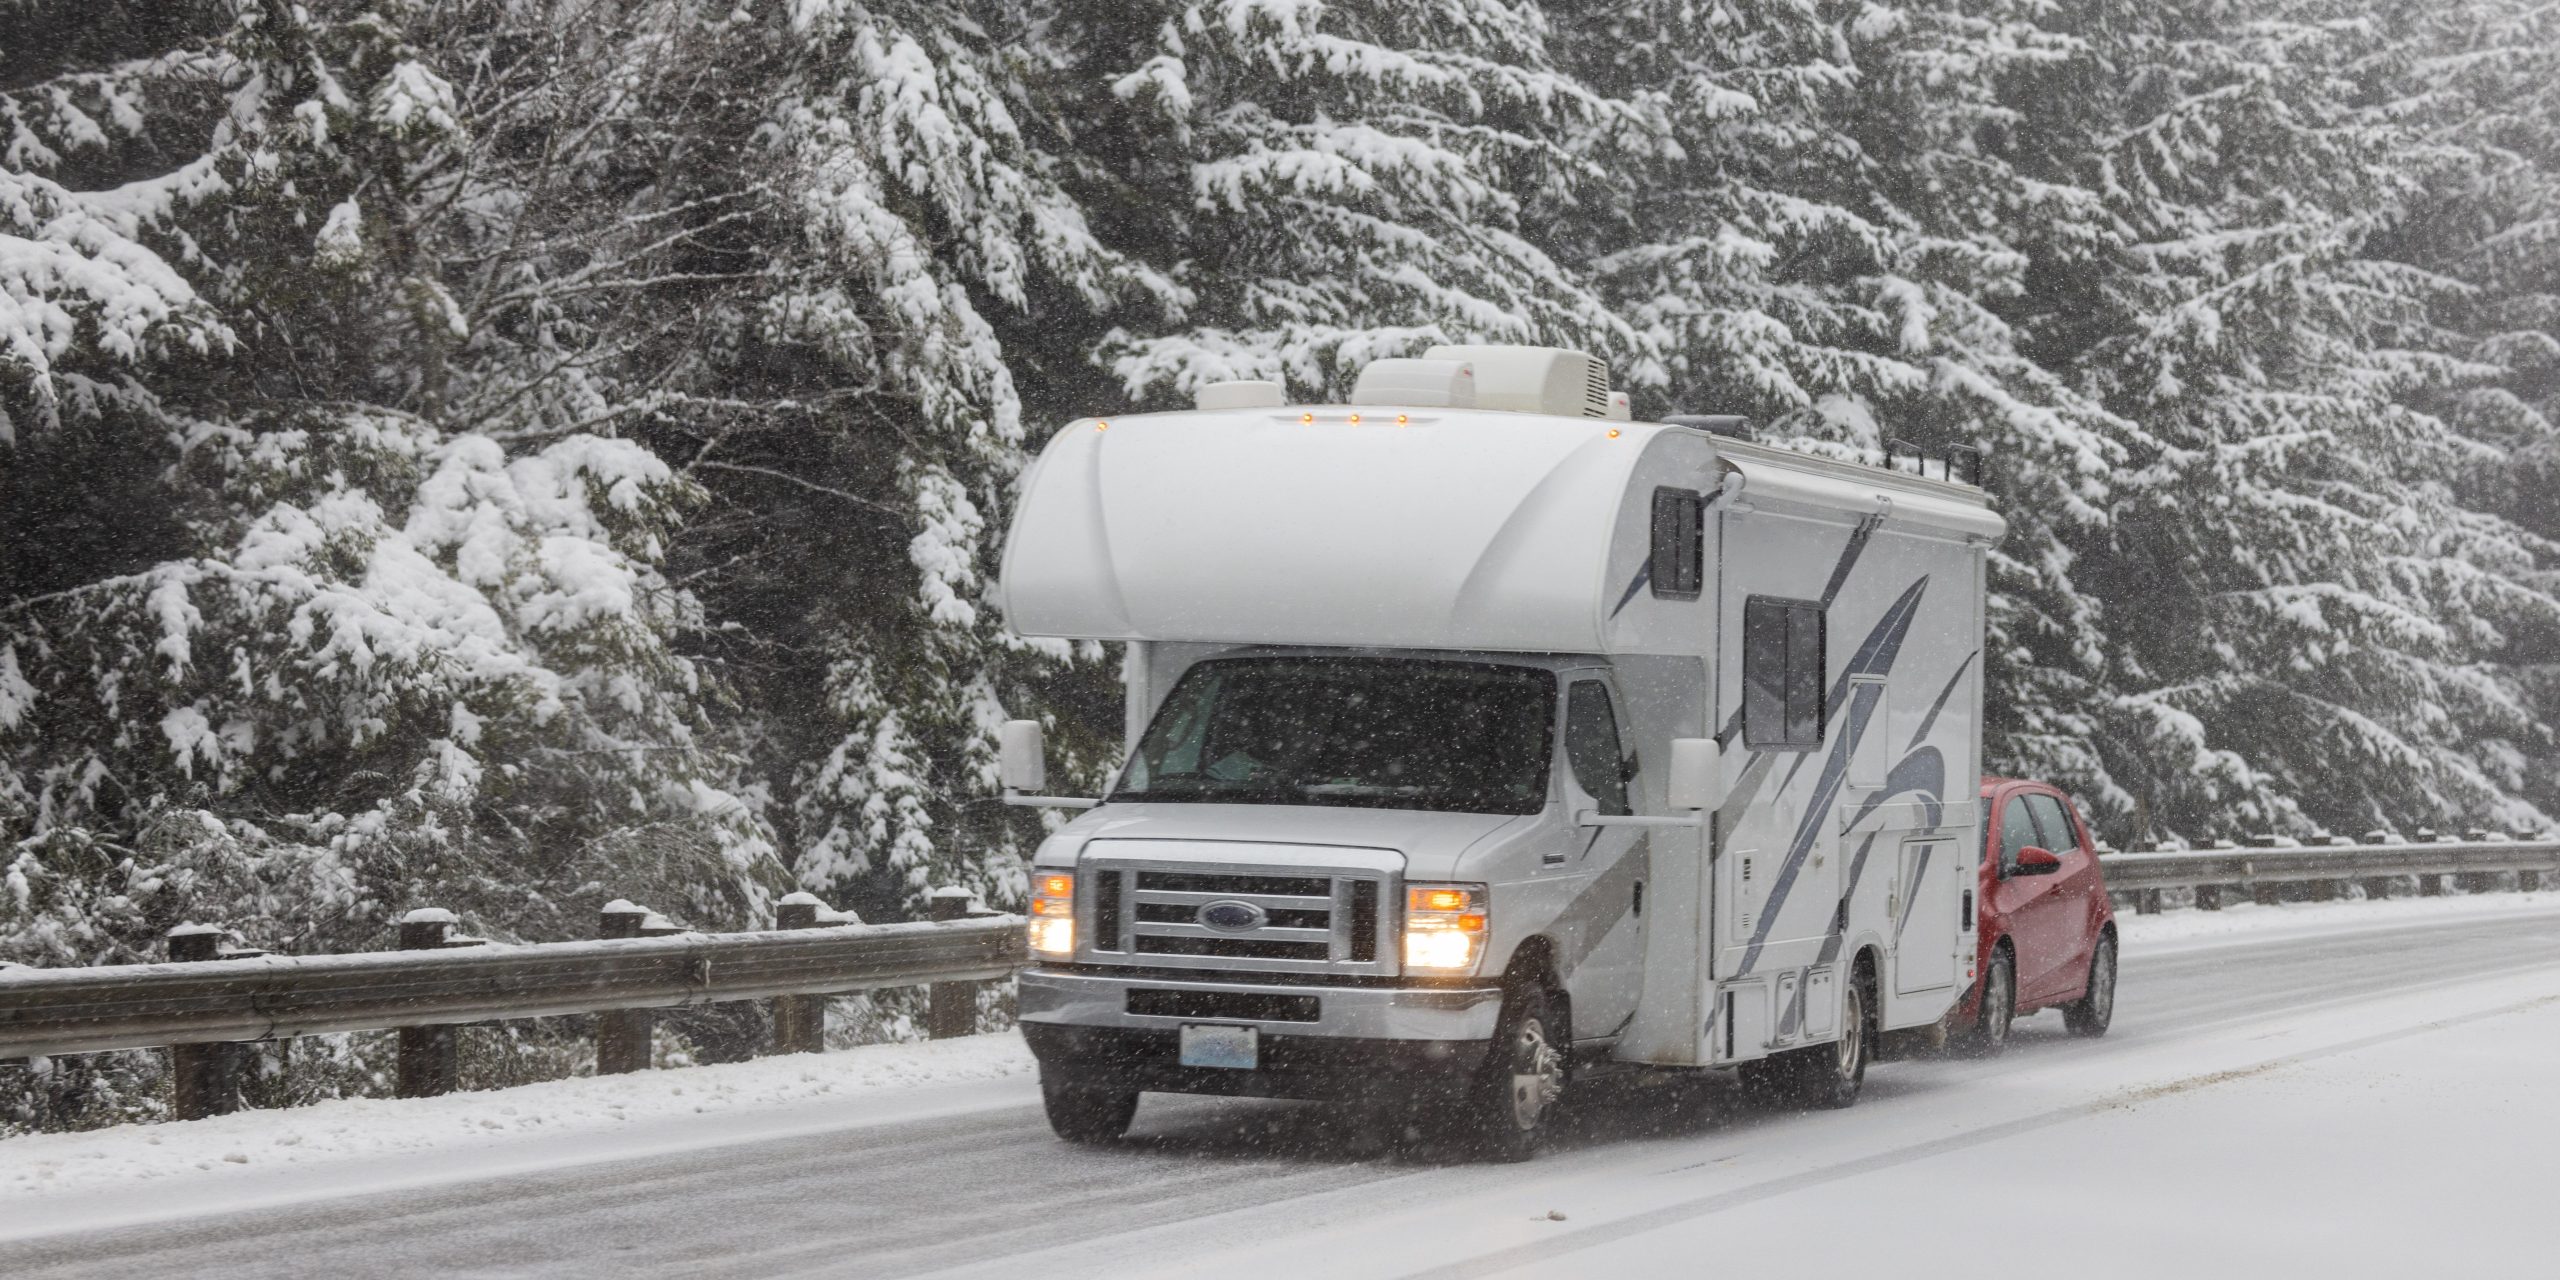
Winter is already upon us. That means whether you’re planning to take your RV somewhere warmer, or you’re thinking about a winter camping vacation, you’re going to have to drive your RV in potentially hazardous conditions. Slippery roads, cold temperatures, unpredictable winds and snowstorms can all be a challenge to navigate in an RV. So, if the thought of driving your RV in winter conditions is a little nerve wracking, you’re not crazy. You’re smart.
In this article, we’ll give you the best tips for driving your RV in winter weather. (And if you’re wondering what I know about all that, you should know something: I camp in Canada.) Trust me, with a little good advice in hand, you can make the most of winter driving. That way, you get safely to your destination.
Avoid Driving When Roads Are Bad
Driving an RV in winter conditions is a lot like driving in any other weather. However, because RVs tend to be heavy, they tend to drive better than some other vehicles in winter weather. Even so, you should also know that their longer wheelbase means if something goes badly, it tends to go really badly.
Let me give you an example. A normally small annoyance, like another driver suddenly cutting in front of you, can turn into a white-knuckled, one-sided conversation with God as you desperately try to avoid a collision. Not to mention, getting misdirected by an online map app and having to get back on route can result in driving miles off course before you find a not-so-convenient spot to turn around.
There’s no doubt that driving in winter weather can be hazardous. That’s why it’s always wise to postpone travel in winter weather, when roads are snow-covered, icy, or otherwise slippery. You also might want to avoid these: the 10 most dangerous winter roads.
Preparation Is Key (As Always)
It goes without saying that a good plan combined with proper preparation are important any time of year. In winter time, planning and preparation are critical when it comes to safety. Being prepared means taking into account everything that could go wrong and being ready for it. Here’s how you’ll need to prepare for your journey, long before you jump into the driver’s seat.
Ensure You Have the Right Gear
Have the right tires. Make sure your RV or tow vehicle has snow tires or all-terrain tires that are approved for use in snow. Snow tires are designed to provide traction when road conditions are slippery. In states and provinces with mountain ranges, it’s mandatory to either have snow tires or carry tire chains (depending on the weight of your vehicle).
Carry tire chains and know how to put them on. Snow chains are used when snow has already accumulated on the road. Tire chains can make the difference between getting stuck or sliding into a ditch and staying on the road. However they can be tricky to install, and the side of a snowy road is a terrible place to learn how to do so. That being said, it’s a good idea to practice installing your tire chains before you leave and always put them on before you get stuck.
Be prepared to get unstuck. Carry traction boards and a snow shovel just in case you need them.
Pack cold weather gear. Do this for each traveler in the RV. No matter how well-heated your rig is, having warm gear is critical in the event the RV propane regulator gets frozen, the solar panels get buried under snow, or the myriad of other things that could go wrong. Winter jackets, gloves, knit hats, warm socks and winter boots are a necessity for winter travel.
Pack plenty of blankets. If everything else goes wrong, these will be a life saver till you can get everything back right.
Store bottled water. Be sure to have water in jugs or bottles inside the RV. That way, even if the RV plumbing freezes en route to your destination, you’ll still have water for drinking, cooking, bathing. Water is essential for life (and coffee), so bring enough for everyone in the RV, including pets.
Stock up on propane. Fill up with fuel and propane before your planned departure time.
Go the Extra Mile on Route Planning
Plan your route. Most folks do this with a route planning app like Google Maps, Apple Maps, or RV Life Trip Wizard. (Trip Wizard has RV safe driving directions.) But it’s a good idea to bring a current road map or atlas along with you. That way, you can double check to make sure the route planner doesn’t take you the wrong way. This happens more frequently than many people think.
Have an alternative route plan. You know, in case there are unexpected delays, weather events, or road closures along your route.
Check the weather routinely. Go online to check the weather along your route before you leave. Weather conditions can change quickly in winter, so it’s a good idea to check the forecast ahead of time.
Be aware of highway conditions. You can find highway conditions and road closures along your route on your state or provincial highway department website. Always check before you drive. You really don’t want to find out bad news en route.
Share your plans. Let someone know your destination and your route plan. Also have a plan to check in with them to let them know you made it.
Fine-Tune Your Timing
Avoid driving between sunset and early morning. Roads are more likely to accumulate black ice at these times.
Plan to take your time. Allow lots of extra time to get to your destination. The time you’ll need will vary according to your route and driving conditions. However, don’t rely on any online resource for approximate driving time, as they never take unexpected events into account.
Take frequent breaks. Driving safely in winter weather requires complete focus and total concentration. You can get tired out without even noticing. Fatigue kills because it slows reaction times and causes you to make the kind of errors in judgement that cause accidents. No amount of caffeine and snacks can prevent fatigue. The only way to stave it off is by taking frequent and adequate rest breaks.
Calmly Handle the Conditions
Don’t drive with snow on your RV. Clear all snow from your RV roof, windows, mirrors and backup camera before you take off. Snow flying off your RV as you drive can impact the visibility of the drivers around you. And that can affect your safety too.
Give your engine adequate time to warm up. RVs and tow vehicles have big engines. That means it can take 15 minutes for the engine to completely warm up. Always follow your RV manufacturer’s recommendations in your RV or tow vehicle’s manual.
Drive according to conditions. Your RV requires a much greater stopping distance than usual in winter driving conditions. Leave extra space between your RV and the vehicle in front of you. Maintain a slow but steady speed and avoid using the brake pedal.
Don’t rush. Slow down even more and put your hazards on if there’s ice or snow on the road.
Correct sliding with steering. What to do if you start to slide, remove your foot from the brake pedal. Then steer into the direction the back wheels are sliding until you safely correct the skid.
Know when to stop. Find a safe spot to pull over and ride out a snowstorm instead of driving through it. If you happen to run into a snowstorm while you’re on the road, it’s best to find a safe spot to pull over until roads or highways have been cleared. Taking a break from driving in your cozy home on wheels is often much safer than driving in the poor visibility and road conditions of a snowstorm.
Final Thoughts on Driving Your RV in Winter
It’s always best to avoid driving in winter weather, especially when the vehicle you’re driving is an RV. However, when there’s no way to avoid winter driving, it makes good sense to plan your trip carefully. Being prepared can turn an otherwise potentially deadly situation into an epic adventure where everyone survives with a good story to tell around the campfire. Preparation for winter RV driving should involve packing enough food and supplies as well as having plenty of fuel, propane, and water. The biggest advantage of driving an RV is being able to pull over and live comfortably if conditions become hazardous. After all, your RV has everything you need to be comfortable and cozy until conditions improve.
Colder weather is already approaching. (And in many cases it’s already here. That means it’s time to start thinking about winterizing your RV to protect it from freezing temperatures. One of the most critical tasks involved in preparing your RV for winter’s onslaught is using RV antifreeze to keep water from freezing in the pipes and bursting them.
In this guide, we’ll delve into everything you need to know Starting with what it is (and is not), we’ll share when, why, and how you should use it to protect your RV’s plumbing system this winter.
What RV Antifreeze Is — and What It Isn’t
You’ve probably seen jugs of pink stuff in the RV maintenance section of your local RV parts or hardware store. Although RV antifreeze is usually found alongside automotive antifreeze, always remember: Even aside from it’s usual pink color, it’s very different from automotive antifreeze. RV antifreeze is formulated with propylene glycol and is made to be nontoxic. Automotive antifreeze, on the other hand, is very toxic because it’s made with ethylene glycol. That’s because the two have very different purposes. And the differences between RV and automotive antifreeze don’t end with toxicity.
Let’s be clear: RV and automotive antifreeze aren’t interchangeable at all. RV antifreeze was formulated specifically for use in plastic RV plumbing components. It even acts as a lubricant for the RV toilet seal. But’s not for use in your car, because propylene glycol just doesn’t have the necessary properties to allow it to regulate engine temperature.
Conversely, automobile antifreeze is specially formulated to help regulate the temperature of vehicle engines no matter what the ambient temperature is. And even more ephartically, you would never want to use automotive antifreeze in RV plumbing because it’s highly toxic. And that’s not all. Automotive antifreeze is also corrosive to plastic and rubber. That means instead of protecting RV plumbing, automotive antifreeze destroys it.
RV Antifreeze Is Not Safe for Consumption
Even though RV antifreeze is technically nontoxic, you should avoid consuming it. Even though propylene glycol is used in minute amounts in processed foods, RV antifreeze is not considered safe for consumption. At least not beyond the trace amounts you ingest when you use it as intended. That being said, after you drain all the antifreeze out of your pipes, the freshwater coming out of your RV faucets will be safe to drink.
Why It’s Necessary for Winterization
Water is one of very few substances that expands as it freezes. That means water that freezes in your RV pipes also expands as it transforms into a solid. This expansion is enough to burst pipes and fittings, creating leaky plumbing and water damage as well as moisture related problems like mold.
Water freezes at 32 degrees Fahrenheit. Contrastingly, RV antifreeze doesn’t freeze until the ambient temperature is a very chilly negative 50 degrees Fahrenheit and doesn’t expand when it finally freezes. Unlike water, instead of expanding into an RV pipe destroying solid form, RV-specific antifreeze freezes into a semi-liquid slush that’s harmless to plumbing. You can probably see why it makes sense to get all the water out of your RV plumbing system and replace it with the pink stuff.
What About Environmental Concerns?
As you’re probably aware, automotive antifreeze has multiple and significant negative environmental impacts. First of all, it’s highly toxic to every living organism, including the bacteria in sewage systems. Automotive antifreeze is so bad for the environment that it’s considered a hazardous material. That being the case, most communities have laws regarding how to dispose of automotive antifreeze.
On the other hand, RV antifreeze is considered non-toxic and breaks down quickly when introduced to a sewage system or water supply. That means when you flush it out of your RV plumbing when spring rolls around, it can go down the drain at the dump station.
How Much Do You Need for RV Winterization?
When it comes to RV antifreeze, most RVs don’t need a lot. Many RVs only require one or two gallons of RV antifreeze to protect the entire plumbing system. But it really depends on the size of your rig. So, if you have a larger RV with multiple bathrooms you may need as much as five gallons.
Where to Buy This Magical Stuff
RV antifreeze is easy to find. It’s readily available from RV supply stores, automotive stores, and hardware stores as well as from online retailers. Here’s a brief list of some of the places where you’ll find RV antifreeze:Amazon, Tractor Supply, Walmart, and Home Depot.
How To Use It to Winterize Your RV
It’s essential to winterize your RV when it will be in storage for the winter months or only used occasionally during that time. Winterizing your plumbing system means draining out all the water and replacing it with RV antifreeze.
Prepping Your Plumbing System
Disconnect from city water and make sure the hot water tank has been turned off overnight.
Empty the majority of water from the plumbing system. With the pump on, turn a faucet on and pump all the water from the freshwater tank and most of the water from the plumbing system. Flush the toilet too. Turn the pump off.
Empty the black tank and gray tank.
Drain the outside shower hose.
Open the low point drains beneath the RV.
Drain the hot water tank by opening the pressure relief valve and remove the drain plug or anode rod.
Open the drain valve under the freshwater tank to drain all the water from it.
Optional step: Connect an air compressor to the city water connection and blow any remaining water out. While this is preferable, it’s not absolutely necessary.
Close all the valves
Find the bypass valves for the water heater and close it to prevent antifreeze from entering the water heater. There will be an intake valve and an outlet valve-both should be closed.
Applying RV Antifreeze
Locate the water pump intake and ensure that it has an antifreeze syphon hose connected. Many RVs have one installed, but if yours doesn’t simply replace the freshwater line with a siphon hose.
Open the siphon hose valve and close the valve that allows water to flow from the freshwater tank.
Insert the siphon hose into a bottle of RV antifreeze.
Turn the pump on.
Open the cold water at the kitchen faucet and close it after pink fluid comes out. Now open the hot water and wait until pink antifreeze comes out before closing it. Repeat these steps with each faucet in the RV, including the indoor and outdoor shower.
Flush the toilet until pink antifreeze runs into the bowl. Leave antifreeze in the bowl to help condition the seal at the bottom of the bowl.
Turn the pump off.
Pour a little antifreeze down each drain in the RV to prevent the the P trap from freezing.
Drain the pump by finding two hoses located near it underneath the RV and opening them. Leave them open until you see RV antifreeze draining from them.
Dump any leftover antifreeze into the toilet, as well as the sink and shower drains.
Final Thoughts on the Pink Stuff
RV antifreeze is crucial for protecting your RV’s plumbing system from freezing while your RV is in storage over winter. RV winterization is easy and can often be done in under 30 minutes, even on a large RV. If you really want to go the extra mile with RV winterization, you’ll want to blow every last bit of water out of your plumbing with an air compressor before pumping RV antifreeze into it. In spring, winterization is as easy as connecting to city water and turning on the faucets until no pink comes out.
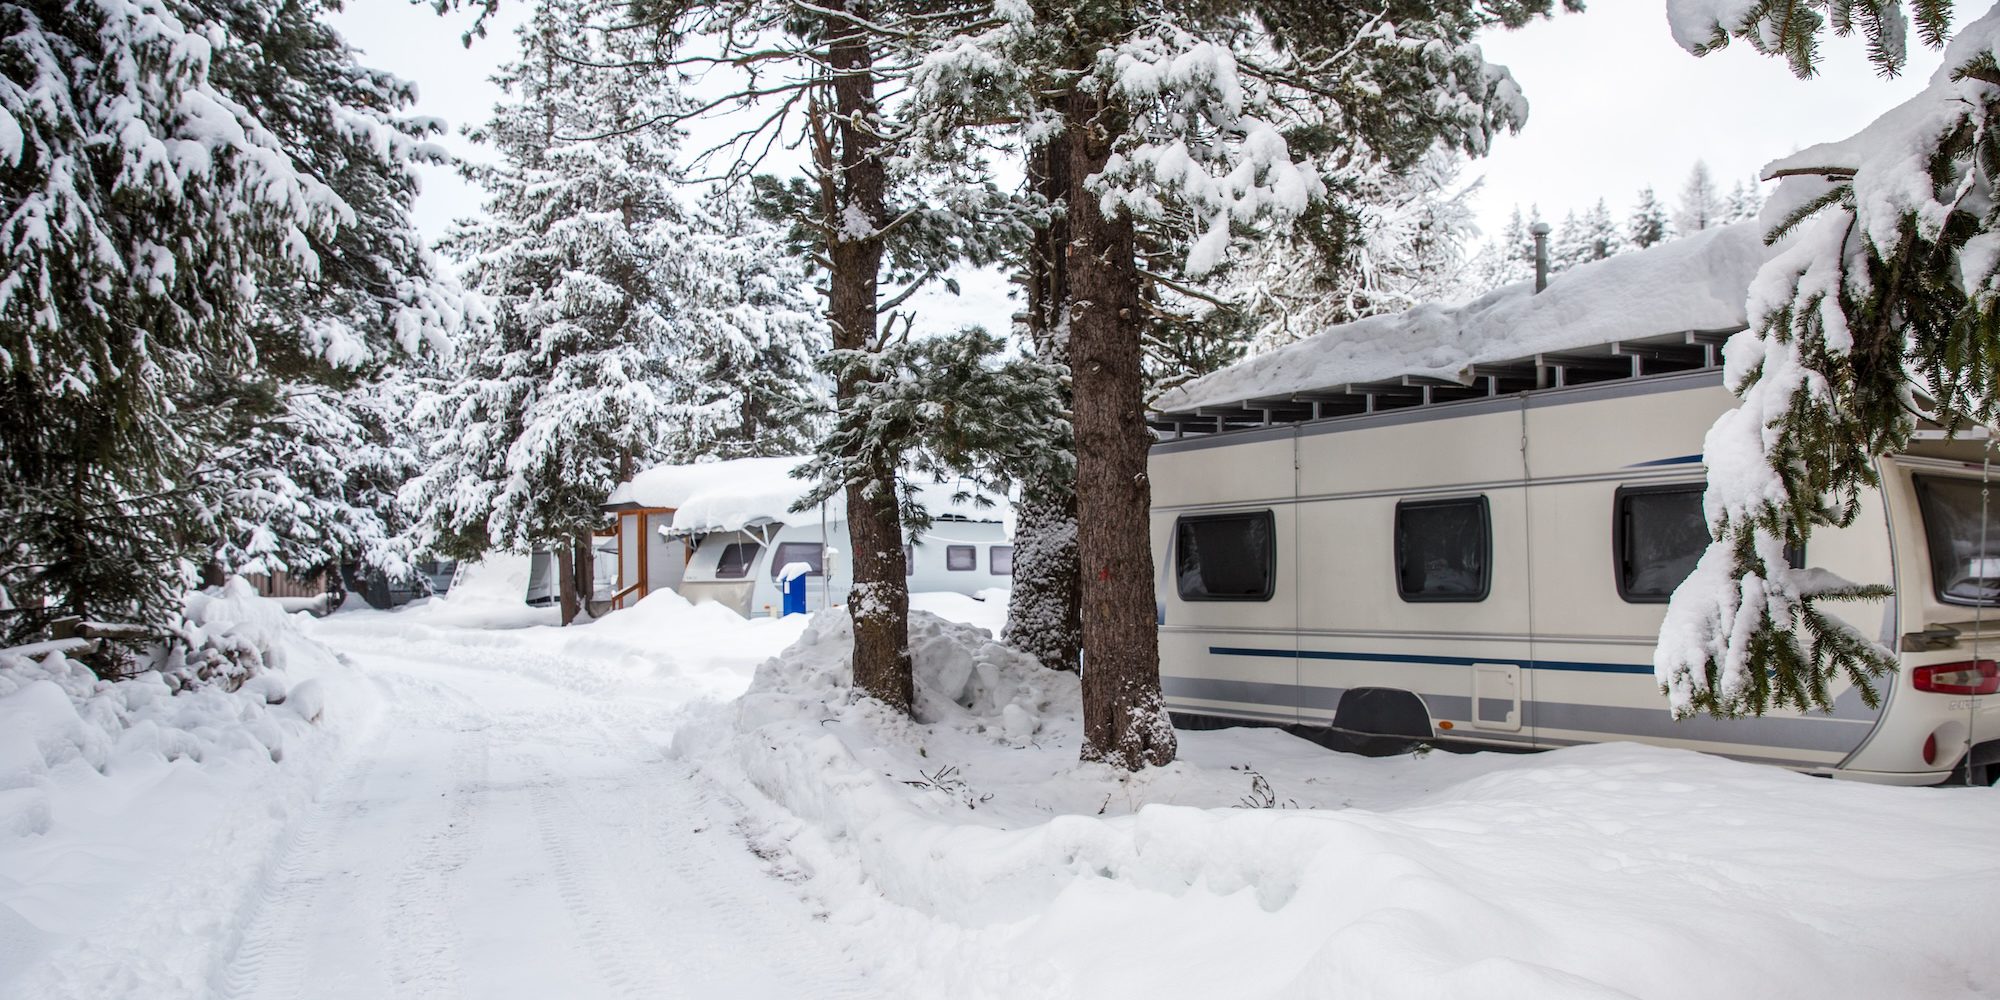
Winter RV camping can be absolutely magical. And if you do everything right, your RV can make a cozy home on wheels. However, there is a flip side. If you don’t do the right things, RVing in winter can be brutal, absolutely miserable. or downright dangerous. To be able to enjoy the winter magic, you need to plan well and have the right winter camping equipment. But the truth is that a lot of campers make the same winter RVing blunders — especially first timers.
While planning and equipment are important any time of year, winter really ups the ante. Things can get critical when you and your RV are facing freezing temperatures, snow, and seasonal storms. Together, these can combine to create hazardous condition.
So, in this article, let’s take a look at some all-too-common winter RVing blunders — and how to avoid them.
No. 1: Not Heading Somewhere Warmer
It makes good sense to take your RV to a warmer location in the winter. (Lots of snowbirds would argue this is the only mistake!) With that being said, there is a difference in enjoying winter camping and deciding to stay in a place where winter conditions will guarantee that get you in trouble. You know, places that are synonymous with frigid temperatures. So let your mobility work for you. RVs have wheels. You can take them almost anywhere. So why not choose a place where “winter conditions” include temperatures that consistently drop into a comfortable “Goldilocks” zone? A snowbird translation: Somewhere you can lounge by a pool or beach without being too hot or too cold.
No. 2: Not Checking the Weather Forecast — Daily
Winter weather can be very unpredictable. Atmospheric rivers, bomb cyclones, flash freezes can result in rapid changes to winter weather conditions. In winter, it’s important to check the weather forecast at least every 24 hours and within four hours of travel. Phone apps such as AccuWeather or Instant Weather (in Canada) are helpful when you have a cell signal. The very cool NOAA Radar and Weather Forecast app gives you a live view of incoming weather patterns.
It’s a good idea to camp with an NOAA Weather radio with you to receive continuous broadcasts of weather conditions across the country. The NOAA also broadcasts a special alert signal if there is a hazardous weather situation coming up. NOAA radio receivers are small and wireless, so you can take them anywhere with you.
No. 3: Being Confused About Winterization
“To winterize, or not to winterize?” is the question many RV newbies ask before their first winter with an RV. The truth is, whether you winterize or not depends on what you’ll do with your RV over winter. The big problem for RVs in winter is water freezing in the pipes if they aren’t being kept above 32 degrees.
RV winterization means getting all the water out of the pipes and replacing it with food-grade RV antifreeze for the winter. Although winterization is always done on RVs that are being stored for the winter, it’s never done on RVs that will be used throughout the winter, where the pipes can be kept from freezing. This is one of the most common — and frankly understandable — winter RVing blunders. With that being said, if you intend to use your RV for occasional camping in winter, it should be winterized. Not only that, keeping the RV winterized will save you the trouble of dewinterizing and then winterizing again.
However, it also means you won’t be able to use the plumbing in the RV, including the toilet. You’ll need to bring bottles of water for drinking, doing dishes and bathing. As a rule of thumb, count on three gallons of water per person per day. (And don’t forget to bring water for pets too.)
No. 4: Leaving an Unattended Space Heater On
Many RVers use a space heater in their RV to stave off winter’s chill. That being said, the use of space heaters in eight out of ten fire-related deaths (NFPA). That being said, RV fires are often far more devastating than home fires due to their multitude of highly flammable components. RVs tend to burn in minutes, while it can take hours for a structure fire to consume a building. Because RV fires burn so fast (and tend to have very few egress points), your risk of dying in an RV fire is far greater than it would be in a house fire.
There are a few things you can do to minimize the fire risk associated with using an electric space heater in your RV.
Allow at least three feet of space between the space heater and combustible materials.
Never use an electric space heater in a sleeping area designated for kids.
Don’t run the space heater for more than a few hours at a time.
Frequently check the RV space heater and unplug it if it feels warm. A warm plug is a sign of electrical current resistance. After a while, this current resistance will eventually damage the wires in your RV until they suddenly burst into flames.
Never, ever leave the space heater plugged in when you are away or sleeping.
In addition, because RV fires spread so fast, it’s a good idea to have an ABC fire extinguisher in each area of the RV, always within easy reach. A big part of RV fire safety 101 is also have a plan in place in case of a fire.
No. 5: Not Having a Generator
Power outages are common in winter. When there’s no electricity coming into the RV, you could get by using your DC electrical system to power things like lights, the furnace, or the 12-volt refrigerator. However, sooner or later, your house batteries will be depleted. It’s always nice to have a backup power supply. But it’s essential to have a generator in winter when power usage is high compared to other times of the year. While a solar power setup can help meet power needs most of the year, it probably won’t be of use in the winter months. That’s because there won’t be enough direct sun hitting the panels.
No. 6: Not Clearing Snow from Your RV Roof
I’m always surprised at the number of RVers who don’t bother to clear snow from the roof of their RV. Snow is heavy. It’s wet. And it can definitely damage any RV roof. Moisture is your RV’s number one enemy, even when it’s frozen. Rooftop snow can also add hundreds of pounds to your RV, putting your RV well over its cargo carrying capacity.
Therefore, it’s a good idea to stash a telescoping ladder and a lightweight snow shovel in your RV or tow vehicle before you head out to winter camp in your RV. That way you can get the snow off your RV roof before it can damage your RV.
No. 7: Not Keeping Your Propane Warm Enough
We buy propane as a liquid, but we use it when it evaporates into a gas state. This works really well in summer, when warm temperatures are ideal for propane to evaporate into a gas. However, winter’s cooler temperatures can make it difficult for propane to evaporate.
Once the ambient temperature drops to 27 degrees Fahrenheit, propane gas sometimes condenses back into a liquid state when it reaches the regulator. The result is a partial or complete blockage inside the regulator, resulting in low pressure in the propane lines and a low orange colored flame that means incomplete gas combustion. When they burn propane at low pressure, RV appliances don’t operate efficiently and will eventually become damaged.
The solution is to keep propane cylinders slightly warm using a propane heating blanket when it’s cold out. Propane heating blankets are easy to find. Here are a few places where you can get one: PowerBlanket.com, Amazon.com, HeatAuthority.com.
No. 8: Ignoring Moisture on RV Windows
Wet, foggy RV windows are your RV’s way of letting you know you have a humidity problem in your RV. The thing is, nearly everything we do in an RV creates moisture. Breathing, cooking, washing dishes, and bathing all contribute to gallons of microscopic water in the air inside the RV. This moisture works its way into every surface of the RV except for glass or metal. When it gets into a porous material like wood particle board, this moist air condenses into water, expanding and damaging the finish and the wood itself. Not only that but this moist, humid environment provides exactly what mold needs to grow.
In winter, the atmospheric moisture inside the warm RV condenses when it hits cold window glass or outer walls of the RV. The result is foggy, wet windows and wet walls in hidden areas like cabinet interiors. Moisture on your RV windows in winter is a sign of a much bigger moisture problem in your RV. While it’s impossible to get rid of all the atmospheric moisture in your RV, there are a few steps you can take to mitigate excessive humidity.
Don’t bring snow or water into the RV on boots or shoes.
Don’t dry clothing in the RV.
Open a vent and turn on overhead fans when cooking, washing dishes or showering.
Open cabinets to allow air to circulate.
Dry wet pets that come into the RV.
Use an appropriately sized dehumidifier.
No. 9. Using Electricity Instead of Propane for Heat
Dry heat and cost effectiveness are the main reasons many RVers use electric heat in the winter instead of the RV’s propane furnace. However, using electric heat in an RV instead of propane has a big downside that many people might not be aware of. (And it’s got nothing to do with the heat produced.) The thing is, RVs are built with furnace ductwork sharing the same interior space as plumbing. The ductwork helps prevent water pipes from freezing when it gets really cold out. Electric heaters don’t offer this protection. (Which definitely makes this one of the sneakiest winter RVing blunders.) So, if you use them instead of propane, you could wind up with frozen pipes.
No. 10: Not Protecting Your RV with Skirting
RV skirting can make a big difference to how warm you feel inside your RV. Skirting prevents wind and frosty air from getting underneath the RV and making it cold. The result is warmer floors and lower heating and propane usage. A popular RV skirting solution is custom-fitted, insulated vinyl skirting that’s installed via snaps or twist locks. However, RV skirting can consist of simple plywood or insulation boards cut to fit your RV.
In addition, inflatable Airskirts provide a simple RV skirting alternative that’s easy to set up and pack up. Airskirts resemble giant cigar tubes and are inflated and are tucked around the perimeter of the RV to provide an extra layer of insulation.
The Cool Reward of Avoiding Winter RVing Blunders
The growing number of four-season RV models are proof that RV manufacturers are recognizing that a growing number of RVers don’t want to end the camping season when the leaves drop from the trees. That’s because winter camping can be a lot of fun. An RV can provide a cozy place to warm up, enjoy a hot beverage, and exchange stories from a day filled with winter activities. Avoiding the common winter RVing blunders that RVers make over winter will help keep winter camping as enjoyable as it should be.
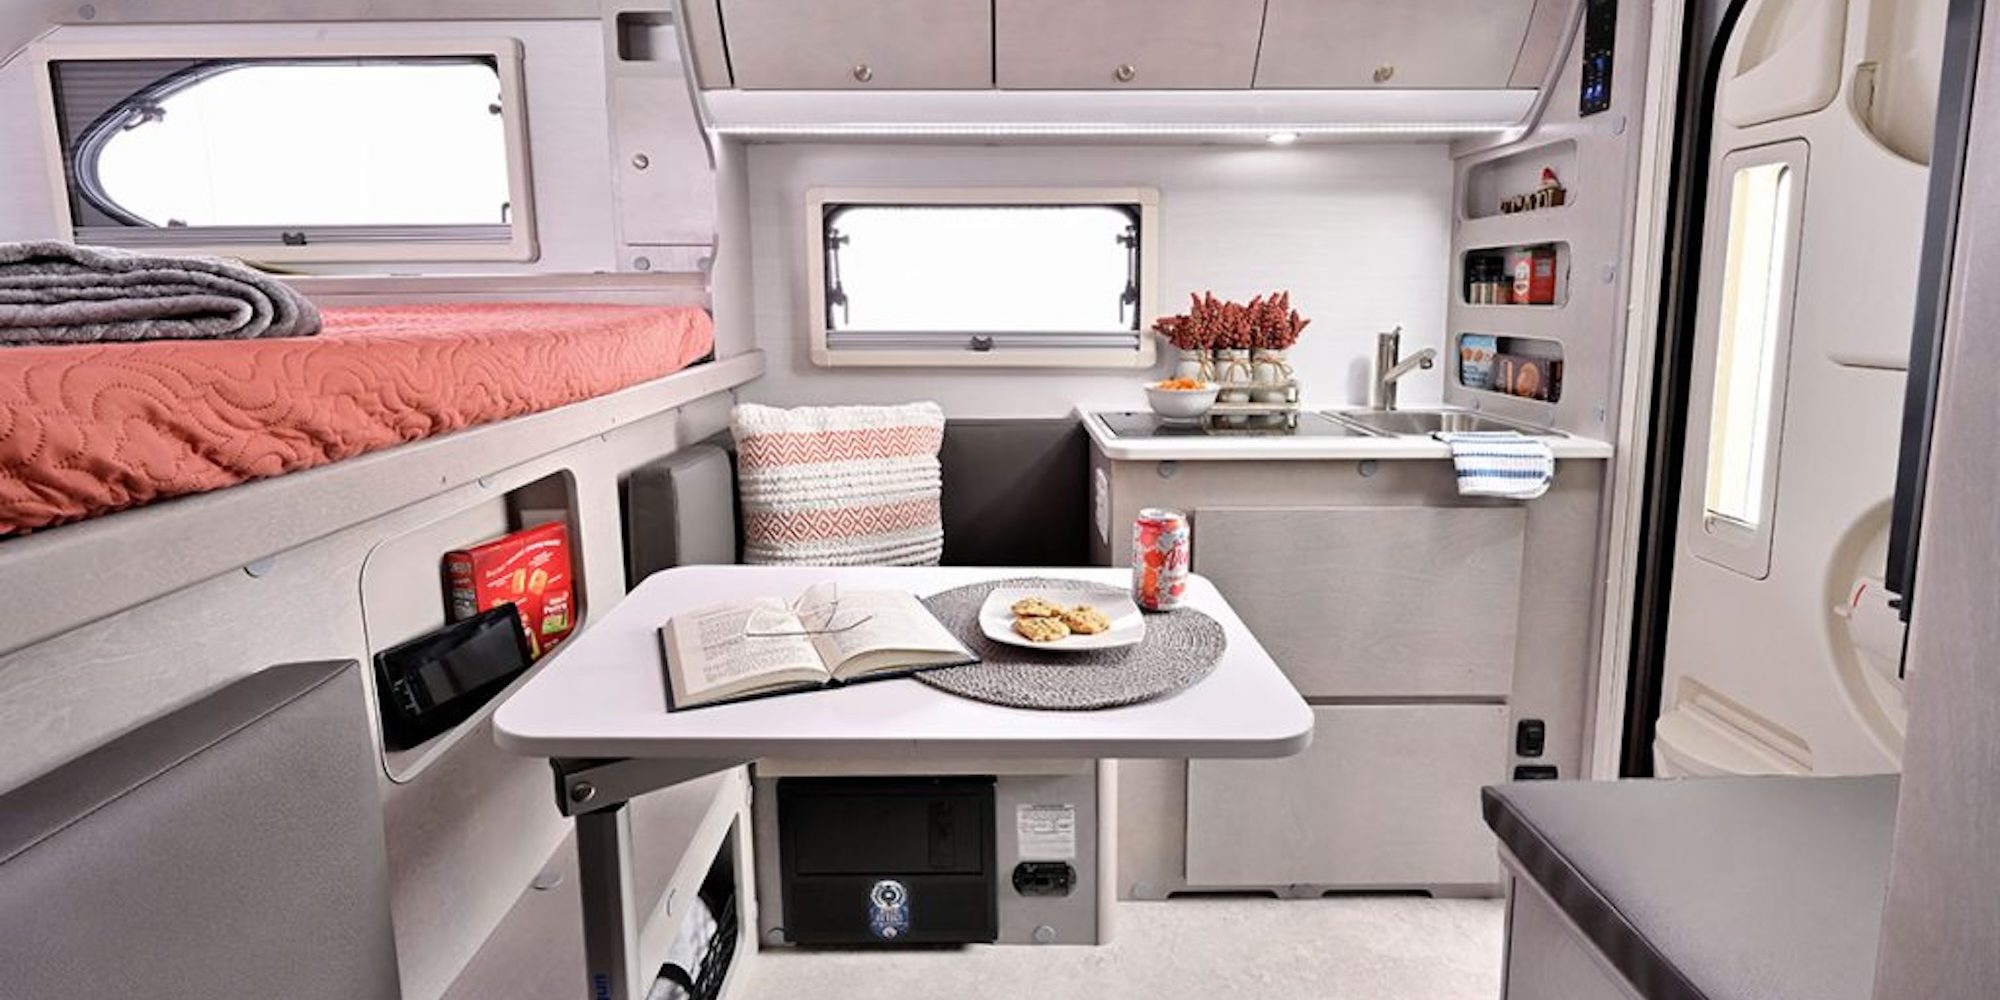

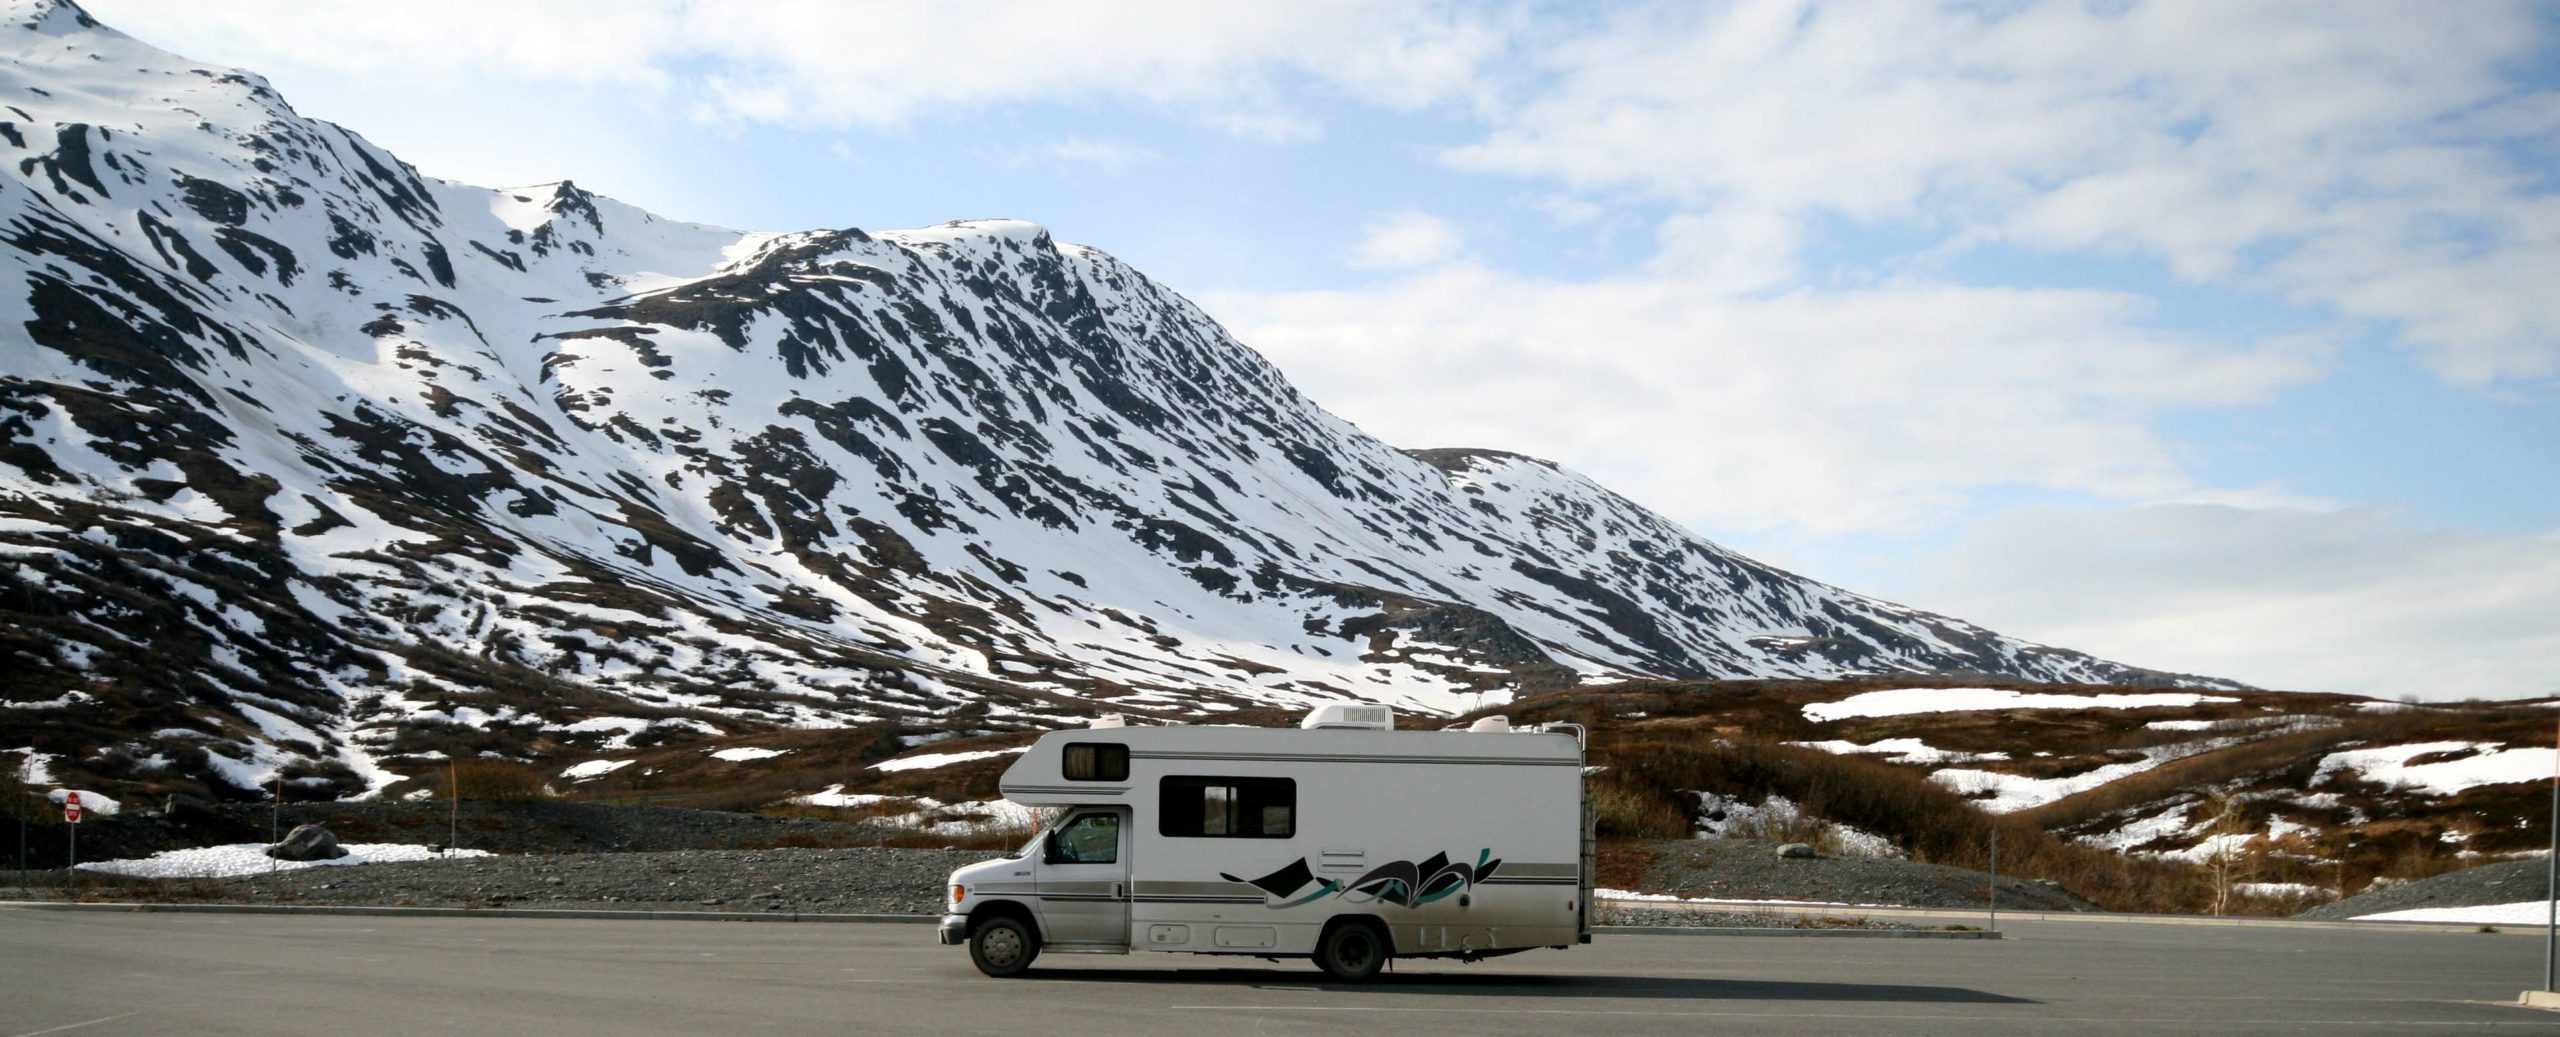
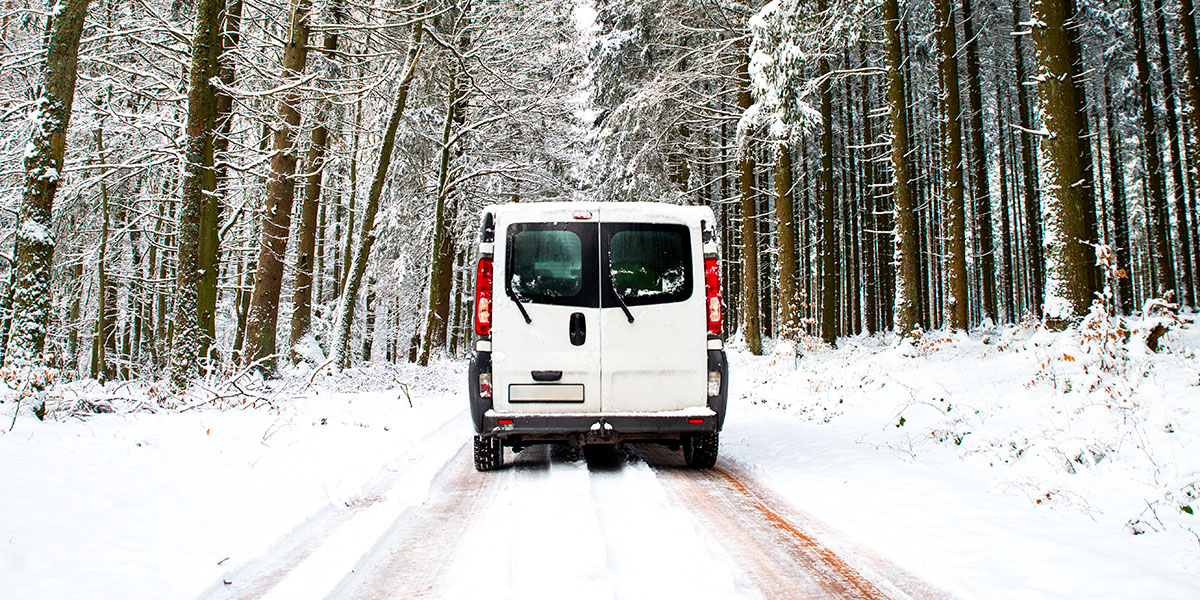

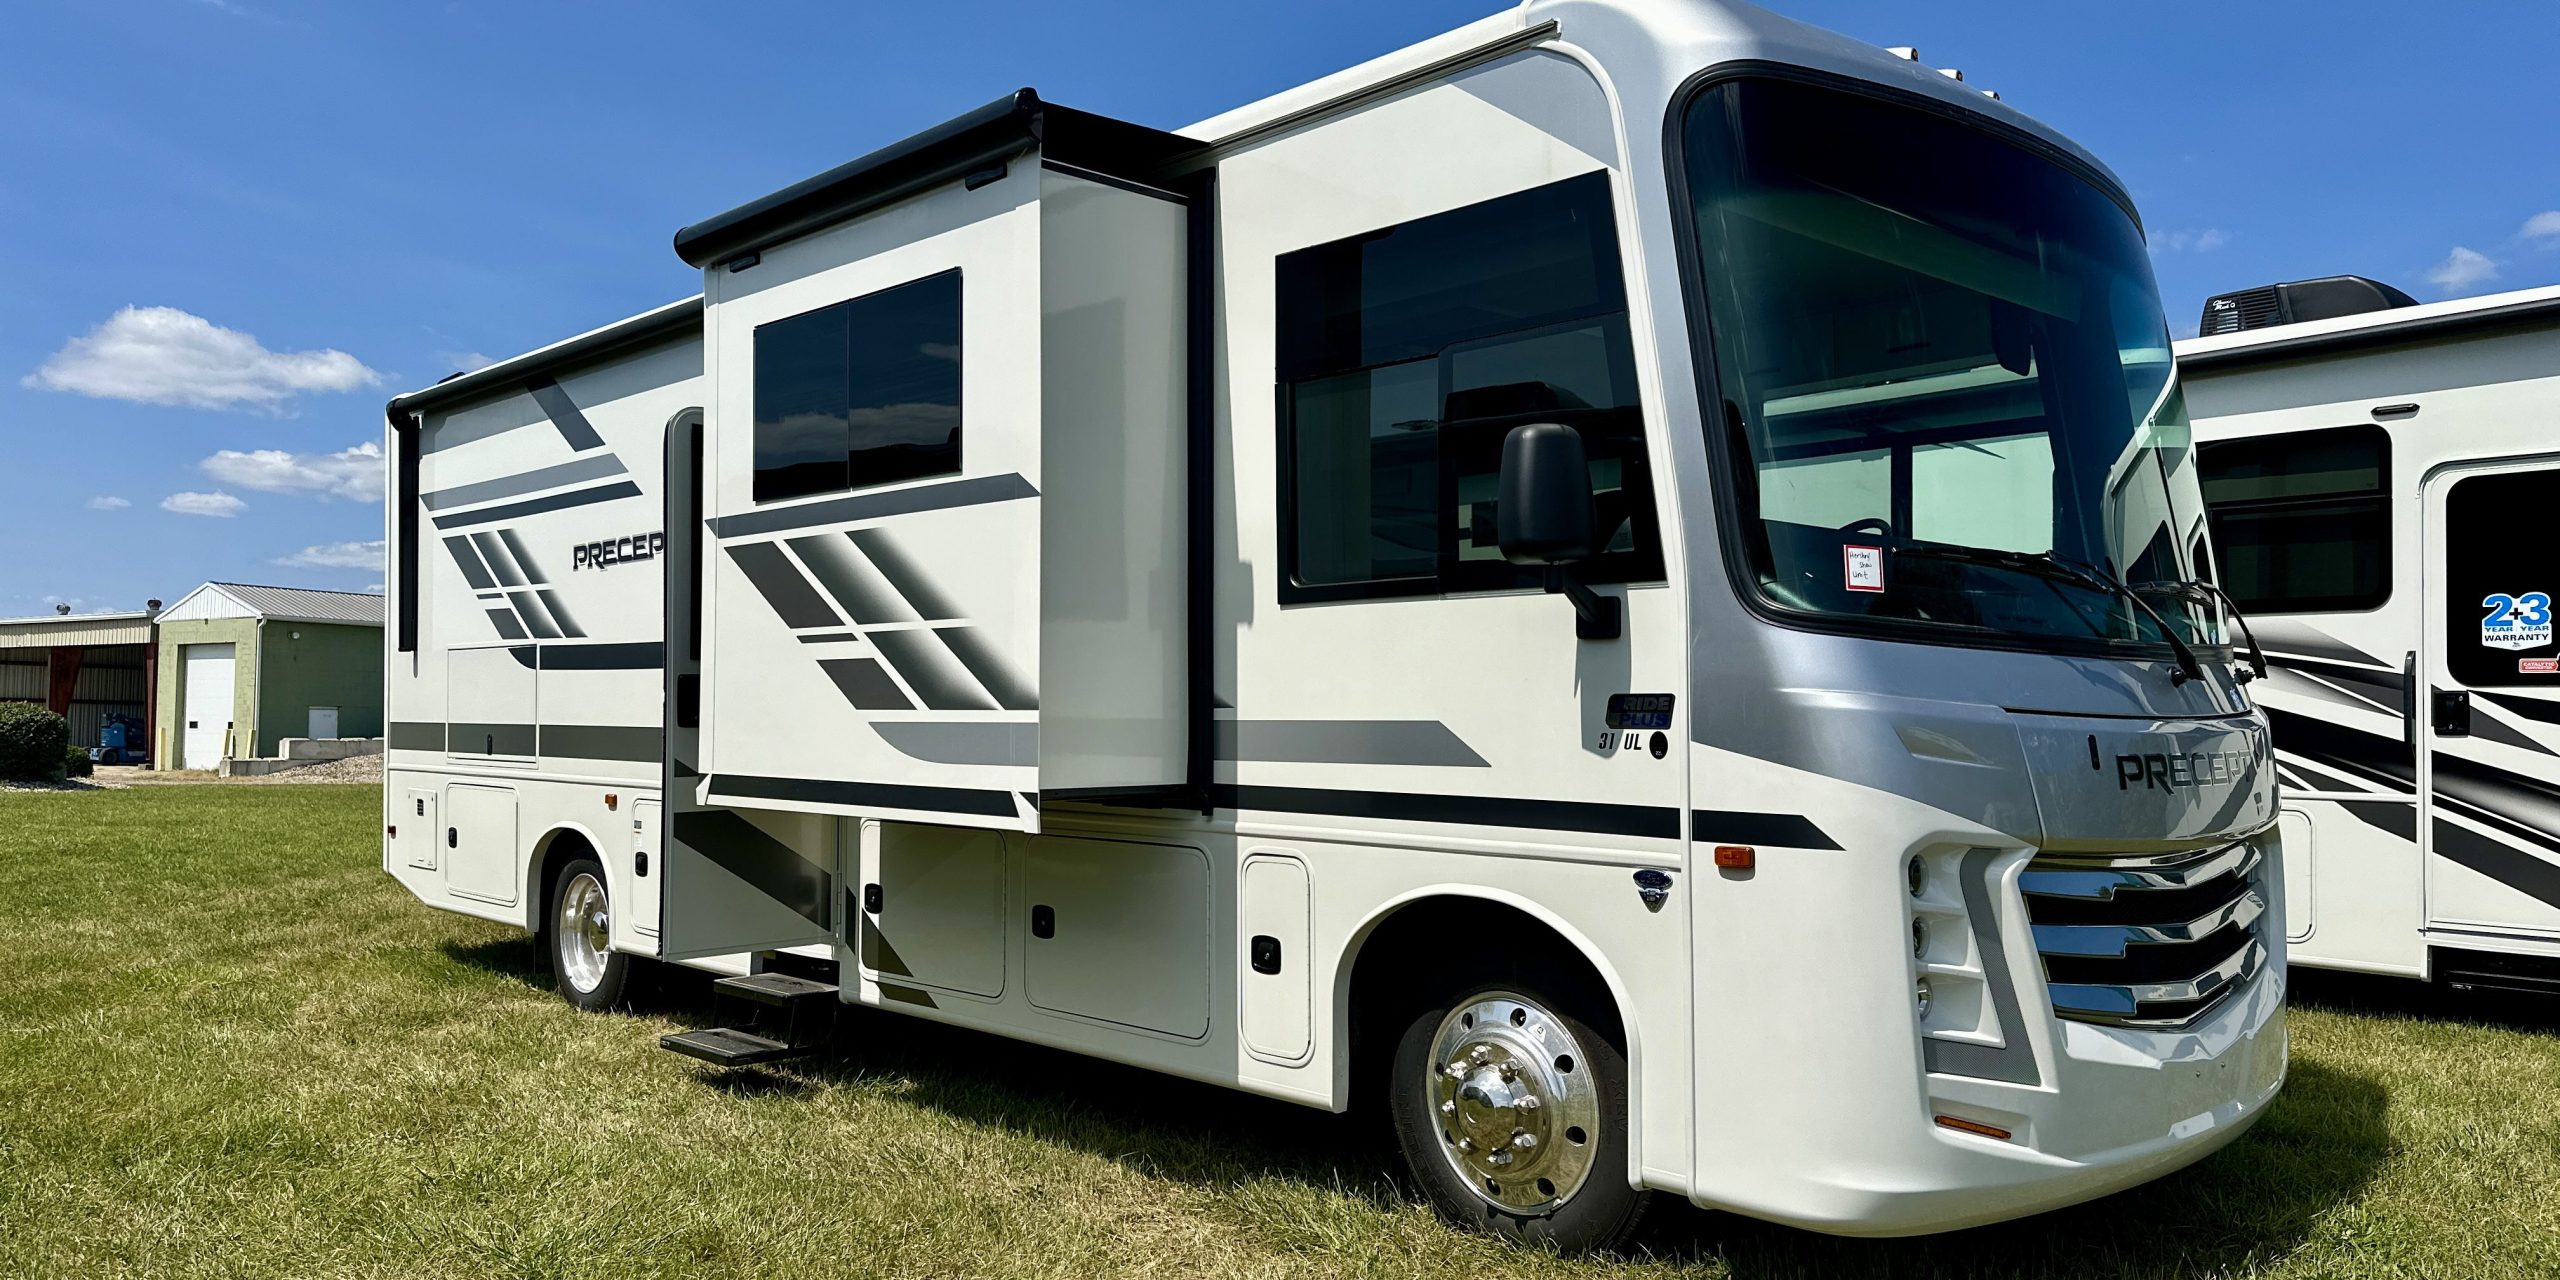
 If you’re looking for a