Author: Freedom in a Can

  • Carlsbad Caverns National Park: RV Camping and Travel Guide

    Carlsbad Caverns National Park: RV Camping and Travel Guide

    Did you know that the National Park Service manages and maintains 122 cave and karst systems across the globe? It’s OK if you didn’t. (And it’s also OK if you now want to Google “karst system.” We’ll save you the trouble: A karst is an irregular limestone region with sinkholes, underground streams, and caverns.) At one point, all this was new to us as well. When we started exploring the parks with our own RV, we had only heard of a few caves. (Nor did we know that there are six different types of caves.) Now, while every cave is fascinating and unique in its own way, Carlsbad Caverns National Park is one of the big names in the cave world. And there are good reasons why.

    Carlsbad Caverns National Park hosts some of the most spectacular and accessible cave formations in North America. It’s something to behold — a bucket list thing. A thing that you will always remember, as will anyone else you take. All this to say: It’s very worthy of an RV road trip.

    So, here are some highlights of this otherworldly park that’s located in the heart of the Chihuahuan Desert of New Mexico.


    Scenic Drives 

    As you might suspect, Carlsbad Caverns National Park does not offer a traditional scenic drive. (Naturally, ou can’t drive through the cave.) But getting there is half the adventure! The scenic beauty heading northeast on U.S. Route 70 out of Las Cruces into the Tularosa Basin allows you gorgeous views and the opportunity to explore White Sands National Park. Further along on U.S. Route 82, you can detour into the fascinating history surrounding Alamogordo, as well as the beautiful Sacramento Mountains and Lincoln National Forest to the north and east. Add a trip along U.S.  Route 62 to the nearby Guadalupe Mountains National Park (containing the highest peak in Texas), and you’ll have racked up three national park visits in one RV road trip!


    Must-Hike Trails 

    There are two options for self-guided cave exploration. One trail is pretty easy, but the other is quite challenging for many people.  Timed entry tickets for self-guided tours are required to enter Carlsbad Caverns and must be made online. This applies to everyone, even if you are an annual pass holder. 

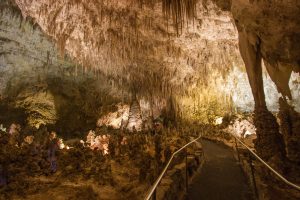
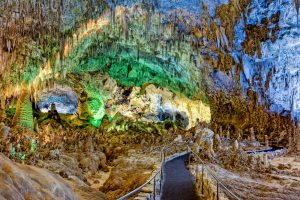
    • Take It Easy on the Big Room Trail. This relatively flat 1.25-mile trail allows you to explore the largest single cave chamber (by volume) in North America. You can take an elevator down to this room, or hike to it via the Natural Entrance. Note: For a shorter trail, there is a shortcut which reduces the walking distance to about a half mile. Also, parts of the Big Room Trail are wheelchair accessible.
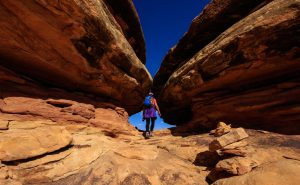
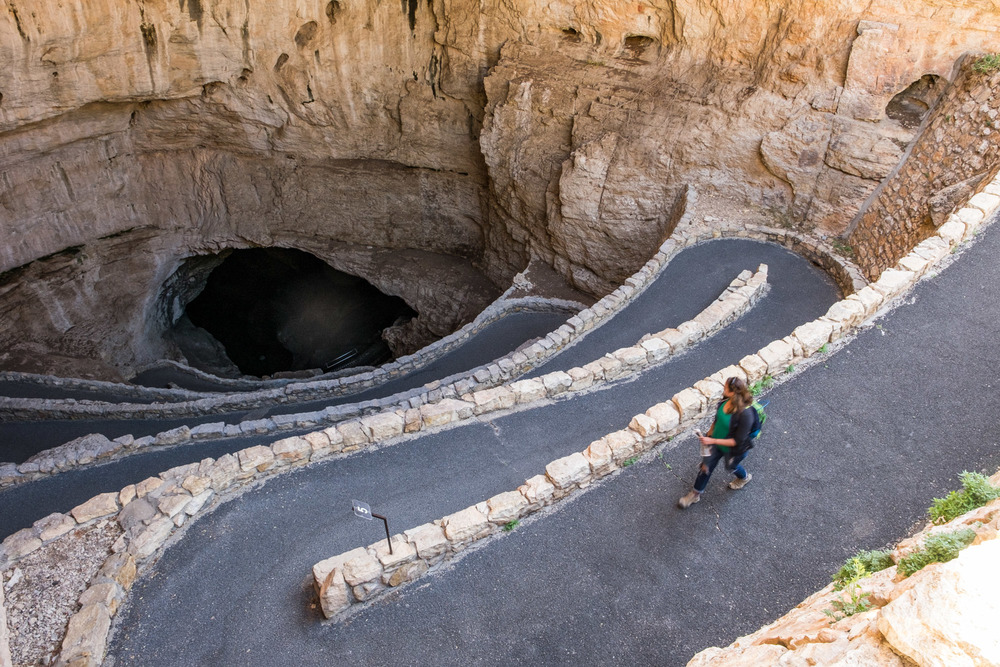
    • Descend and Ascend the Natural Entrance Trail. This 1.25 mile is extremely steep and allows you to follow the footsteps of early explorers as you pass various cave formations. The elevation loss (in) and gain (out) is 750 feet. For a little perspective, that’s equivalent to a 75-story building. Note: This trail is not recommended for visitors with heart or respiratory conditions, and is not an accessible trail.
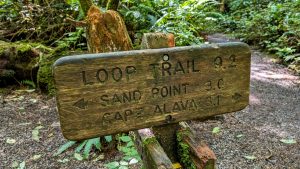
    • Enjoy Above Ground Trails. If caves simply aren’t your thing, you can opt for open air. The park offers several above ground trails. Among them include: Walnut Canyon Overlook, Chihuahuan Desert Nature Trail, Slaughter Canyon Cave Trail, Old Guano Trail, Juniper Ridge, Lower Rattlesnake Canyon, Upper Rattlesnake Canyon to Guadalupe Ridge Loop, Slaughter Canyon, Yucca Canyon, Guadalupe Ridge, and the Guadalupe Ridge Trail.


    Hiking into Carlsbad Caverns National Park via the Natural Entrance is a descent worthy of Dante.


    RV Parks & Campgrounds 

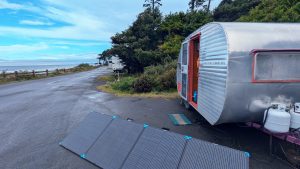
    There are no RV campgrounds within the park boundaries, and overnight RV parking is not permitted. Primitive camping is allowed in the backcountry only, and requires a free permit which is issued at the park’s visitor center when you arrive.

    If you’re not a primitive camper, the closest campground and amenities are available in White’s City, New Mexico. It’s about seven miles away. Also, Carlsbad, New Mexico (about 20 miles northeast of the park) also has a few campground options.  

    If you’re boondocking, the park is surrounded by Bureau of Land Management (BLM) land and they allow permit-free RV and tent camping.


    Seasonal Advice 

    For over 275 days out of the year, the park greets visitors with gorgeous blue and sunny skies! Temperatures ranging from 90 degrees to over 100 degrees Fahrenheit are typical during summer. So, bring plenty of water, do any outside hiking early in the day, use sunscreen, and wear a hat.  If you plan to explore the caves, bring layers as the year-round temperature in the cave is a cool 56 degrees Fahrenheit!

    If you plan to visit during the off-season or shoulder season, windy conditions and mild temperatures are common in early spring (March-May). And you’ll encounter frequent rain during monsoon season in late summer/early fall (August-September). During the winter, the Chihuahuan Desert can also be quite cold with occasional snow and icy conditions. 


    Insider Tips!

    Popular Programs & Tours

    • Ranger-Led Tours. Even if you plan to explore other parts of the cave system on your own, we highly recommend taking a guided tour first so you’ll learn about cave formations/ecosystems and know what you are looking at when you are on your own.  The King’s Palace Tour is the only guided tour currently available – space is limited and reservations are recommended.
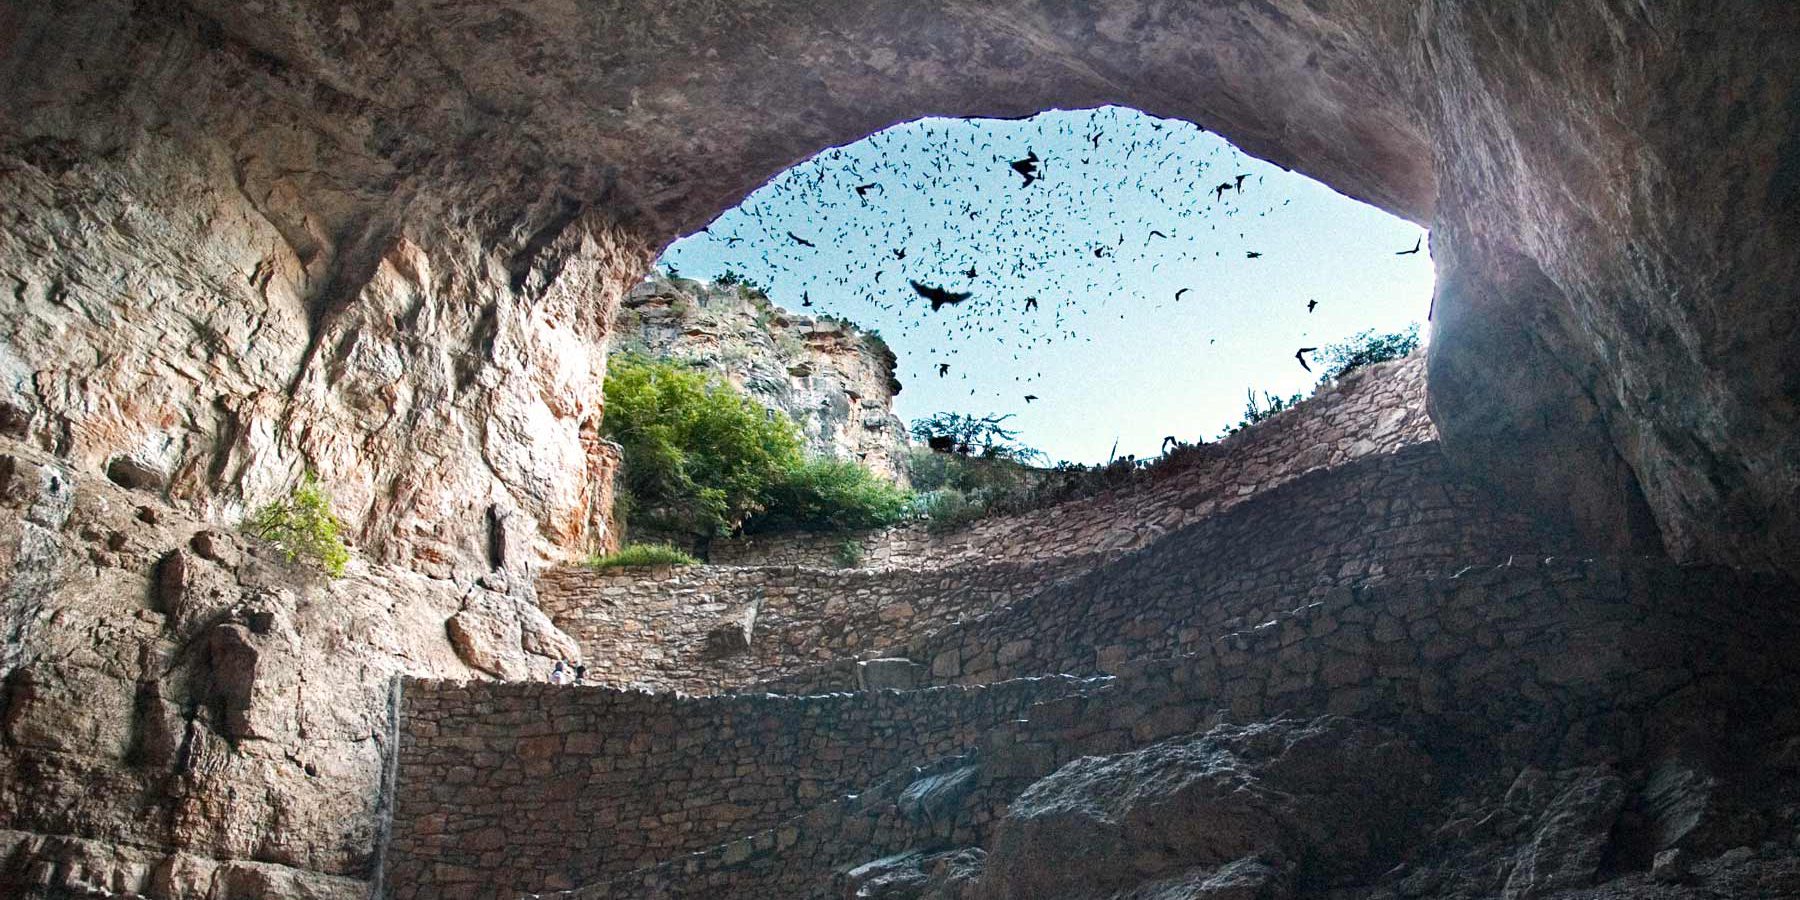
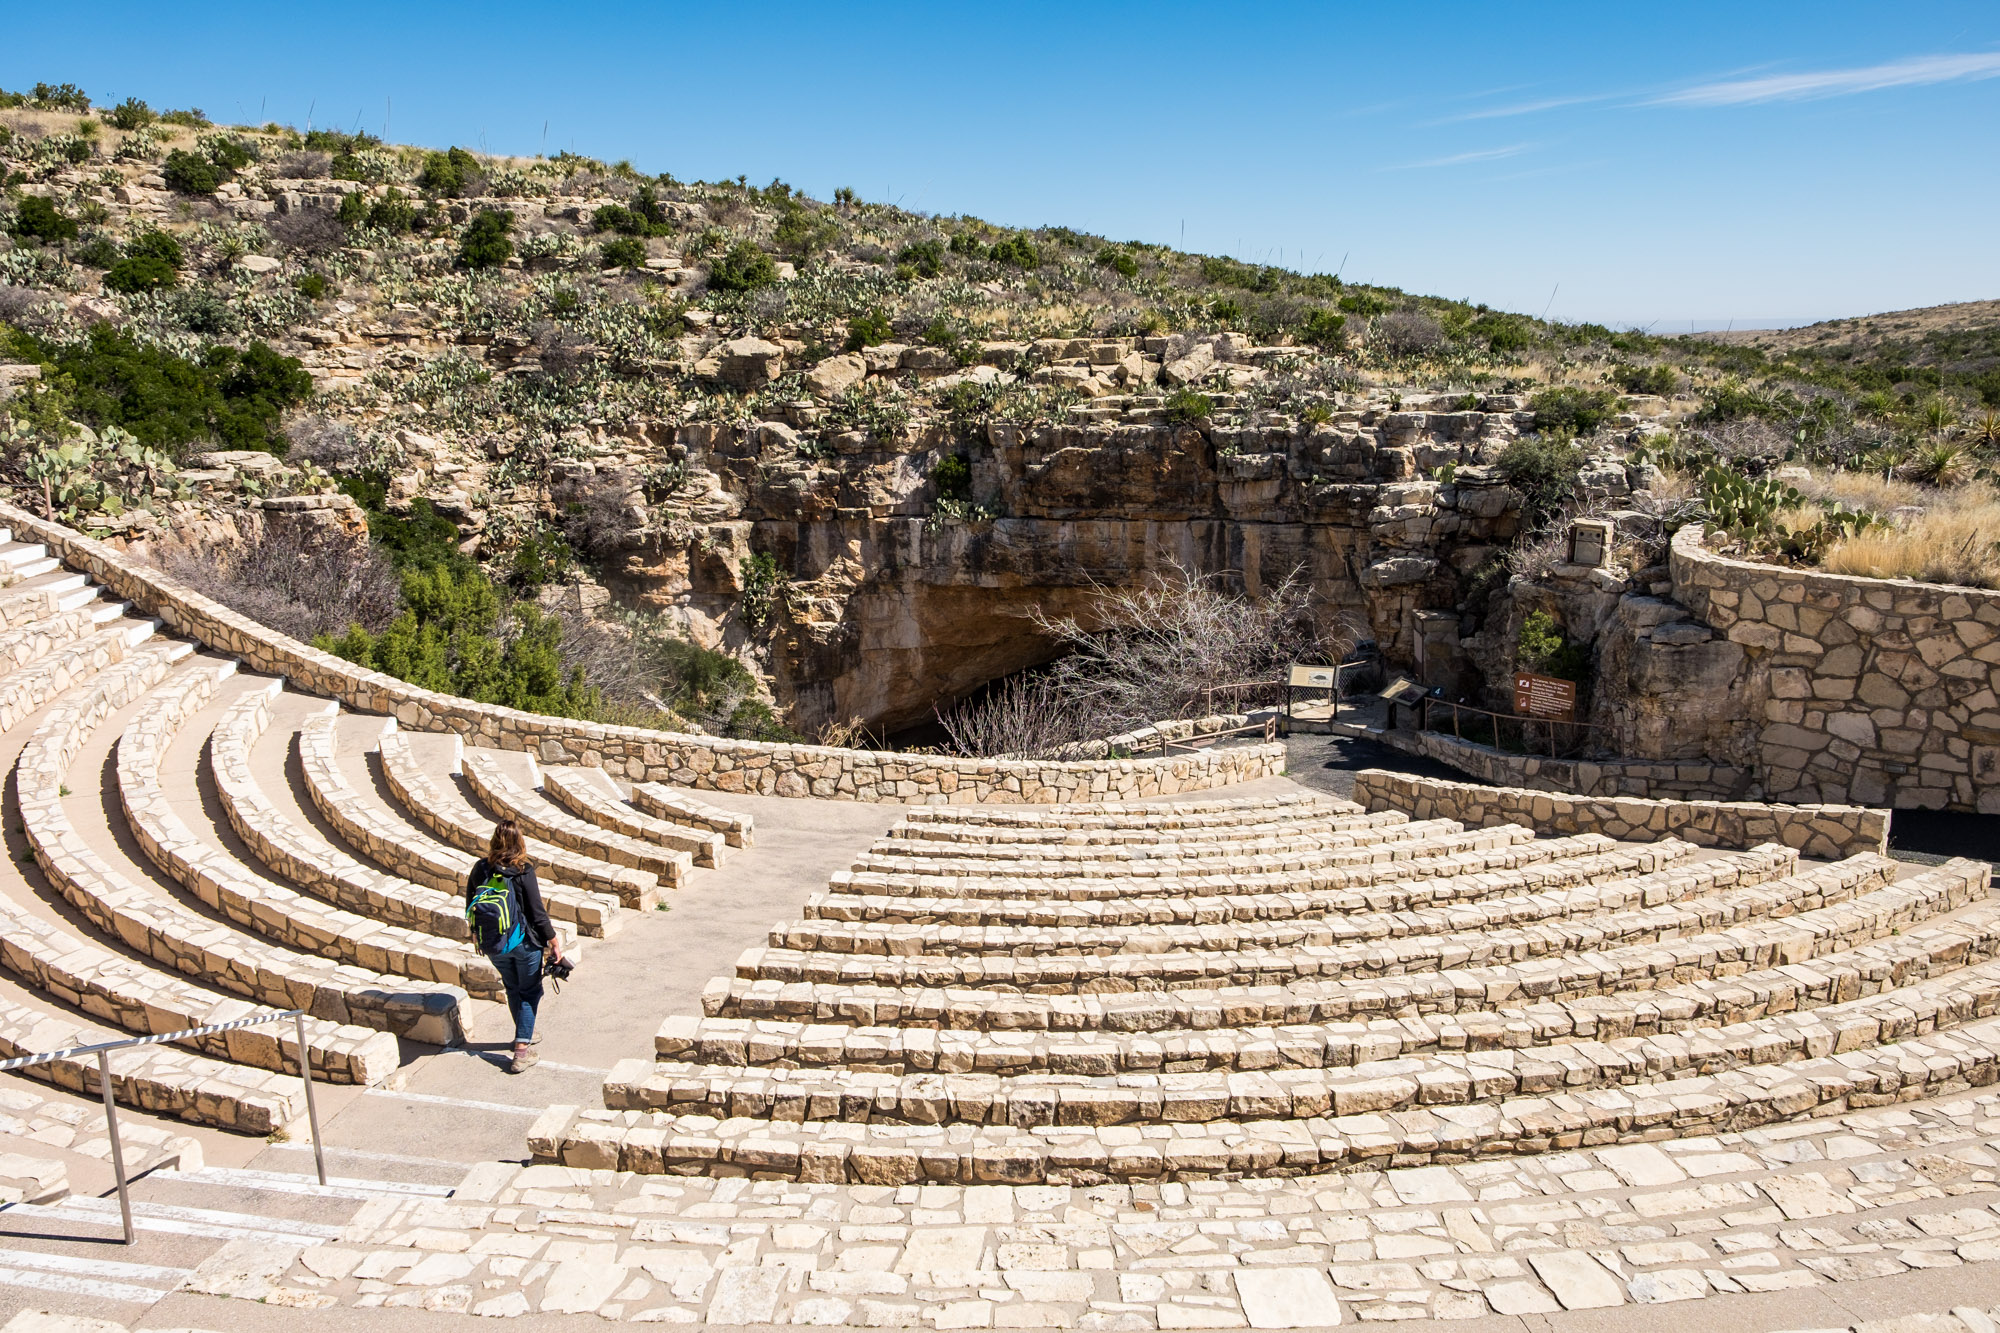
    • Bat Flight Program.  Hundreds of thousands of Brazilian free-tailed bats return to Carlsbad Cavern in April and stay through October. From late May-October, an evening program at the Bat Flight Amphitheater is offered every night prior to the bats making their grand exit from the cave!  No reservations are required and the start time for the program changes as the sunset time changes throughout the year.  Note: If you visit between late April and Memorial Day weekend, you can still watch the bats as they exit the cavern at dusk.
    • Dawn of the Bats. Bats are nocturnal animals. They sleep all day, hunt all night, then return to the cave at dawn. While watching their mass exodus from the cavern each evening is a nightly tradition, annually on the third Saturday of July, folks gather at dawn to watch their return to the cave.
    • Night Sky Programs. On several nights throughout the late spring, summer, and early fall, Star Parties and Night Hikes are offered by rangers. With the clear skies and lack of city lights nearby, you are (nearly) guaranteed the best night sky viewing you’ll ever experience.


    The Bat Flight Amphitheater.


    Special Precautions

    A disease known as white-nose syndrome is killing bats in North America. To prevent it from spreading, do not wear shoes, clothing, or gear into any cave at Carlsbad Caverns that were worn/used in another cave.

  • Olympic National Park: RV Camping and Travel Guide

    Olympic National Park: RV Camping and Travel Guide

    Early on in our national park travels, we fell in love with all that Washington State offers. There are emerald forests dripping in moss. And glacial peaks. There is coastal surf. And there are the Columbia plains. From end to end, Olympic National Park showcases a landscape full of diversity. So, as you might imagine, our recent deep dive into the Olympic Peninsula has only deepened our love affair with Washington State!

    What makes Olympic National Park so diverse, so exciting, and so worthy of an RV road trip? We’re happy to share everything we learned. That way, you can take your RV trip at the right time and be clued into all the incredible sights.


    Scenic Drives 

    Olympic National Park is spread out across the vast Olympic Peninsula. This strip of earth is uncanny. It contains ice-capped summits, dense rainforest, and an accessible rocky coastline. Which means that no matter where you are, the view is incredible and arresting. And that includes your RV’s view from the road. Taking the Olympic Peninsula Loop itself takes you 329 miles and about eight hours. But there are also several drives throughout the parkthat  highlight the best of each section.  

    • Hurricane Ridge Road. Hurricane Ridge* climbs from nearly sea level in Port Angeles, WA to 5,242 feet. The drive offers gorgeous mountain views of the Olympic mountain range on clear days. 
    • Highway 101 Detours. The peninsula’s western coast offers numerous stunning beaches such as South, Kalaloch/Ruby, and Mora/Rialto. Each showcases a beautiful, rocky coastline.  
    • Hoh River Road. Just driving into the Hoh Rainforest* is a stunner, a prequel to the trails you’ll find.
    • Sol Duc Road. The Sol Duc area offers both hot springs for soaking and Lake Crescent for water sports. The area is full of beautiful headwaters flowing down the mountain.
    • Hoko-Ozette Road. Picturesque and quiet, Ozette is a gateway to Olympic National Park’s coastal wilderness. It’s also the westernmost point of the contiguous 48 states – Cape Alava.


    *Be prepared for mid-day traffic during the busy season. The park meters vehicles coming in at the entrance station to avoid traffic jams in the parking areas.  Also, consider leaving your rig and driving either just your tow vehicle or your toad.


    Must-Hike Trails 

    The park maintains several hiking areas. So, you can expect to find something for all interests, time, and ability in every section of the park. (And really, all across the peninsula.) 

    • Stroll Through a Rainforest. Yes, you read that right: a rainforest. And yes, still in North America. Enter the famous Hoh Rainforest. Dripping in moss and lichen, you’ll be enveloped in nearly every shade of green. Stop by the visitor center next to the campground for a short ranger-led program, or better yet, take a ranger-led walk through the forest. 
    • Bring Binos on a Whale Trail. Trails along the western coastline beaches are dotted with tide pools and sea stacks as far as the eye can see. Hike a short distance from the parking areas, and you’ll experience fewer crowds and find your own special place. Bring your binoculars and keep your eyes peeled for spouts, you may just be blessed with a distant whale sighting!   
    • Give an Olympic Effort. Enjoy a more serious climb up to Hurricane Ridge for a view of Mount Olympus on a clear day. And if you are lucky, views can include Mount Baker and Mount Rainier to the north and east across the Puget Sound.
    • Stretch Toward the West. Hike to the westernmost point of the contiguous 48 states along the 4-mile (mostly boardwalk) trail out to Cape Alava from Ozette.  Worth every minute of the journey! 


    RV Parks & Campgrounds 

    The national park maintains 14 campgrounds with 11 of them open to RVs.  Just two are run by local concessionaires: Sol Duc and Log Cabin campgrounds. Both offer serviced sites.  Most campgrounds have only a few sites that can accommodate RVs greater than 30 feet, so plan ahead. Many of Olympic National Park’s campgrounds are reservation-only during the busy season, but a few remain first-come, first-served for those “less planned” travelers.  

    Beyond federal campgrounds maintained by the park, the peninsula offers many camping areas — national and state recreation areas, state parks, state land, county parks, as well as some low-key RV parks. While camping reservations are probably only necessary in the summer months, it’s good to confirm because each campground opens and closes at different times of the year.

    If you are equipped with solar power and interested in off-grid camping or boondocking, check out the iOverlander app for some good overnight options on the “edges” of the peninsula where you will find fewer trees.


    Seasonal Advice 

    The best time to visit Olympic National Park is June through September, though the months of May and October offer some unique beauty and fewer crowds. It is situated in a temperate rainforest along the ocean, so this peninsula gets a lot of moisture in the form of rain, snow, and low hanging fog. While we were blessed with sun for days on end, we also had off and on rain for an entire week.  Bring quality rain gear and comfortable muck boots to stay dry when this rainforest earns its designation!  


    Insider PRO Tips!  

    • The very best way to explore and experience this stunning park is by foot and by water, so bring those hiking shoes and kayaks/canoes!
    • The popular areas of the park can be very crowded between 10 a.m. and 3 p.m. So, channel your early bird or go later in the day to avoid pressure on roads, parking areas, and trails. 
    • The Olympic Peninsula is known for its temperamental weather, so give yourself plenty of time for your visit. Personally, we recommend one to two weeks to experience a variety of weather. 
  • RV Fire Safety 101

    RV Fire Safety 101

    While driving in the Texas panhandle, some folks pulled up next to us frantically waving and pointing to our travel trailer. We pulled over immediately. That’s when we discovered that one of our trailer’s tires had broken its bearing and was loosely spinning inside of the wheel well … no longer connected to the axle. Despite the wobbling and drag this must have caused, neither of us had felt anything from the front seats of our tow vehicle. Had it gone on any longer, a fire could have easily erupted — the exact kind of RV fire safety disaster no one wants to experience.

    The last thing you want to think about when you are dreaming about your next RV road trip is what to do in case of a fire emergency.  But, the 4,200 RV fires reported annually between 2018 and 2020 mean that you have got to take RV fire safety seriously. So, how can you prevent and prepare for an RV fire? Think about the following: 1) your RV, 2) yourself, and 3) your family. 

    So, let’s start with how to prepare your motorhome or trailer for RV fire safety.


    1) Preparing Your RV: Fire Prevention Strategy and Protection

    RVs are small houses with many of the same working systems of a traditional home. But most of those don’t rattle down the road.  Maintenance and cleanliness of each system is the first step in fire prevention. Here’s a checklist of items to assess on your RV.


    Mechanical  — Engine, Running Gear, and Wheels

    Over 26 percent of all RV fires start from the engine compartment or near the wheels and other equipment needed to enable the RV to travel smoothly. So it’s especially important to ensure that your bearings, brakes, axles, and the vehicle’s engine is regularly serviced and free from debris* (see note at bottom of section). One key piece of equipment to help keep an eye on things is a remote tire pressure monitoring system — especially when pulling a travel trailer or toad.


    Electrical — AC & DC Wiring

    Most RVs have two electrical systems — both an alternating current (110-120V) system like in a traditional home, and a direct current (12-48V) system that is energized directly from your battery bank. Typically, the AC side is only electrified when plugged into shore power, or through an inverter which is powered from the DC battery bank.  

    All wires need to be sized appropriately for the intended load, and the length of run from source to outlet. Additionally, each wire circuit needs to be fused appropriately to protect the wires from overheating. Doing any of these things incorrectly can cause wires to heat up and catch fire.  

    Other electrical fire sources can be loose fitting or worn connections. Vehicle vibration will inevitably loosen electrical connections overtime and loose connections can become an ignition source. Regularly check any connections that use nuts, screws, or bolts and retighten appropriately. Visually inspecting all connections, switches, and appliances for corrosion or discoloration is a good habit as well. 

    When plugging into shore power, always connect to an appropriate circuit for your RV’s load. Never try to run a 50A load through a 30A circuit, or 30A through a 15A, even through an adapter. While most campsite electrical posts are fused to prevent overloading, do not rely on this as a protection for your own RV.  


    Liquid Propane Gas

    Potential fires can come from any misuse, leak, or clog in the LPG system. Inspecting the propane line(s) for wear and tear from its source at the tank to the appliance is a good practice, especially if its path is close to any moving parts.  

    Propane has a particularly noxious odor (rotten eggs) that alerts us to its presence. If you smell it, get everyone out, and immediately shut off the LPG at the tank valve. Small leaks can go undetected. All RVs should have an LPG detector installed near the floor because LPG is heavier than air and will collect in low spots.  

    Exterior furnace or refrigerator flue vents can be a source for ignition if they become clogged* (see note at bottom of section), or if you are parked too close to another vehicle or structure. Be sure to keep adequate space for combustion fumes and heat to dissipate.  Inspect all flues and vents prior to using the propane after storage.  

    When in doubt, have your LP gas and electrical systems checked by a certified RV technician!


    Kitchen

    While cooking fires are a small percentage of the total fires reported, good practices are important:

    • Keep the cooking area clear from other flammable materials (e.g., paper towels, grease, etc.).
    • Regularly clean the gas burners and/or oven, or use an induction stove.
    • Avoid leaving the RV while cooking. Take a timer with you if you have to leave momentarily.


    Exits

    All RVs should have at least two exits. And everyone spending the night should know where they are. Any window exits should be able to open completely without a screen impeding the egress.

    *Don’t forget to check for this! Animal nests, especially small rodents, can be a major RV maintenance issue, especially if you store your RV for any length of time unoccupied.  


    Protection Devices

    Adding and regularly testing the following devices can save lives. Most have a 5-year lifespan from the date of initial installation.

    • Smoke detectors should be near the cooking area and in each sleeping area.  Closing doors between rooms at night can help compartmentalize any fire.
    • Carbon monoxide is an odorless and deadly gas that is a byproduct of combustion. CO detectors should be near the engine compartment in all self-propelled RVs as well as in all sleeping areas at shoulder level.
    • LPG detectors should be installed near the floor by a propane source.
    • Fire extinguishers should be located just inside every door, including a labeled and unlocked exterior hatch. Regularly checking to see if they are still operational should become a habit and each model will have instructions for testing.  


    2) Preparing Yourself: Flight or Fight?

    People before property is always the first priority of dealing with any fires. Knowing whether this is a fire you can fight, or you should leave it to the professionals, is crucial and could save lives.  


    If you choose to fight…

    Always get everyone out. Then call 9-1-1. And only then try to fight small fires only with a reliable and appropriate fire extinguisher.  Never try to put out a grease kitchen fire with water because it can actually cause an explosion of steam and flammable oil!


    If you choose to go…

    Have a three-day go bag near the main exit with the following: 

    • Extra cell phone, family contacts, pet records, and copies of important paperwork.
    • Extra clothes, shoes, and medications for a few days. 
    • Extra credit cards, keys, IDs, and some cash.  
    • Personal-sized “wet chem” fire extinguisher, headlamps, hammer, whistle, and road flare.


    3) Preparing Family and Guests

    Including your family (including children) in a fire prevention plan is key!  

    • All people sleeping in the rig should know where the designated exits are, how to reach them in the dark, and how to get out of them.
    • Everyone should know the location of all fire extinguishers and how to use them.
    • Have a designated meeting location in case people need to leave from a different exit.
  • Basic Tools to Always Keep in Your RV

    Basic Tools to Always Keep in Your RV

    Who doesn’t love a good power tool workshop? Even if you don’t know a biscuit cutter from a drill press (or your soldering iron from a spoke wrench), it’s hard not to admire a well-laid out and organized workroom of the modern DIYer. But whether you have a tidy tool shed at the house or a hot mess of tool chaos, the fact is that neither will fit into your RV lifestyle. So, what are the essential tools to keep in your RV toolbox? (Because if you know anything about the RV life, you’re going to need them.)

    Quite simply, ith limited space, you’ll need to pair down your tools. You know, to what can fit in the back of your vehicle or dedicated storage area in your RV. When we first hit the road in 2012, we took just the most important hand tools. In fact, we’ve managed for years with what could fit into a traditional, two-layer toolbox. When weeding through your tools, think about both multi-purpose and specialty tools. 

    Here are some of go-to tools to keep in your RV.


    Standard Tools for Your RV Toolbox

    Alright, let’s take a look at the tools that are worth their RV weight.


    • 4-Way Cross Wrench
      Also known as a “spinner wrench” for changing a tire. You need to be able to loosen the lug nuts on your towing vehicle and the trailer. This tool is a one and done!  

    • Multi-Bit Screwdriver
      We keep our goto multi-bit driver in the driver’s door compartment so we can swap out different bits for Phillips, standard, square, or hex fasteners in a jiffy.

    • Adjustable Wrench
      Alongside the screwdriver in the driver’s door, this is ready for use at a moment’s notice.  

    • Multi-Tool
      Love your Leatherman or Swiss army knife? And there’s a good reason why! We reach for this tool most often when we need some multi-purpose needle nose pliers or a flathead screwdriver.

    • 5-in-1 Tool
      All toolboxes should be sold with this handy tool already included. We use it for everything from scraping and prying to spreading and cleaning paint rollers.  

    • Channellock Pliers
      These are adjustable and useful for tightening (or untightening) jobs that require some extra umph, as well as in the kitchen to remove anything hot on the stove or campfire.  

    • Hatchet/Hammer Combo
      This is a great 2-in-1 tool for camping. It not only helps prepare kindling and larger firewood, but also helps drive a few tent stakes for any outdoor shade or rain shelter. The hammer head on the reverse side of the hatchet blade will work for any other small pounding tasks.  

    • Cordless Drill/Driver
      If you have to choose only one power tool, this is it. Chalk in a bit large enough to handle your stabilizer jacks, and you’ll use this every time you set up the rig. A cordless drill is as helpful on the road as it is in your home, so be sure to bring it along with the charger, an extra battery, and set of drill and driver bits.  

    • Socket Set
      While you probably don’t need the big set, the junior set is very helpful to tighten many things on the truck or RV – making the job 10x easier. 

    • Blow Torch
      Surprised? From quickly starting the evening’s campfire to melting the cheese on a batch of nachos or pizza, these come in handy when needing a quick blast of heat. Oh! And also to heat shrink plastic tubing, reshape a plastic fitting, sweat a pipe fitting, thaw out frozen copper pipes, and more. 

    • Utility Knife
      There’s no end to the usefulness of a good blade and these inexpensive box cutters always earn their place in your small toolkit. 


    Electrical/Solar Tools

    These tools work with both AC and DC wiring. They’ll come in especially hand if you’re doing DIY work on your RV solar system

    • Wire Cutter/Stripper/Crimper Combo

    • Wire Nuts and Connectors

    • Electrical Tape

    • Zip-Ties 

    • MC-4 Tool
      For installation and quick disconnect of standard solar panel connections.


    Plumbing Tools

    Most RVs have moved away from copper pipes and rely on higher pressure PEX and PVC pipes for drains and waste water. The benefit of PEX is that they are flexible, seal easily with the proper fittings, and are less likely to be damaged by freezing temperatures.

    • Small Saw/Coping Saw.
      Works great in small spaces and cuts through PVC plastic easily to replace a section of pipe if needed.

    • Crescent Wrench Set.
      Helps to remove faucet and water tap fittings, though an adjustable wrench works well, too.


    Structural Tools

    Every now and again, something will come loose on a house that rolls. Many of the tools listed above will help snug something up.  Also, keep a variety of cabinet and finish screws on hand, and you’ll always be able to get something back together. Much of the cabinetry in modern RVs is made of particle board covered in vinyl wrapping. 

    Pro Tip!  To get a snug fit, pre-drill the hole, slip a toothpick inside the hole, replace the screw, and don’t overtighten.  Use wood glue if the problem persists!

    ***


    Being able to handle a repair on the road? Yeah, that’s good for morale.


    While you may find that you need a few more things along the way, this list will get you started on your first RV road trip. Naturally, no one likes to think they’ll need to do a lot of repairs. But when you’ve identified the basic tools to keep in your RV, you give yourself a better chance at handling the unexpected when it comes your way.

  • Part-Time RVers, Beware! You May Get Hooked

    Part-Time RVers, Beware! You May Get Hooked

    We remember it well. Just six months into our part-time RV lifestyle, Hutch looked up from the sci-fi book he was reading by candlelight and asked me, “Do you want to go back?” 

    “You mean, home?” I clarified. 

    Hutch replied, “I think we might actually be home for the first time.” 

    Suddenly, our part-time RV escape was looking like a life of adventure.


    “We were caught in the spiral …”

    During our first 14 years together, we worked to complete our master’s degrees. We secured jobs in the same town and maintained a successful, traditional Western lifestyle. It was one that most young couples dream about. We had a three-bedroom home in the mountains. Plus, two busy careers, two cars, two weeks of vacation per year, a community of loving people, great colleagues, et cetera.  But, the success”that we had worked so hard to build for ourselves didn’t necessarily fit who we were or who we wanted to be. It didn’t even really make us happy.  

    We kept saying that we wanted to live more sustainably, but we didn’t even really know what that truly meant. We were caught in the spiral of working 50- to 60-hour work weeks. Then there was remodeling our home; planting a garden and mowing the lawn; squeezing in vacations and family visits; stressing out over being able to get it all done; and not sleeping well. And we were starting to see the ill effects of it all on our health. (And we didn’t even have children, so we can only wonder at how the rest of y’all do it?)


    “We thought it would be for a year, maybe two at most.”

    When we launched from our home in the Blue Ridge Mountains of North Carolina on September 3, 2012, we took a deep breath. We made the first of many leaps of faith by pulling out of our driveway. This special day was our 12th wedding anniversary, and this midlife, part-time RV adventure was intended to be both a gift to ourselves and our marriage. We had just quit our busy university careers, downsized our life, rented out our home, said so long to friends and colleagues, and hit the road in a restored 55-year-old camper which I had purchased on eBay in 2010 after having “that day” at work. (And you know what type of day we are talking about here.) Simply put, it was time for a change to something more sustainable —and drastically different. We thought it would be for a year, maybe two at most.

    Six months of exploring our continent turned into two years. Two years turned into eight. And now we can claim that we’ve spent half of our 24-year marriage traveling around North America. (It’s definitely been the better half!) We’ve put 200,000 miles on our vintage, rolling, solar-powered, 72-square-foot rig that we purchased for $900. Some would call us crazy; others brave, or even lucky. But this lifestyle simply fits us.  


    “The freedom to explore the natural world.”

    If we had a nickel for every time we’ve heard, “You are living our dream! We want to travel for a couple of years around the country, but it’s gotta be expensive.” Our response is always the same, “Don’t let us live YOUR dream! It doesn’t have to be expensive.” We can easily live on less than $30,000 per year — for absolutely everything. It simply depends on your priorities and how you like to camp. 

    Our solar powered, traveling lifestyle gives us the freedom to roam. The freedom to explore the natural world. The freedom to live off-grid, and to visit friends and family scattered across the country. We have the freedom to volunteer for causes we believe in, and the freedom to work from the road. And we are not just surviving. We are thriving! To date, we’ve explored all 50 states, 10 Canadian provinces, and have left our rig behind to volunteer and travel abroad. We’ve hiked, biked, and kayaked through every U.S. national park to which you can drive, as well as a few that require a flight or ferry.  


    “Those seeking a different way of life”

    For the first couple of years, we lived off of our modest savings. During the following few years, we worked seasonally in campgrounds, as outdoor and environmental educators, and regularly picked up odd jobs and side gigs. Now, we run an international, mobile business from our RV, which focuses on living a sustainable, traveling, active lifestyle. We’ve met thousands of others who make a living while traveling – either working online, for a local business, or for themselves. It’s all possible, it just depends on what you love to do and making it happen. The number one resource that we recommend for folks who are new to the road is Escapees RV Club.  Their endless resources, community of fun people, and job opportunities are a tremendous asset for those seeking a different way of life.

    When we meet other full-time RVers at campgrounds and boondocking areas around the country, we often exchange where we are from, where we’ve recently been, and how long we’ve been on the road. Early in our travels, we met very few folks our own age… most were either fresh out of college or retired. But, since 2020, we’ve met hundreds of people of all ages who are trying out a mobile lifestyle for the first time.  


    “Be careful y’all …”

    While the full-time RV life isn’t necessarily for everyone, it is certainly a refreshing change from the grind – as our curious participants at our RV show seminars often hear us say, “Be careful y’all: Part-time RVing is just the gateway drug!” We are living evidence of that.

  • Shhh… These RV Work Trade and Volunteer Jobs Pay

    Shhh… These RV Work Trade and Volunteer Jobs Pay

    It’s a common problem. You may be ready to drive off into the sunset in your RV, but … your bank account isn’t up to the challenge. Well, do you love to share your skills with others as well as learn new ones? If so, RV work trade and volunteer jobs pay more than you might think!

    When we drove away from our home, careers, and community in the fall of 2012, we were in our early forties and ready for something completely different. While living and traveling in our vintage rig, we spent several years doing volunteer work and work-trade in order to build new skills, try new things, discover new parts of the country, and meet new people. (All while stretching our savings account a bit further. )

    Unexpected Benefits

    There are lots of good reasons to do this. You may be officially retired and want to offset some travel costs. Or maybe you’re a in a couple where one person is not yet retired, but the other is seeking something meaningful to dig into each day. Jumping into RV work trade and volunteer jobs will often do more than give you a place to park your rig. Many organizations also provide some meals/potlucks, as well as bathroom, laundry, and Wi-Fi privileges. We found that these extra amenities drastically lower our living expenses for a few weeks (or even months). All while we give freely of our time to various organizations across the country!

    The best parts are that you don’t have to be an expert. And you don’t need to work full-time. In fact, most are just part-time opportunities. This gives you time to explore the area. You just need some related, transferable experience, a positive attitude, and a willingness to try and learn new things. 

    So, here are some examples of RV work trade and volunteer jobs while traveling around the country in your own home on wheels.


    Love to garden and play in the dirt? Farmers will dig you.

    Try organic farm work at small, family-owned farms; we’ve volunteered on farms from Maine to Hawaii.  You’ll meet like-minded people and learn a whole host of new skills as well.  And, don’t even get us started about those amazing potlucks! Check out Worldwide Opportunities on Organic Farms for details.


    Here’s Hutch working at Full Moon Farm.


    Have office, people, or landscaping skills? Campgrounds want workampers.

    Workamping and campground hosting are great options for folks of all ages and abilities.  Each opportunity and each campground requires different skills and abilities, so be sure to carefully read the details of each position.


    Enjoy music and festivals? Help is music to their ears.

    Many festivals hire an army of volunteers and provide them an RV spot in exchange for their time. Check out Music Festival Wizard for a list of opportunities. We recently volunteered at the Albuquerque International Balloon Fiesta for 11 days and had a blast! 

    Pro Tip: You can peruse the AIBF volunteer options before February 1 for that year’s event, but applications become available on the first day of February each year. And the good ones often fill up quickly.


    Who would have guessed that you can volunteer at a balloon festival?


    Got construction skills or want to learn some? Use them for good.  

    Join a Habitat for Humanity RV Care-A-Vanner Group Build! These builds are held all over the country at different times of year and many offer RV spaces (and even electrical/water hook-ups) to their volunteers. Bring your skills, meet people from all over the country, and make some new friends.


    Have teaching experience and love the outdoors? Our parks need you.

    Several federal agencies (national parks, monuments, historic sites, etc.) and many state parks around the country need educators to lead interpretative tours for visitors. We’ve volunteered as Environmental Educators in a couple different parks — and many of these options even come with a campsite in the volunteer/staff campground as well as a park pass for the year.  

    Note: Full background checks are typically required for these positions.


    Shari volunteered as an environmental educator at Acadia National Park in 2015.


    Want to help with disaster relief? Partner and deploy. 

    Join the DOVE program — a partnership between Escapees and the American Red Cross. When disasters strike, RVers are deployed to assist with a variety of critical needs. Typically, RVers need to be self-contained and provide their own power and water.  Many RVers group up and park close to each other to support each other’s needs as well as the folks they are helping through the disaster.  

    Note: Training is required for this opportunity, as well as a full background check.


    ***

    So, why even consider waiting around for another decade in a job you don’t like when you can simply jump into your RV and hit the road NOW? You may not be ready to retire. You may not want to stop working. Or maybe you just want to offset some costs of your road trip. Trust us, there are so many opportunities out there! But we guarantee you that they won’t come knocking at your door, you’ve got to go out there and find them.  


    Want to learn more about working from the road? This article is part of our Working from the Road 101 series.

    The Essential Mindset to Work from Your RV (Part 1)
    Seasonal RV Jobs and Side Gigs: How to Find Them (Part 2)
    Everything You Need to Work Remotely from Your RV (Part 3)
    RV Work Trade and Volunteering (Part 4)

  • Does a DIY RV Solar System Install Make Sense for Me?

    Does a DIY RV Solar System Install Make Sense for Me?

    There’s something very American about a do-it-yourself (DIY) project. But a DIY RV solar system project can seem daunting. Even so, don’t overlook the benefits. Beyond proving your rugged individualism, one of the great things about installing your own RV solar system is that you will know it well. And should something go wrong while you are boondocking, you’ll have the tools as well as the skills to fix it. 

    Back in 2011, when we did a full renovation of our vintage camper, we started with zero knowledge of how to do any of it — much less DIY an RV solar system install. But, with some patience, resourcefulness, and time, we did 99 percent of it ourselves. Over the past 12 years, we’ve had the opportunity to teach thousands of RVers how to install their own solar powered system — both in person and online.  

    Curious whether your up to the challenge of a DIY RV solar system? Take this short quiz to determine if you have what it takes to DIY.


    The DIY Quiz to Assess DIY RV Solar System Ability

    1. Do I have the free time to do this?

    While we know that everyone who wants to learn how to install solar can do it themselves, it’s important to be completely honest with yourself about your schedule. If you are new to solar, these projects can often take three times longer than you think. Consider doing part of it by yourself and hiring a professional to do the rest. Weigh the cost-benefit of both options and be sure to be realistic.


    2. Do I have the space to work on my rig?

    It’s one thing to be able to store your camper in your driveway, but do your community regulations allow you to work on it there as well?Not every neighborhood allows RVs to be parked long term and/or be under construction. 


    3. Am I able-bodied enough?

    Some of this work requires getting up on top of the roof of your RV, while other parts require laying down on the ground underneath it, as well as wiggling into some tight spaces. If you are able-bodied enough to deep clean your house or do yard work, then you are probably able-bodied enough to DIY your own system.


    4. Do I want to spend the time on the research?  

    There’s a lot of information out there – some great, some…well…not so much.  Sifting through it all can be time consuming and frustrating for newbies. We’ve compiled a list of great DIY resources in addition to making our own resources easy to follow and understand for the beginner. 


    5. Do I own the right tools?

    You don’t need expensive power tools to install solar, just some basic hand tools.  We have everything we need in a toolbox in our truck. If you are a handy homeowner or do basic work on your car, you probably already own these or can borrow them from a friend.  


    6. Do I have a friend or relative with handyman/mechanical skills?  

    None of us get by without a helpful, handy friend. Make a list of everyone you know that works on their car, RV, or house.  For the price of dinner and a 6-pack, you can often enlist their help. And, remember, we can be that friend for you as well as we offer free solar coaching.


    7. Can I still do middle school math?  

    To calculate the size of your solar powered system to meet your energy demands, you need to determine your average daily watt hours based on the appliances you use in your RV or van. While this is just basic middle school math, this solar system sizing worksheet will do most of the hard work for you.


    8. Can I identify the difference between AC and DC wires?

    RV’s and vans have both AC (alternating current) and DC (direct current) electrical systems that run various appliances. It’s important to understand what each system does and how to identify and size the wires* within each system as they can differ depending on whether they run standard household appliances (AC) or fans, slideouts, water pumps, etc (DC). *See pages 37-38.


    9. Can I follow a recipe? 

    If you can bake a cake or prepare a holiday dinner, you can probably follow a wiring diagram. Take it step-by-step and be sure to read all the instructions before diving into the installation of any new components. Check out this video series to watch a full installation… then decide for yourself!


    Got Your Results?! Here’s What’s Next

    If you answered mostly YES to these questions, you are eager and ready to DIY your own system! If mostly NO, it’s important to listen to that realistic voice in your head and hire a professional to do part OR all of the installation for you.  We wish you the best of luck and reach out if you need assistance!


    In our next installment, we’ll walk you through a self-assessment to determine if you have what it takes to DIY your own RV solar powered system…or hire a professional installer?

    What to Look for in a Solar-Ready RV (Part 1)
    5 Solar Components Every RVer Should Know (Part 2)
    RV Solar Explained … with Middle School Math (Part 3)
    Does a DIY RV Solar System Install Make Sense for Me? (Part 4)
    Choosing the Right Solar Powered System for My RV (Part 5, Coming Soon)

  • RV Solar Explained … with Middle School Math

    RV Solar Explained … with Middle School Math

    Want to boondock with solar? It’s so easy. Any off-grid solar powered system just needs to do four things: 1)Transform solar energy into an electrical current (solar panels); 2) regulate the electrical current for appropriate battery charging (charge controller); 3) store the electrical energy for later use (battery); and 4) transform the stored current to power household appliances (inverter).

    Easy, right?

    Look: We get that solar can be a little daunting for beginners. We’ve been there. When we built our own solar-powered system in 2012, there was a barren of resources.  But now, 12 years later, we have good news: There’s an all-you-can-eat buffet of information. Some of it is great, and some of it … not so much.  

    Taking the lessons learned from 12 years of living with solar, we created a worksheet to help RVers size, select, and price out the components needed to build a custom, off-grid, solar powered system.


    AC/DC: The Two Rockstars of Electricity

    Direct Current (DC) = current that flows in one direction within a circuit from source to appliance, just like water, from a place of higher pressure to lower. Solar panels create and batteries store/release DC current. Appliances including lights, fans, water pumps, smartphones and even some RV refrigerators can run directly off of DC power.

    Alternating Current (AC) = current that moves back and forth from the source to the appliance all along the circuit. It is the type of current that connects to our houses, and powers a standard household outlet. Anything with the typical two or three prong plug needs AC power in order to function. 


    Basic Electrical Terminology

    Forgive us if you’ve already read our summary of a few of these essential terms in our previous article. Understanding them is so vital, it’s always good for a little review. Let’s use the analogy of water flowing through a pipe to discuss these terms.

    Voltage/Volts (V) = a unit used to measure the pressure within the electrical system. Imagine water flowing through a shower head, volts would measure the pressure of the water in the system. 

    Amperage/Amps (A) = a unit used to measure the flow of the electrical current in the system. Back in the shower, if volts is pressure, amps measure the flow rate of the water moving through it.

    Wattage/Watts (W) = the unit used to measure the work completed by the electrical system; it is the product of volts and amps.  This is an important equation to remember, W = V x A. Using our analogy, wattage measures how well (and how satisfying) the shower worked at cleaning you. 

    Watt Hours (Wh) = (W x time) the total hours that a system can do work at a given flow rate and pressure, or the length of time that you could take a shower at the same pressure and flow. 

    Amp Hours (Ah) = the number of amps that a battery can deliver in 1 hour at its nominal voltage (e.g. 12V).  For example, a 100Ah deep cycle battery can provide 100A for 1 hour -OR- provide 1A for 100 hours.  In shower terms, you could have a firehose for 1 hour -OR- a trickle for 5 days.

    View our Solar 101” video for more information.


    Calculating YOUR Daily Watt Hours

    Everyone will use their RV off-grid differently. So, it’s important to do your own energy audit rather than relying on the same system as your RVing neighbors. Relax, it’s just middle school math. And our worksheet does most of the calculations for you.

    The first step is to figure out how many watts each of your appliances requires.  While most AC appliances are already listed in watts, many DC appliances just list the amps because the voltage may vary.  If you only know the amps, but need to determine the appliance’s watts, what would you do?  Remember our friendly equation:  watts = volts x amps

    Examples:

    • Fan Vent:  12V (DC voltage of your system) x 1.9A (amps of the appliance) = 22.8W
    • LED Light Strip / Bulb:  12V x .667A = 8W    


    If you can’t find the wattage of your appliances, use this Wattage Chart for Typical RV Appliances.  Some appliances have a wide wattage range, so it’s always best to determine the wattages of YOUR appliances.


    Watts x Hours = Watt Hours (WH)

    Now that you’ve determined the watts of each appliance, estimate how long you will run them.  Using the watts for each appliance, multiply the watts for each appliance x the hours you typically use EACH appliance EACH day.   

    Examples:

    • Fan: 22.8W x 4 hours = 91.2WH
    • Coffee Maker:  1200W x 0.25 hours = 300Wh
    • Lights: 16W x 5 hours = 90WH
    • Laptop: 65W x 6 hours = 390WH   


    Add all of these WH together to reach YOUR TOTAL Watt Hours, or what we like to call YOUR “magic number.” This will help you choose which and how many components that you need.  And here’s where our downloadable worksheet will help you keep track of everything in one place.  

    In our next installment, we’ll walk you through a self-assessment to determine if you have what it takes to DIY your own RV solar powered system…or hire a professional installer?

    What to Look for in a Solar-Ready RV (Part 1)
    5 Solar Components Every RVer Should Know (Part 2)
    RV Solar Explained … with Middle School Math (Part 3)
    Determining How Much Solar Power My RV Needs (Part 4, Coming Soon)
    Should I Attempt a DIY Install for My RV? (Part 4, Coming Soon)
    Choosing the Right Solar Powered System for My RV (Part 5, Coming Soon)

  • Boondocking Essentials for RV Newbies

    Boondocking Essentials for RV Newbies

    Some call it boondocking. Others, dry camping. Or off-grid RVing or overlanding … on and on. Whatever you may call it, this type of camping has its appeal. It offers very few services, is low cost (in some ways free), and doesn’t require reservations. Quite simply, this is camping like it was meant to be. But if you’re new to going off-grid, you might wonder what the boondocking essentials are. (It’s all about the essentials, after all, right?) Well, we have some good news for you: The resources in this blog will help! (And, like some of the best boondocking essentials, this advice is free.)

    Thinking about boondocking essentials starts by getting to the bottom Maslow’s Hierarchy. But if you’re just eating dehydrated meals and drinking bottled water, you might not be doing it well.  Here’s some expert tips to handle the boondocking essentials well.


    Water: Replenishing Your Supply

    Most RVs have water storage tanks, but if you use them like you do at home, you’ll run out quickly. But that doesn’t necessarily mean you have to conserve your precious tank if you’re planning on being out there longer than your freshwater budget allows. It’s important to remember that most water sources in North America such as rivers and lakes are “not potable” due to harmful bacteria and viruses. Even so, there are things that you can do to help replenish your supply. When camping on a lake/reservoir, find a stream that flows into the lake as your water source, then make it potable using one of the following methods.

    • Boiling. Bring water to a rolling boil for at least 1 minute to kill all viruses or bacteria.
    • Filtering. Backcountry water filters remove harmful bacteria, though not always viruses because of their extremely small size. 
    • Treating. Iodine tablets, or other water purification tablets, are extremely effective against bacteria and viruses.  


    Water for dishwashing, laundry, or personal hygiene can be used untreated. If you’re nervous about untreated dishwashing water, use a small amount of bleach in the rinse water and allow dishes to fully dry. 


    Power: Adding a Little Star Power

    According to Our World in Data, solar power offers the least expensive, safest, and least polluting source of energy.  (And you’re less likely to offend your neighbors by setting out your portable panel rather than firing up a noisy gas generator.)  With many different solar panel options, and high efficiency LiFePO4 batteries, an effective off-grid solar powered system is within reach of every boondocking RVer. 

    Fast track your solar know-how with our RV Solar 101 blog series.  Also, on YouTube we show how to size a system with our solar system sizing worksheet


    Waste Management: Dealing with Dark Matter

    Without facilities nearby, it’s simple: You must bring your own. Many RVs include a bathroom with gray and black water storage tanks. And many RV campground locator apps include dump station emojis to help you find them. While holding tanks can be a limiting factor for boondocking, there are other ways to manage water/waste:

    • Bag and bury. Portable toilets with bag liners that contain chemicals and gelling agents can provide a safe and effective way to collect, and later dispose of waste. Burying human waste is appropriate if using proper Leave No Trace techniques is appropriate in some areas.
    • Slow the flow. Shower less frequently and wash hands outside with biodegradable soap.
    • Stave, sieve, and scatter. Use three stacking bins for dishwashing (wash, rinse, and sanitizing with bleach solution) maximizes space and uses minimal water. Remember to sieve out all food particles, then scatter the water outside.


    Food Storage: Keeping Micro Bears Out

    While boondocking, a major concern is keeping the fridge running. Many RVs on the market come with fridges that can either run on propane or DC power to save energy while not plugged into shore power.  Consider installing a 12V Fridge Freezer, which uses very little energy!

    While it’s important to keep our food safe for consumption, preventing the local residents from absconding with it is of equal concern. While bears are a concern, it’s the “micro-bears” that often do the most damage. Mice, other rodents, and birds can be among the most voracious infiltrators. Follow these steps for safe storage:

    • Lock it up. Keep food in a hard sided container, inside the rig or vehicle.  
    • Don’t leave it out. Never leave unattended food outside.
    • Keep things tidy. Clean up all food waste, including micro-trash, even if it’s biodegradable. Using a table cloth helps contain food for proper disposal.


    Food Storage


    Safety

    Each person has a different threshold for what they consider safe. Ours generally assumes that where there’s more people, there’s more problems. We don’t typically boondock, or lotdock, in urban areas for more than one night. Rather, we find more remote areas to feel more secluded, and more safe. Keep in mind, most people are using that area for the very same reasons you are. Some basic tips:  

    • Check the use. Look at the camping area in daylight; if it is heavily used, move on.
    • Feel it out. Trust your gut, if something doesn’t feel right, move on. 
    • Keep valuables low key. Don’t leave valuables outside of your vehicles, and don’t leave any valuables visible in your vehicles.
    • Lock things up. Lock your vehicles and set vehicle alarms. 


    Leave No Trace

    Every person who learns and practices Leave No Trace principles will reach another 256 people in their lifetime. Be a good steward and educate yourself. If everyone followed these seven simple practices, we’d never have any conflict in the outdoors.  Quite frankly, with record numbers of people recreating and boondocking across this continent, we need all the education possible.


    Got the boondocking essentials down? Well, there are even more ways to save — including how you eat. Next up, we’ve got tips and recipes for making fun, delicious camping meals that won’t break the bank! This article is part of our Cutting RV Travel Costs 101 series.

    The First Step to Find Your Dream RV (Part 1)
    A Few RV Secrets to Help You Save on Camping Fees (Part 2)
    Boondocking Essentials for RV Newbies (Part 3)

    RV Kitchen Must-Haves: How to Make Memorable Meals That Save Cash (Part 4, Coming Soon)
    Going Deep into Your Backyard (Part 5, Coming Soon)

  • 5 Common Mistakes That Lead to RV Trailer Hitch Problems

    5 Common Mistakes That Lead to RV Trailer Hitch Problems

    “Funny thing, accidents. You never have them till you’re having them.” – Eeyore from Winnie the Pooh

    If your RV is a towable, odds are you have a story about a bad hitch connection. You’ve either seen trailer hitch problems, or experienced them yourself. We’ve been in both camps. Once, there was a funny sound coming from the area between our truck and camper. We’d connected everything as usual, checking things twice. We pulled out onto one of the narrowest winding dirt roads we’ve ever driven along the Salt River in Arizona.  Shifting into 4-wheel drive, we slowly wound our way 20 or so miles back to pavement. At every turn we’d hear that strange noise again. Finally, we reached a parking lot at the end of the road. So, we pulled in to check things out. Turns out, we missed something, a big something. The hitch coupler was locked down alright, but it wasn’t fully down on the ball hitch. It was just resting on top of it. So, that’s what made the noise. 

    Lesson learned: If something doesn’t sound right, feel right, or look right, pull over ASAP and check it out. There’s another lesson there: Your traveling speed compounds mistakes.  The road was bumpy and winding, but because we took things slow, our mistake didn’t cost us an unplanned testing of the safety chains.  

    We’ve been traveling the continent with our tiny camper since the fall of 2012. We’ve made a lot of mistakes and survived plenty of trailer hitch problems. Some even as dumb as simply forgetting to connect the lock through the hitch coupler. True story. After 20 minutes of driving on the interstate, I started to question if I’d even locked it. I pull over, and there, sitting on the tongue is the unlocked lock just where I set it down 20 minutes before. What are the odds of that?


    5 Common Connection Mistakes

    Repair shops hear plenty of stories and deal with the damage that comes out of them. Consequently, services teams often cite these five common mistakes as the origin of most trailer hitch problems.

    1. Not having the right plug. Not using a waterproof plug for the 4-way or 7-way connector. This can lead to corrosion of the wires at either plug or outlet.
    2. Not checking for a good connection. When you’ve plugged in your trailer, make sure the lights work as expected. Every. Single. Time.
    3. Not connecting the wires properly. The complexity of vehicle electrical systems these days means that you need to use the appropriate adapter to your wiring harness for the plug you’ll be using.  
    4. Not securing the ball and hitch coupler correctly. Hear any funny noises?  
    5. Not greasing the ball enough. Now, let’s talk a little more about that.


    The Great Debate: To Grease … or Not

    Look: We know this is a passionate debate where people take sides and dig in! (So, if you’re a hardliner camp, you may enjoy scrolling through this debate forum on the topic.) Now, let’s examine the arguments from both sides about which solution better resolves (or creates) potential trailer hitch problems. (And pant problems too, but, we’ll get there in a minute.)


    No Grease

    The parts of a hitch ball and hitch coupler are made of hardened metal that can withstand a lot of force. The ball metal is harder than the coupler and will wear at different rates. Plus, the grease is messy and will attract dust, grit, and dirt into the metal coupling between the two parts and actually increase the wear and tear. Then, there’s the part about accidentally getting the grease on the knee of your new trousers.  


    Grease

    Two pieces of metal that connect and disconnect — and frequently rub, bump, and grind against each other — create friction. Which, of course, produces wear, heat, and possibly noise. Grease reduces friction, and thereby reduces wear, heat, and noise.  Plus, it also helps slide the hitch coupler onto (and off) the ball. Which makes backing into a campsite all the more pleasant.  Sure: It’s important to regularly clean and regrease both parts to remove grit and dirt. And if you don’t want your pants stained by the grease, you can buy a ball hitch cover, or use an old beer koozie as we’ve done for over a decade. 

    Whichever camp you fall into in this great grease debate, it’s unlikely you’ll convince anyone on the other side.  

    As for use, we’ve been greasers for the following reasons:

    • Smooth release. Without grease, the trailer coupler frequently “stuck” on the ball. When it released, it did so forcefully; and if the camper wasn’t on level ground, it tended to lurch forward. With grease, it slides off like butter.
    • Noise reduction. When greased, we no longer heard squeaking and squawking coming from the ball/hitch area.


    Parting Advice to Avoid Trailer Hitch Problems

    An RV dealer once gave us his advice when connecting the towing vehicle and trailer:

    • Never be in a rush. Move slowly and deliberately.
    • Ensure all connections are appropriately made and locked, including hitch coupler, tension bars, and 7-pin electrical plug.
    • Remove or raise all trailer stabilizers. 
    • Turn the vehicle on and check that all lights are working appropriately. 
    • Shut the vehicle down and go to the restroom. Cuz’ it’s always good to go before you go. And if hurry is bad (it is), nothing puts in a greater hurry than need to go.
    • On the way back to the rig, take a long look and make sure that everything looks right. 
    • Pull out slowly, and keep an eye on things as you go down the road.


    Did I mention not to be in a rush?  If something is set to go wrong, rushing will always make it worse! Eager to learn more about hitches? Read more in our RV Tow Hitches 101 series.

    Hitch Types and Ratings: RV Basics (Part 1)
    How to Choose the Right Tow Hitch for Your RV (Part 2)
    5 Common Mistakes That Lead to RV Trailer Hitch Problems (Part 3)