Category: RV Advice

  • Prepare Your Propane Tanks for the Cold

    Prepare Your Propane Tanks for the Cold

    Living in an RV year-round means facing the elements head on. But you won’t be the only one facing the elements: Your appliances will face them as well. Most RV’s rely entirely on propane for fuel. (Although this is starting to change with hybrid and all-electric RVs.) Propane is a clean-burning fuel and safe. It is an environmentally friendly choice compared to gas or diesel, since it releases negligible amounts of fossil fuels. Many RVs use propane to power a stove, oven, heater, refrigerator, outdoor stove, and hot water heater. That means that the majority of our creature comforts are almost entirely dependent on propane. Therefore, in winter weather, precautions need to be taken to prevent malfunctions. You need to prepare your propane tanks for the cold.

    There are lots of good reasons to take on the challenges of four-season RV camping. To do that (and keep you and your RV warm), let’s start with the basics.


    Propane Fundamentals

    Propane is a flammable hydrocarbon gas. It’s made up of carbon and hydrogen, C3H8. In its natural state, propane is colorless and odorless. For safety reasons, an odor is added to easily detect a leak. It is a gas, but under pressure it is liquified. This makes it relatively simple to transfer in bulk form. So, to simplify this, the propane inside your tank is a liquid. As pressure in the tank is released, the liquid boils, or vaporizes, into gas that is released into your appliances.  


    Propane Problems in Cold Weather

    In its liquid form, propane can technically freeze, but it only does so in -44 degrees Fahrenheit. The main issues you will face in low temperatures are pressure related. A liquid propane tank functions with a reservoir of gas at the top of the heater. The gas is what is used in your appliances. The liquid boils, replenishing the gas reservoir at the top of your tank. In cold weather, the pressure inside your tank will decrease, and the boiling process will slow down.

    The problem most people have with their propane in cold weather is exhausting their reservoir of gas at the top of the tank before it can be replenished by the boiling process. When the reservoir of gas is used up before the boiling process can replenish it, the propane system malfunctions. This is often referred to as a “frozen tank,” although the propane isn’t actually frozen. It is a result of a slowed down “rebound” of the gas made by the boiling propane. This is the main issue that can result in the lower pressure of your propane tank caused by cold temperatures. On a night when it’s cold enough to have these effects on your tank, you may be depending on your propane heater to warm you up! Because these malfunctions can happen, it doesn’t hurt to have a small backup space heater in your RV just in case. 


    Prepare Your Propane Tanks for the Cold

    If you’re about to embark on a cold weather RV trip, consider getting a bigger propane tank. It’s a good way to prepare your propane for the cold. You probably won’t burn all that propane, but the larger tank size might prevent the “frozen-tank” issue by increasing the size of the gas reservoir at the top of your tank. 

    Another way to ensure proper functioning of your propane tanks in the winter is to keep the tank at least 30 percent full. If the tank is full, the pressure might not drop enough to affect the flow of gas to your appliances. Being conscientious of your propane intake will help ensure your tank stays somewhat full. You can turn your thermostat down at night, and turn your water heater off when you aren’t using it. 

    The only problem with keeping your tank at least 30 percent full, is that most places that fill propane, charge the same amount no matter what is left in the tank. If you can find someone who fills propane by volume, that will save you some money in the long run.

    And if you’re in an area with a lot of snow and ice accumulation, step outside in the mornings and evenings and brush the snow and ice off your tanks. 


    Finicky Tank Moments

    Sometimes tank regulators and safety shut-off devices can be finicky in cold weather due to pressure differences. If you open your tank too quickly, it may trigger a safety shut off feature on your regulator. Before you take your RV to the shop, try this: Shut your tank off, and disconnect the line that goes from the regulator to the tank. Let it sit for a minute or two, and then reconnect the line and open the tank up slowly.  You may find your problem has magically resolved itself.  


  • Ditch the Dealer: Sell Your RV Online for More Cash

    Ditch the Dealer: Sell Your RV Online for More Cash

    When it’s time to sell your RV, one of the biggest decisions you’ll face is whether to sell it privately or trade it in to a dealer. While going directly to a dealer might seem more convenient, you might be surprised that if you sell your RV online might be easier. And more profitable. Selling your RV on a marketplace like RV Trader can help you pocket significantly more money. In this post, we’ll break down the benefits of listing your RV on a private seller marketplace versus selling to a dealer — and show how private sellers more often come out ahead.


    Why Do Dealers Pay Less?

    To make the sale more lucrative, dealers are in the business of buying low and selling high. When you sell your RV to a dealer, they will offer a price that works for them. Their price will leave room for them to recondition the vehicle, market it, and sell it at a profit. *As a result, dealer offers are often 10–20 percent lower than the RV’s true market value.

    While selling to a dealer can save time, it comes at a cost: less cash in your pocket.


    The Benefits of Selling on a Marketplace

    By listing your RV on an online marketplace such as RV Trader, you gain direct access to motivated buyers looking for an RV just like yours. When you sell your RV online, this enables you to command a higher price than you would receive from a dealer. Here are five reasons why selling your used RV on an online marketplace is the smarter choice to help you maximize your earnings.


    1. Get Full Market Value

    By using an online marketplace, you’re able to see the prices of comparable RVs. And you can set your own price accordingly. Since you’re selling directly to consumers, there’s no middleman marking up the price for resale. You get what your RV is worth. That price is often thousands more than what a dealer would offer.


    2. Nationwide Audience

    By listing with a top online marketplace, your listing will have access to a massive audience of interested buyers. That’s not only locally, but from all across the country. An expansive nationwide reach increases the chances of finding the right buyer who’s willing to pay top dollar for your RV.


    3. Increased Buyer Demand

    Demand for used RVs has skyrocketed, with more people turning to RVing for travel and adventure. By listing your RV online, you can take advantage of this high demand, ensuring more eyes on your listing and a better chance of selling at or near your asking price.


    4. You Control the Sale

    Selling privately through an online marketplace gives you complete control. You set the price, negotiate with potential buyers, and get to decide ultimately who gets to purchase your RV. Being in charge allows you to maximize your profits by cutting out dealer commissions and fees.


    5. Trusted Marketplace

    RV Trader is a leading trusted marketplace for buying and selling RVs. Listing your RV on our marketplace lends credibility to your sale, making buyers feel more confident in purchasing from a verified platform rather than a smaller, less secure option.


    Real-Life Example: Dealer vs. Private Sale

    Let’s take a real-world scenario. Imagine you have an RV worth $50,000 based on its market value. Here’s how the numbers break down:

    • Selling to a Dealer: The dealer might offer you $35,000 or $40,000, taking into account their need to make a profit after resale.
    • Selling on RV Trader: You can list your RV at its full market value of $50,000, or even slightly higher if there’s strong demand for your model – the profit is all yours.

    In this scenario, by selling your RV privately online, you could make $10,000 to $15,000 more compared to a dealer trade-in.


    Quick Tips to Sell Your RV Online

    To get the most out of your listing, follow these tips:

    • Take High-Quality Photos: RV buyers want to see clear images of both the interior and exterior of your RV. Make sure to showcase your RV from all angles.
    • Write a Detailed Description: Include all relevant details such as the year, make, model, mileage, condition, and any upgrades or maintenance records.
    • Set a Competitive Price: Do your research by checking out similar RV listings on RV Trader to price your vehicle appropriately.
    • Be Responsive to Inquiries: Promptly answer questions from potential buyers to keep the sales process moving smoothly.


    Conclusion: More Money, More Control

    Selling your RV privately through an online marketplace offers a significant financial advantage over selling to a dealer. By cutting out the middleman and tapping into a national network of buyers, you’re likely to earn thousands more for your RV, all while maintaining full control over the selling process.

    Ready to sell your RV and make more money? Get started on RV Trader today!

    *https://www.bishs.com/blog/most-value-for-rv-trade/


  • Repairing RV Water Damage: Stains, Mold, and More

    Repairing RV Water Damage: Stains, Mold, and More

    RV life on the road is a proverbial roller coaster. One minute you’re enjoying a cup of morning coffee with a view of the crystal-clear waters of the Florida Keys. And the next minute? You’re drying the floor with beach towels, wondering where in the world the water is coming from. Sounds far-fetched, but that’s what happened in my first RV. Even with a major RV water damage scare like that, my love for this life is still as strong as ever. My wife and I are now well into year six of RV life, and we are on our fourth rig.

    For most situations, we have found that with some know-how and a bit of elbow grease, you can tackle many of these problems head-on and keep your RV in tip-top shape. But we have also realized that in some cases, getting a professional is the best option for the job.

    What can you do yourself, and how do you tell when it’s time to call for help? Here’s a guide to dealing with mold and water damage in your RV.


    Recognizing the Signs of Water Damage

    First comes water. Then comes damage. Then comes mold throughout the RV carriage. If you went back and sang that like I did, then you are my kind of people. In all seriousness though, that is the essential order for this process, so we start with the water.

    Water damage can sneak up on you if you’re not paying close attention. What starts as a small leak can quickly turn into a bigger problem, especially if it goes unnoticed. Here are some common signs:

    Common Signs of RV Water Damage
    1. Discoloration or Stains: Water stains on the ceiling, walls, or floors are often the first indicators of a leak. If you notice dark or discolored patches, it’s time to investigate.

    2. Soft Spots: Walk around your RV and press on the walls, floor, and ceiling. If you find any soft or spongy areas, this could indicate water damage beneath the surface.

    3. Musty Odor: Mold loves damp, dark spaces. If you detect a musty smell, it’s a strong sign that there’s moisture trapped somewhere, and mold could already be taking hold.

    4. Peeling Wallpaper or Paint: Water can cause adhesives to break down, leading to peeling wallpaper or bubbling paint. If you see these signs, there’s likely moisture behind the scenes.

    5. Warped or Buckled Materials: Wood or laminate flooring that is buckling, or walls that appear warped, are telltale signs that water has been pooling somewhere it shouldn’t.


    Steps to Address RV Water Damage

    Once you’ve identified the signs of water damage, it’s crucial to act quickly to prevent further issues, including the growth of mold. And trust me when I say they usually aren’t as easy to spot as a beach towel’s worth of water on the floor.


    Step 1: Find and Stop the Source of the Leak

    Before you can begin repairing the damage, you need to stop more water from entering your RV. This could be from any number of sources or weak spots, but three of the more common culprits are a leaking roof, windows, or even plumbing. Inspect the areas where you noticed damage and trace the water back to its source.

    In our beach towel situation, we couldn’t find the leak at all, and that’s when we cut our losses and took it to the professionals. We were lucky enough to have the RV under warranty and they were eventually able to work on it. In our third RV we had a smaller leak from the window and all it needed was a bigger, thicker, seal around the window frame.

    Tip: Don’t forget to check around slide-outs, vents, and any other areas where the RV’s exterior is interrupted by seams or openings. These spots are notorious for letting water in.


    Step 2: Dry Out the Affected Area

    Once you’ve stopped the leak, your next step is to dry out the affected area as thoroughly as possible. Mold can begin to grow in as little as 24 to 48 hours, so time is of the essence.

    Tip: Use fans, a dehumidifier, and open windows and doors to get as much airflow as possible. If the weather is dry, this can be incredibly effective. If you have a chance to get to the west, where the climate is much drier, it can be a huge help. For more severe cases, you may need to use a wet/dry vacuum to remove standing water.


    Step 3: Remove Damaged Materials

    Water damage can weaken materials like wood, insulation, and even drywall. If any part of your RV shows signs of rot, warping, or mold, it’s essential to remove and replace these materials.

    Tip: Be thorough in your inspection and removal. Mold can spread quickly, and if any affected material is left behind, the problem could return. Use mold-resistant replacement material where possible to prevent future issues.


    Dealing with Mold: A Step-by-Step Guide

    While we were lucky with the mold situation in our RV. it was under warranty and was taken care of by professionals – I’ve had to deal with mold in buildings, and let me tell you, it is not a fun or healthy experience. So, if you discover mold in your RV, it’s important to handle it carefully to avoid spreading spores and worsening the problem.


    Step 1: Wear Protective Gear

    Mold can be harmful to your health, so before you begin, make sure you’re wearing gloves, a mask, and protective eyewear. This will help prevent inhalation of mold spores and skin contact. If you are like me and mold can have a truly negative experience on your health or breathing, then I highly suggest hiring a professional to work on the situation.

    Your health is always worth more than trying to save a few bucks with a DIY!


    Step 2: Isolate the Area

    If you are moving forward with a DIY, then the first step after putting on all your protective gear, is to try and seal off the area where the mold is located. Remember to close doors, cover vents, and tape plastic sheeting over doorways to contain any spores that might get kicked up during cleaning. This way the spores don’t spread to other parts of the RV.


    Step 3: Clean the Mold

    Sometimes a mixture of water and detergent as well as a commercial mold cleaner to scrub the affected area can go a long way. Another option to try is a solution of water and bleach (1 cup of bleach to 1 gallon of water) — but be sure to ventilate the area well.

    Tip: Avoid using bleach on porous surfaces like wood or drywall, as it doesn’t always penetrate deeply enough to kill all the mold. For these situations, try using a cleaner specifically designed for these materials.


    Step 4: Prevent Future Mold Growth

    Once the mold is cleaned, take steps to prevent it from returning. Ensure the area is thoroughly dried and consider applying a mold-resistant coating to surfaces prone to moisture. Regularly inspect your RV for any signs of new leaks or dampness and address these issues immediately.


    Restoring or Replacing Damaged Materials: Bringing Your RV Back to Life

    After tackling water damage and mold, the next step is to restore or replace the affected areas to get your RV back in shape. This can seem overwhelming, but breaking it down into manageable steps makes it doable.

    1. Assess and Remove Damaged Materials: Start by thoroughly inspecting your RV to determine what needs to go — soft spots in the floor, warped walls, or swollen cabinetry. Carefully remove any damaged materials, being sure to cut away all affected areas to prevent future issues.
    2. Replace Subfloor and Wall Structures: If the subfloor or wall framing is compromised, replace these with new materials. Use sturdy plywood for subfloors and fresh wood for framing, ensuring everything is level and secure. Don’t forget to replace any damaged insulation with a mold-resistant option.

    3. Rebuild and Refinish: Once the structural repairs are complete, rebuild and refinish your RV’s interior:

      Walls: Install new wall panels, seal seams, and add a fresh coat of paint or wallpaper.
      • Flooring: Lay down new vinyl, laminate, or carpet, leaving room for expansion and finishing with trim.
      Cabinetry: Refinish or replace cabinets, making sure they’re securely installed.

    4. Final Touches: Finish by adding trim, painting, and decorating to make your RV feel like home again. With some effort, your RV will be ready for more adventures, looking and feeling as good as new

    Staying Ahead of RV Water Damage

    Dealing with water damage and mold in an RV is no fun, but with regular inspections and quick action, you can stay ahead of these issues. My wife and I have learned from experience that catching a leak early can save you a lot of headaches (and money) down the road. By following these steps and keeping a close eye on your RV, you can keep your home on wheels in great shape and focus on enjoying the adventures that lie ahead. Safe travels!

  • 6 Steps to Set Your RV Renovation Budget

    6 Steps to Set Your RV Renovation Budget

    If you’re here, I’m going to assume you are looking to finally pull the trigger on that RV renovation. You know, the one you’ve been putting off. And, since you’re here, I’m also going to assume that you have a burning question about your RV renovation budget: how much should this reno cost?

    For those in the starting phase and looking for ideas, you may want to check out my blog on popular RV renovations ideas. If you’re past that phase (or you just finished reading that blog), then it’s time to figure out the numbers. That’s where I can help. As fun and rewarding as transforming your RV into your dream home on wheels can be, when the costs start to add up, those dreams can turn into nightmares. So, to help you avoid some of the pitfalls, here’s a guide to help you set a realistic budget for your RV renovation.


    Step 1: Determine Your Priorities

    Before you start crunching numbers on your RV renovation budget, take some time to think about what’s most important to you in your RV. Are you focused on functionality, comfort, aesthetics, or maybe a combination of all three? By identifying your priorities, you can allocate your budget to the areas that matter most to you.

    Consider these questions:
    • Which areas of your RV need the most attention? (e.g., flooring, kitchen, bathroom)
    • What are the “must-haves” versus the “nice-to-haves”?
    • Are you planning any major structural changes, or are you mostly focused on cosmetic upgrades?

    Once you’ve got your priorities straight, you can move on to the next step.


    Step 2: Research Costs and Gather Estimates

    The next step is to research the costs associated with your renovation projects. This includes everything from materials and tools to professional labor if you’re not planning to DIY the entire project. For example, if you’re upgrading your flooring, you’ll want to look at the cost of materials like vinyl planks or laminate, as well as any tools you might need for installation. If you’re considering a solar power upgrade, you’ll need to factor in the cost of panels, batteries, and installation.

    DIY Tip: For a more accurate estimate and better pricing, consider visiting various local home-improvement stores and browsing online retailers. Don’t forget to include shipping costs for larger items that aren’t available locally. You can also look on Facebook Marketplace or some similar app to find products that may be in decent condition at a discounted price.


    Step 3: Set a Realistic Budget

    Now that you have a good idea of what each part of your renovation will cost, it’s time to set a budget. Be realistic about what you can afford and make sure to include a buffer for unexpected expenses – because trust me, there will be some. A good rule of thumb is to set aside an extra 15 to 20 percent of your total budget for those unforeseen costs that always seem to pop up during a renovation.

    Sample budget breakdown (not actual prices)

    • Flooring: $1,000 (including materials and tools)
    • Kitchen Remodel: $1,500 (including appliances, cabinets, and paint)
    • Bathroom Upgrades: $500 (including fixtures, paint, and accessories)
    • Solar Power Installation: $2,000 (including panels, batteries, and installation)
    • Miscellaneous: $500 (for smaller projects like painting and decor)
    • 20% Buffer: $1,100 (for unexpected costs)

    Total Budget: $6,600


    Step 4: Consider Financing Options

    If your renovation plans exceed your current financial liquidity, you might want to explore financing options. Some RV owners take out personal loans or use a credit card with an introductory zero-percent interest period to finance their renovations. This is a great tool if you know that you can pay off the entirety of the project in the allotted time for zero interest. A quick internet search for the best zero-percent credit cards can get you upwards of 12 months interest free. If you calculate your monthly payment for the total over that timeframe, and realize that you won’t be able to finish before interest starts accruing, then just be sure to factor in the cost of interest to ensure that your monthly payments fit comfortably within your budget.

    Financing Tip: If you’re planning to sell your RV in the future, consider how much your renovations will increase – or decrease – its resale value. This can help you determine whether financing your renovation is a sound investment.


    Step 5: Track Your Spending

    Once you’ve set your budget and started your renovation, it’s crucial to track your spending to ensure you’re staying within range. Keep all your receipts, and regularly update a spreadsheet or use a budgeting app to monitor your expenses. This will help you identify any areas where you might be overspending and allow you to make adjustments as needed. 

    Tracking Tip: Break down your spending by category (e.g., flooring, kitchen, bathroom) to see exactly where your money is going. This can also help you adjust your budget mid-project if you need to allocate more funds to a particular area.


    Step 6: Be Prepared to Make Adjustments

    Renovations rarely go exactly as planned, so be prepared to make adjustments along the way. If you find that you’re overspending in one area, consider scaling back in another. For example, if your kitchen remodel is costing more than expected, you might decide to delay the installation of that solar power system until a later date.

    Adjustment Tip: Prioritize the projects that are most important to you and be flexible with the rest. Remember, you can always tackle additional upgrades down the road.


    Renovating Your RV Without Breaking the Bank

    Setting an RV renovation budget is a crucial step that will help you turn your dream home on wheels into a reality without emptying your bank account. By determining your priorities, researching costs, setting a realistic budget, knowing your skill level, and tracking your spending, you can keep your renovation on track and enjoy the process. Whether you’re making small changes or tackling major upgrades, careful budgeting will ensure that your RV renovation is a success. Happy renovating, and may your travels be filled with adventure and comfort!

    For more inspiration and tips on RV renovations, check out my story on popular RV renovation projects. It’s packed with ideas that can help you transform your RV into the cozy, stylish retreat you’ve always wanted. Looking for more advice? Check out the RV 101 section on the RVTrader blog.

  • These RV Reviews Reveal What Owners Love — and Hate

    These RV Reviews Reveal What Owners Love — and Hate

    Opinions are like RVs: If you look hard enough, you can find one that fits you. (And sometimes you can trade them in for new ones.) That’s why with over 11 million families now RVing, it’s hard to keep track of the current opinions on what’s hot, what’s popular, and what really matters in the RV world. Fortunately, the RV reviews from owners on RVInsider keep us up-to-date.

    Here are five recurring themes that owners on RVInsider are calling out (for better and worse) in their RV reviews.


    Top 5 Features RV Reviewers Love

    1. Spacious and Functional Floor Plans

    More space is better — this is a fundamental truth about RVing. Maybe more than any other feature, users love spacious floor plans, so RVs with well-designed layouts that maximize space and offer functional living areas are more popular than ever. These days, RVers appreciate layouts that include separate bedrooms, ample storage, and open living spaces.

    As one reviewer put it: “The floorplan is perfect and once the two slides are out you are in a roomy accommodation! You can pull a curtain and have a separate bedroom with a TV while another person can be in the living room area with another TV. So perfect!”


    2. High-Quality Build and Materials

    One of the easy-to-spot discrepancies between high and low RV price points is the durability and quality of materials. This pops up all the time as key positives in RV review after review: “The quality of the materials used throughout is excellent. The cabinetry is solid, and the overall build feels like it’s made to last.”

    Owners appreciate when manufacturers use sturdy materials that can withstand the rigors of travel and long-term use, and we’ve caught on that just because a plastic looks pretty on the show floor doesn’t mean it’s going to look pretty for long on the road.


    3. Comfortable Sleeping Arrangements

    Comfort is crucial. So naturally, beds and sleeping areas appear on RV reviews for many owners — especially those using RVs for extended trips. Memory foam mattresses, easy-to-convert beds, and spacious bedrooms receive high marks. Because where you lay your head might not matter, but what you lay it on sure does – which is why many RV reviews mention adding a mattress topper or swapping out the mattress entirely.

    An RVInsider.com user had this to say about a toy hauler: “The quality of the convertible couches in the garage is nice. They are comfortable to sit on and convert easily to a queen-size bed; and can be stored vertically on the wall or, when it is converted to a bed, can be raised to the ceiling.”


    4. Efficient Climate Control

    Effective heating and cooling systems are highly valued, especially by RVers who travel across different climates. Many reviewers highlight the importance of an insulated RV without leaky walls – an RV that maintains a comfortable interior temperature year-round. Gone are the days of humans tolerating the temperatures of the great outdoors. And if we were going to tolerate outdoor temps, we would just be regular campers.

    One of the RV reviews stated, “The dual AC units and the furnace keep the temperature just right, whether we’re in the heat of summer or the cold of winter.”


    5. Advanced Technology and Features

    RVs equipped with modern technology, like advanced entertainment systems, smart controls, and solar power setups, are hot commodities. These features enhance the convenience and enjoyment of RV living. Which begs the question: When are we going to see the first AI-enabled RV? Manufacturers: We’ll take 10% of the profit just for giving you the idea!

    A satisfied owner shared on RVInsider, “The built-in solar setup and the smart control panel make managing the RV’s systems a breeze, even when we’re off the grid.”


    And Some Issues That RV Reviews Call Out …

    Just like there are positive themes, there are also some constants that pop up in negative RV reviews, too. Here are the top three things to keep an eye out for when evaluating a new RV.


    1. Frequent Mechanical or Electrical Failures

    The garage queen can be a real drag on your checkbook, but also on your travel schedule. It’s hard to get out on the road when you’re always fixing something. Owners often complain about frequent breakdowns of mechanical components such as slide-outs, awnings, and leveling systems. Electrical problems, including faulty wiring, malfunctioning appliances, and issues with the RV’s battery and power systems, are also common.

    One reviewer wrote, “We’ve had constant issues with the slide-outs getting stuck and the electrical system shorting out, leading to multiple trips to the repair shop.”


    2. Inadequate Customer Service and Warranty Support

    No matter what quality your RV is, something will eventually go wrong. That’s why great customer service is key to a great RV experience. Complaints include long wait times for repairs, difficulty getting warranty claims approved, and a lack of responsiveness from customer service reps. What makes this problem worse is that you probably already have one problem, otherwise you wouldn’t be calling.

    A reviewer shared, “The customer service has been terrible. It took weeks to get a response, and when we finally did, they were unwilling to cover the repairs under warranty.”


    3. Interior Design and Functionality Issues

    While some RV owners praise the spaciousness of their RVs, others find fault with the interior design and functionality. Complaints include poorly designed storage spaces, uncomfortable seating, and inconveniently placed fixtures and appliances. These design flaws can make daily living in the RV less enjoyable and more challenging.

    A review pointed out, “The layout looks good on paper, but in practice, it’s a nightmare. The storage is awkwardly placed, and the seating is uncomfortable for long trips.”


    Continue Your Research with RV Reviews

    Really, there’s no substitute for doing your own research. Searching for exact models on RV Insider is a great place to start to get insights from owners, but it’s also great to read independent RV reviews from experts. Whatever works best for you, really. If that means RV window shopping to see what’s out there, so be it. If it means heading to an RV show or dealership to walk through an actual model, that’s going to serve you well. Just equip yourself to make an informed decision. That way, when you become an RV owner yourself, your review will be filled with less regret and more joy.

  • How to Choose the Right Tow Hitch for Your RV

    How to Choose the Right Tow Hitch for Your RV

    After 10 years on the road, we updated our towing vehicle to a 2015 Nissan Frontier with a larger engine, more towing capacity, and even a rear bed cover to keep our extra gear out of the weather. But we were surprised when we hooked up our vintage camper, because the truck’s rear axle was riding a little low. Had the trailer gained weight?  Or did we not have the right tow hitch?

    Despite having a preinstalled towing package, our new truck didn’t have the same rear suspension of the former. When we hitched up and loaded our extra gear into the back, it caused the rear suspension to sag.  To remedy this, we added “helper springs.” We’ve ridden along smooth and level for four years now.  

    This experience pointed out a key difference between overloading the suspension and overloading the vehicle’s capacity. Increasing the stiffness of your rear suspension will not increase the total towing capacity or total tongue weight limits of your vehicle. In our case, it helped level our tow and smooth out the ride.  

    In our recent article about hitches, we discussed a few key points about safe driving with a trailer, as well as the different classes of hitches. But how do you choose the right tow hitch for your vehicle?


    4 Things to Know, BEFORE You Tow Our Example: 2015 Nissan Frontier + 15’ Camper
    Tow Vehicle’s Towing Capacity (TC)  6,100 pounds (5,000*)
    T-GVW (Trailer Gross Vehicle Weight) 3,300 pounds [should be less than 80% of (TC)]
    Trailer’s Tongue Weight (TW) 330 pounds
    Rear Gross Axle Weight Rating (rGAWR) 3,331 pounds


    *Our vehicle’s towing capacity is less when using a standard rear hitch (dead weight); a weight distribution hitch allows us to tow closer to the maximum weight of 6,100 pounds.


    Don’t know your numbers? Here are some great resources to determine them for your situation. Each hitch class has a safe range. Below are some considerations that might make your hauling experience even safer!


    RV Hitch Options

    Standard Hitch & Receiver (aka Dead Weight)

    Class III trailer hitches are the most common. They cover the largest range of vehicles with moderate towing capacity, as well as the largest range of trailers.  With a 2-inch by 2-inch hitch receiver and a 2-inch – 2 5/16-inch ball receiver, this setup will handle many campers.  

    In a standard set-up, the weight of the trailer is primarily resting upon the towing vehicle’s rear axle.  The recommended towing capacity in this configuration is less than the manufacturer’s maximum capacity. 

    It is important to choose the right rise or drop on the hitch insert (ball mount) so that the trailer and tow vehicle ride level.  Measuring the height of your hitch receiver and the height of your trailer hitch coupler (while level and on level ground) should do the trick.  There are several hitch types:

    Standard Hitch Types
    • Riser Hitch. Raises the ball above the hitch receiver.
    • Drop Hitch. Lowers the ball below the hitch receiver. You can turn a riser into a drop by simply flipping it over and reorienting the ball (and vice versa).
    • Adjustable Hitch. This is a good choice if you’re going to be hauling various trailers.  


    Weight Distribution Hitch vs. Sway Bars

    • Weight distribution hitches include metal spring bars that connect to brackets on the trailer tongue. When loaded this helps distribute the weight of the entire rig across both axles of the towing vehicle and the axle(s) of the trailer. Everything rides smoothly and evenly, which maintains performance, braking, and control of the rig. Many modern weight distribution hitches also include sway control. These hitches allow a greater towing capacity. For example our Nissan Frontier has a maximum of 6,100 pounds with a weight distribution hitch. But it has only 5,000 pounds with a standard hitch.
    • Sway bars are a friction device that connects from the side of the trailer tongue to a secondary ball mount on the side of the ball hitch insert. When driving at highway speeds, any crosswinds have to overcome the additional friction of the sway bar in order to push the trailer around. This helps keep everything tracking nicely behind the tow vehicle. To maneuver into a camping spot, it’s a simple matter of releasing the tension on the bar so you can more easily back into a tight spot.  


    Hitches for BIG RIGS

    Class IV and V hitches are for towing the heaviest loads. Both fifth wheels and gooseneck hitches have a connection point in the bed of the towing truck, rather than near the bumper. Either allows for a closer pivot point so that the trailer tracks better when cornering and is generally more maneuverable as a result. The difference between the two is where the coupler mechanism lies.  

    • Gooseneck trailers locate the ball hitch in the truck bed, while the coupler is on the trailer “neck.” As the name suggests, it looks like a bird reaching into the back of the truck. 
    • Fifth wheel hitches locate the “ball” on the trailer, while the coupler is installed in the center of the truck bed. Fifth wheel couplers are more intricate, can handle more weight and generally allow a smoother, and more stable tow, which is why they are preferred over goosenecks for RV applications.    


    In our next blog, we’ll cover some do’s and don’ts when connecting trailers, some common mistakes we’ve made, and discuss the great “grease or no grease” debate. 

    Eager to learn more about hitches? That’s very wise. Read more from our RV Tow Hitches 101 series.

    Hitch Types and Ratings: RV Basics (Part 1)
    How to Choose the Right Tow Hitch for Your RV (Part 2)
    5 Common Mistakes That Lead to RV Trailer Hitch Problems (Part 3)

  • A Few RV Secrets to Help You Save on Camping Fees

    A Few RV Secrets to Help You Save on Camping Fees

    The No. 1 way to cut costs on your next RV road trip is to spend less money on camping fees. (Following your RV purchase, that is. More on cutting purchase costs here.) Out on the road, most RV parks and state parks that offer full or partial hook-ups charge $50 to $100 per night. While still cheaper than a night in a hotel, camping fees on a long road trip can add up as quickly as your bill at the gas pump!

    We’ve traveled the continent with solar as our main source of electrical power, so we don’t need hook-ups and can camp on FREE public land and/or inexpensive campgrounds. We estimate that we’ve saved over $200,000 on camping fees since 2012!

    Where do you find these free and lower cost alternatives? While not an exhaustive list of all available resources, below are our go-to resources for information about free dispersed camping and traditional fee-based campgrounds, as well as boondocking for a couple nights. Most locations have stay limits, so pay close attention to those so you don’t put a strain on resources, or get a ticket. Also, please leave every place BETTER than you found it by following Leave No Trace!


    Website Resources to Save on Camping Fees

    Both the Bureau of Land Management (BLM) and U.S. Forest Service offer numerous options from semi-developed campgrounds (for a small fee) to dispersed camping with nothing but open land (usually free). Most do not offer hook-ups, so being self-contained is key. Some offer potable water and vault toilets. Nearly all offer gorgeous views. While most of the BLM land is found out West, national forests are located throughout the country. Stay limits are typically 14 to 21 days. So, always check the local regulations. If you are 62 or older or are disabled, get an America the Beautiful” Senior Pass or Access Pass which gives you half-off camping on ALL federal properties … saving you even more!

    • BLM: While land use and camping information is available online (by state), stop by the state’s BLM office for a free paper map that outlines the amenities for each area and is helpful when you have no cell service.
    • USFS: This website offers information about 157 national forest and grassland campgrounds! You can search by state, or by a specific forest/grassland area. The only downside is that there is no integrated map function, so you have to triangulate the data with either a road atlas or phone navigation app.

    Smartphone Apps

    iOverlander 2

    iOverlander 2 is the updated version of the original crowd-sourced app that helps you find everything. That could be a spot on the side of the highway for the night. Or a dispersed camping area. A casino. Even a parking lot. Always read reviews before you head to the pinned location on the map. Restrictions change frequently, and some could be marked as closed! Completely free.


    The Dyrt

    The Dyrt is a comprehensive campground locator app, offering the most listings of any app across the U.S. Read reviews and see photos/videos from real people who’ve camped there. Use the helpful filters to find free and inexpensive campgrounds, as well as dispersed areas. Search regions and create lists to plan out your next camping trip.  Even book reservable sites and get discounts through the app. Free; the PRO version provides some bonus features that are well worth the small annual fee!


    Boondockers Welcome

    This app is a collection of 3600+ people across the U.S. and Canada who love to offer their driveway, land, farm, etc. to other self-contained RVers for free. Some hosts do offer hook-ups for a nominal fee, as well as water, local knowledge, and new friendships. Use the availability calendar on the app to request a night’s stay (or up to five nights depending on the host). Annual fee.


    Harvest Hosts

    Harvest Hosts is a network of wineries, breweries, distilleries, farms, and attractions that invite self-contained RVers to stay in 5200+ sites across the U.S. and Canada. The annual fee provides members unlimited access to overnight stays at any one of the hosts’ locations. Members are encouraged to purchase at least $30 of products made by the host. It’s is a great way to support the small business allowing you to park there. The hosts typically do not offer hook-ups, so being self-contained is key. Use the availability calendar on the app to request a night’s stay (usually limited to one night). Annual fee.


    Nice! Now I Can Save on Camping Fees … But What Other Ways Can I Save?

    In addition to these helpful apps, there are several Facebook groups in which members post free and dispersed camping options. Just search Facebook with keywords such as boondocking, free camping, or dispersed camping and request to be part of the group. There’s a whole community ready to help you save on camping fees — and, in turn, ready to hear how you’re doing it yourself. Use these helpful resources on your next RV road trip to save hundreds, if not thousands of dollars! 

    We’ll be back next time with more information about key boondocking essentials that’ll make off-grid camping a breeze!

    Enjoying what you’re learning? This article is part of our Cutting RV Travel Costs 101 series.

    The First Step to Find Your Dream RV (Part 1)
    A Few RV Secrets to Help You Save on Camping Fees (Part 2)
    Boondocking Essentials for RV Newbies (Part 3)
    RV Kitchen Must-Haves: How to Make Memorable Meals That Save Cash (Part 4, Coming Soon)
    Going Deep into Your Backyard (Part 5, Coming Soon)


  • 5 Solar Components Every RVer Should Know

    5 Solar Components Every RVer Should Know

    So, you’ve gotten yourself a solar-ready RV, and now you want harness energy from the sun, huh? And store it for later use, of course. Then make it usable to run ordinary household appliances in your RV, right? Well, that requires four simple solar components: solar panels, charge controller, battery bank, and an inverter. And to really trick out your off-grid RV, let’s throw in a fifth component — the DC to DC charger!


    Important Electrical Terms to Master Solar

    Before diving into the solar components, let’s introduce a few electrical terms that you need to know. To simplify, I’ll use the analogy of water flowing through a garden hose to illustrate. Amperage (A) is the flow of current through the electrical system. Or, in our analogy, the flow of water through the hose. Voltage (V) is the pressure of the electrical system, which is like the force on the water moving through the hose. Wattage (W) is the electrical work being done by an appliance itself. With our analogy, that’d be the overall effectiveness of the hose.

    To increase flow, you need a bigger hose, but the spray will lose pressure. To increase pressure, add a nozzle which restricts the flow but increases the spray power. While either one may still get that bird poop off your RV window, the important thing to remember is that to get power (W) you multiply the flow (A) times the pressure (V) – Amps x Volts = Watts

    One last term to understand is Watt hours (Wh). Watt hours are the amount of time you could do the electrical work with the given energy supply. Or, back to our analogy, how long you could wash the RV with the hose at the same pressure and flow. It is simply watts times hours. (We’ll cover how to determine your RV’s average daily Wh in our next blog.)


    5 Essential Solar Components

    Here’s a quick look at what each of the five major solar components do. I’ve also included how each is rated using the different units of electricity described above.

    1. Solar Panels

    Solar panels produce an electrical current when sunlight shines upon them. That current can run a DC appliance directly, but most off-grid systems use batteries to store that energy for later use. (For example, when it’s after dark, cloudy, or raining.) Solar panels are rated in watts (W). The watts of a specific solar panel (e.g., 100W, 200W, 300W) indicates the maximum power a panel can produce under optimal solar conditions. Solar panels come in either rigid, flexible, or bifacial varieties. They can also be permanently fixed to the roof or set up on the ground near the RV. (Portable solar panels are made specifically for this purpose.)


    2. Charge Controllers

    The charging current from the solar panels will fluctuate based upon what’s happening in the atmosphere (passing clouds, etc.). Charge controllers manage the charging current between the panels and the battery bank. They act as the “brain” of the system, and ensure that the battery bank is charged appropriately and safely. Charge controllers are rated in amps (A). The specific rating (20A, 40A, 100A) is the upper limit of current that the controller can safely handle. The two different types of charge controllers are PWM (Pulse Width Modulation) and MPPT (Maximum Power Point Tracking) — with MPPT being up to 30 percent more efficient!


    3. Deep Cycle Batteries

    Deep cycle batteries come in various voltages (12V-24V-48V), but their capacity is rated in amp hours (Ah). That way, you will know the length of time you could expect a specific flow in amps. There are four types of solar deep cycle batteries: flooded lead acid, gel, AGM, and lithium-ion phosphate. Deep cycle batteries are designed to be discharged and charged many times over their lifespan. And they can vary significantly with regards to their chemistry, price, lifespan, charging time, cycles, etc.


    4. Inverters

    Inverters are rated in watts (W) because they do the work of changing DC power to AC power for your appliances that have a standard household plug. Their rating (700W, 1000W, 3500W) indicates the maximum power output that an inverter can safely handle. Pure sine wave inverters most closely replicate the type of AC power that is delivered to your home and are less likely to damage sensitive electronics.


    5. DC-to-DC Chargers

    DC-to-DC chargers make use of excess engine power while the vehicle is running to effectively charge the RV battery bank. These chargers serve as an electrical “pump” — taking that trickle charge typically delivered through a 7-pin trailer connection and pumping it up to 30A, 40A, 50A, or 60A. These chargers are rated in amps (A), with this number referring to the possible maximum current that the charger can safely deliver to the RV batteries. Some models even combine a charge controller and DC to DC charger into one unit to save space.


    So, Now You Know the Solar Components … What’s Next?

    As you dive into your own RV solar project, understand that everyone has different energy needs and uses their RV differently. In our next blog, we’ll dive into how to design a solar powered system that will work for you and your energy demands!

    Enjoying what you’re learning? This article is part of our RV Solar 101 series.

    What to Look for in a Solar-Ready RV (Part 1)
    5 Solar Components Every RVer Should Know (Part 2)
    RV Solar Explained … with Middle School Math (Part 3)
    Does a DIY RV Solar System Install Make Sense for Me? (Part 4)
    Choosing the Right Solar Powered System for My RV (Part 5, Coming Soon)

  • What Not to Do When Renovating Your RV (Like Ever, Ever)

    What Not to Do When Renovating Your RV (Like Ever, Ever)

    O, the DIY project, how I love and hate thee! If you are like me, then you mostly prefer to enjoy life, work on what you’re good at, and you try to get a professional to do your home and RV projects. That being said, saving money and time is always a great feeling, and it can be pretty fulfilling to make that cool renovation yourself — until it’s not. Because renovating your RV, while rewarding, is no joke.

    As an avid RVer and DIYer for over six years, I’ve talked before about 10 popular RV renovations that can transform your home on wheels into a personalized haven. However, there are a few common mistakes that can turn your dream renovation into a nightmare, and that is what today’s story is all about. To help you navigate this journey smoothly, here’s a guide on what not to do when renovating your RV.


    1. Don’t Dive Straight Into Renovating Your RV

    One of the biggest mistakes you can make is diving into your renovation without a detailed plan. This often leads to hasty decisions, budget overruns, and a lot of frustration. Trust me, planning and measuring several times before executing is the only way to go.

    With our new solar system, other than some minor wiring issues, the thorough planning thoroughly and measuring everything several times helped the project stay fairly on time and budget. Even then, unexpected things happened. Now, if you haven’t read my freezing toilet mishap, you can check out the link at the end of this post for a good laugh at my expense.

    Tip: Start by outlining your goals, making a budget, and creating a timeline. Sketch out your ideas and list the materials you’ll need before you begin. Once that is done, increase your cost and time estimates by 15 to 20 percent for unforeseen circumstances.


    2. Avoid Using Heavy Materials

    While it might be tempting to use materials like hardwood or granite to create a luxurious feel, these heavy materials can significantly affect your RV’s weight and fuel efficiency.

    Tip: Alternatives like peel-and-stick, vinyl planks, or laminate for countertops, flooring, and the like can offer a similar aesthetic appeal without the added weight.


    3. Don’t Ignore Your RV’s Weight Capacity

    This goes hand in hand with number 2, because every RV has a maximum weight capacity, and exceeding this can lead to safety issues, increased wear and tear, and potential fines.

    Tip: Weigh your RV before and after renovations to ensure you stay within the safe limit. Remember, this includes everything you plan to carry on your trips, including passengers, food, belongings, etc. If you can, try to get a good estimate on the total weight you are taking out and the weight you are adding for your project.


    4. Avoid DIY Electrical Work Without Proper Knowledge

    Tackling electrical work without the necessary expertise can be dangerous and lead to severe problems down the road like burnt fuses, wires, or even a full-blown fire.

    If you’re not confident in your electrical skills, it’s best to hire a professional. Even if you are confident, reading forums and watching YouTube videos are always recommended with these types of projects before beginning.

    Tip: Always disconnect and turn off the power before working on electrical components to avoid shocks and injuries.


    5. Don’t Sacrifice Function for Aesthetics

    It’s easy to get caught up in making your RV look beautiful, but functionality should always come first. A pretty kitchen isn’t much use if it doesn’t have enough storage or counter space. A balance between aesthetics and practicality will make your RV both beautiful and livable.

    Tip: Start by ensuring there’s ample storage, comfortable seating, and functional appliances. No matter where your renovation takes you, these are must-haves for any RV.


    6. Avoid Neglecting Proper Ventilation

    Proper ventilation is crucial in an RV to prevent issues like mold, mildew, and unpleasant odors. Skimping on ventilation can even lead to health problems and costly repairs.

    Ensure your RV has adequate vents and fans, especially in areas prone to moisture like the kitchen and bathroom.

    Tip: Regularly check and clean your ventilation systems and filters to keep them functioning properly.


    7. Don’t Forget About Temperature Extremes

    Materials that work well in a stationary home might not perform as expected in an RV due to temperature fluctuations. Warping, cracking, and other issues can arise if you choose the wrong materials.

    Tip: Consult with experts or fellow RVers for recommendations on the best materials for your climate. This will ensure your renovations last through all your adventures, hot or cold.


    8. Avoid Making Permanent Changes That Reduce Resale Value

    While personalizing your RV is important, making changes that are too specific to your taste can reduce its resale value. Permanent modifications might not appeal to future buyers.

    I took out the dinette and valances on one of our fifth wheels; when it came time to sell, the dealer that was helping us recommended that we reinstall them for the original look. Luckily we had hung onto them, and were able to restore and sell the RV.

    When in doubt, opt for neutral changes that enhance the RV’s appeal to a broader audience. Stick to timeless designs and avoid overly trendy choices.

    Tip: When deciding between two options, if one can be easily reversed, that is usually the best way to go.


    9. Don’t Underestimate the Importance of Quality Tools and Materials

    Using low-quality tools and materials might save you money initially, but they can lead to poor results and frequent repairs in the long run.

    Invest in quality tools and materials to ensure your renovations are durable and long-lasting. It’s worth spending a bit more upfront to avoid headaches later.

    Tip: Quality tools can also make the renovation process smoother and more enjoyable.


    10. Don’t Ignore the Legal and Safety Requirements

    Renovations that don’t comply with safety regulations and legal requirements can lead to fines, insurance issues, and even accidents.

    Familiarize yourself with local and state laws/codes for whatever state the RV is registered in, including safety standards and guidelines. This is especially true for weight limits, as some states have regulations for certain weights and driver license classifications.

    Ensure all renovations meet these requirements to keep your RV safe and compliant. Nothing is ever full proof, but taking these measures will help protect you, and it will likely minimize your risk of financial or legal issues with insurance or law enforcement, should an incident occur.

    Tip: A detailed plan is an invaluable asset when navigating regulations and requirements. Knowing the exact changes you want to make to your RV will help you look up relevant guidelines – or ask the right questions when consulting a professional.


    While jumping into renovating your RV can be exciting and rewarding, taking time to plan, and avoiding these common pitfalls is crucial to ensure a smooth and successful transformation. By planning meticulously, prioritizing functionality, and investing in quality, you can create a beautiful and practical home on wheels. Best wishes with renovating your RV, and remember, don’t be like me and try to fix a frozen toilet in the winter!

  • Always Ask These 13 Questions When Buying an RV

    Always Ask These 13 Questions When Buying an RV

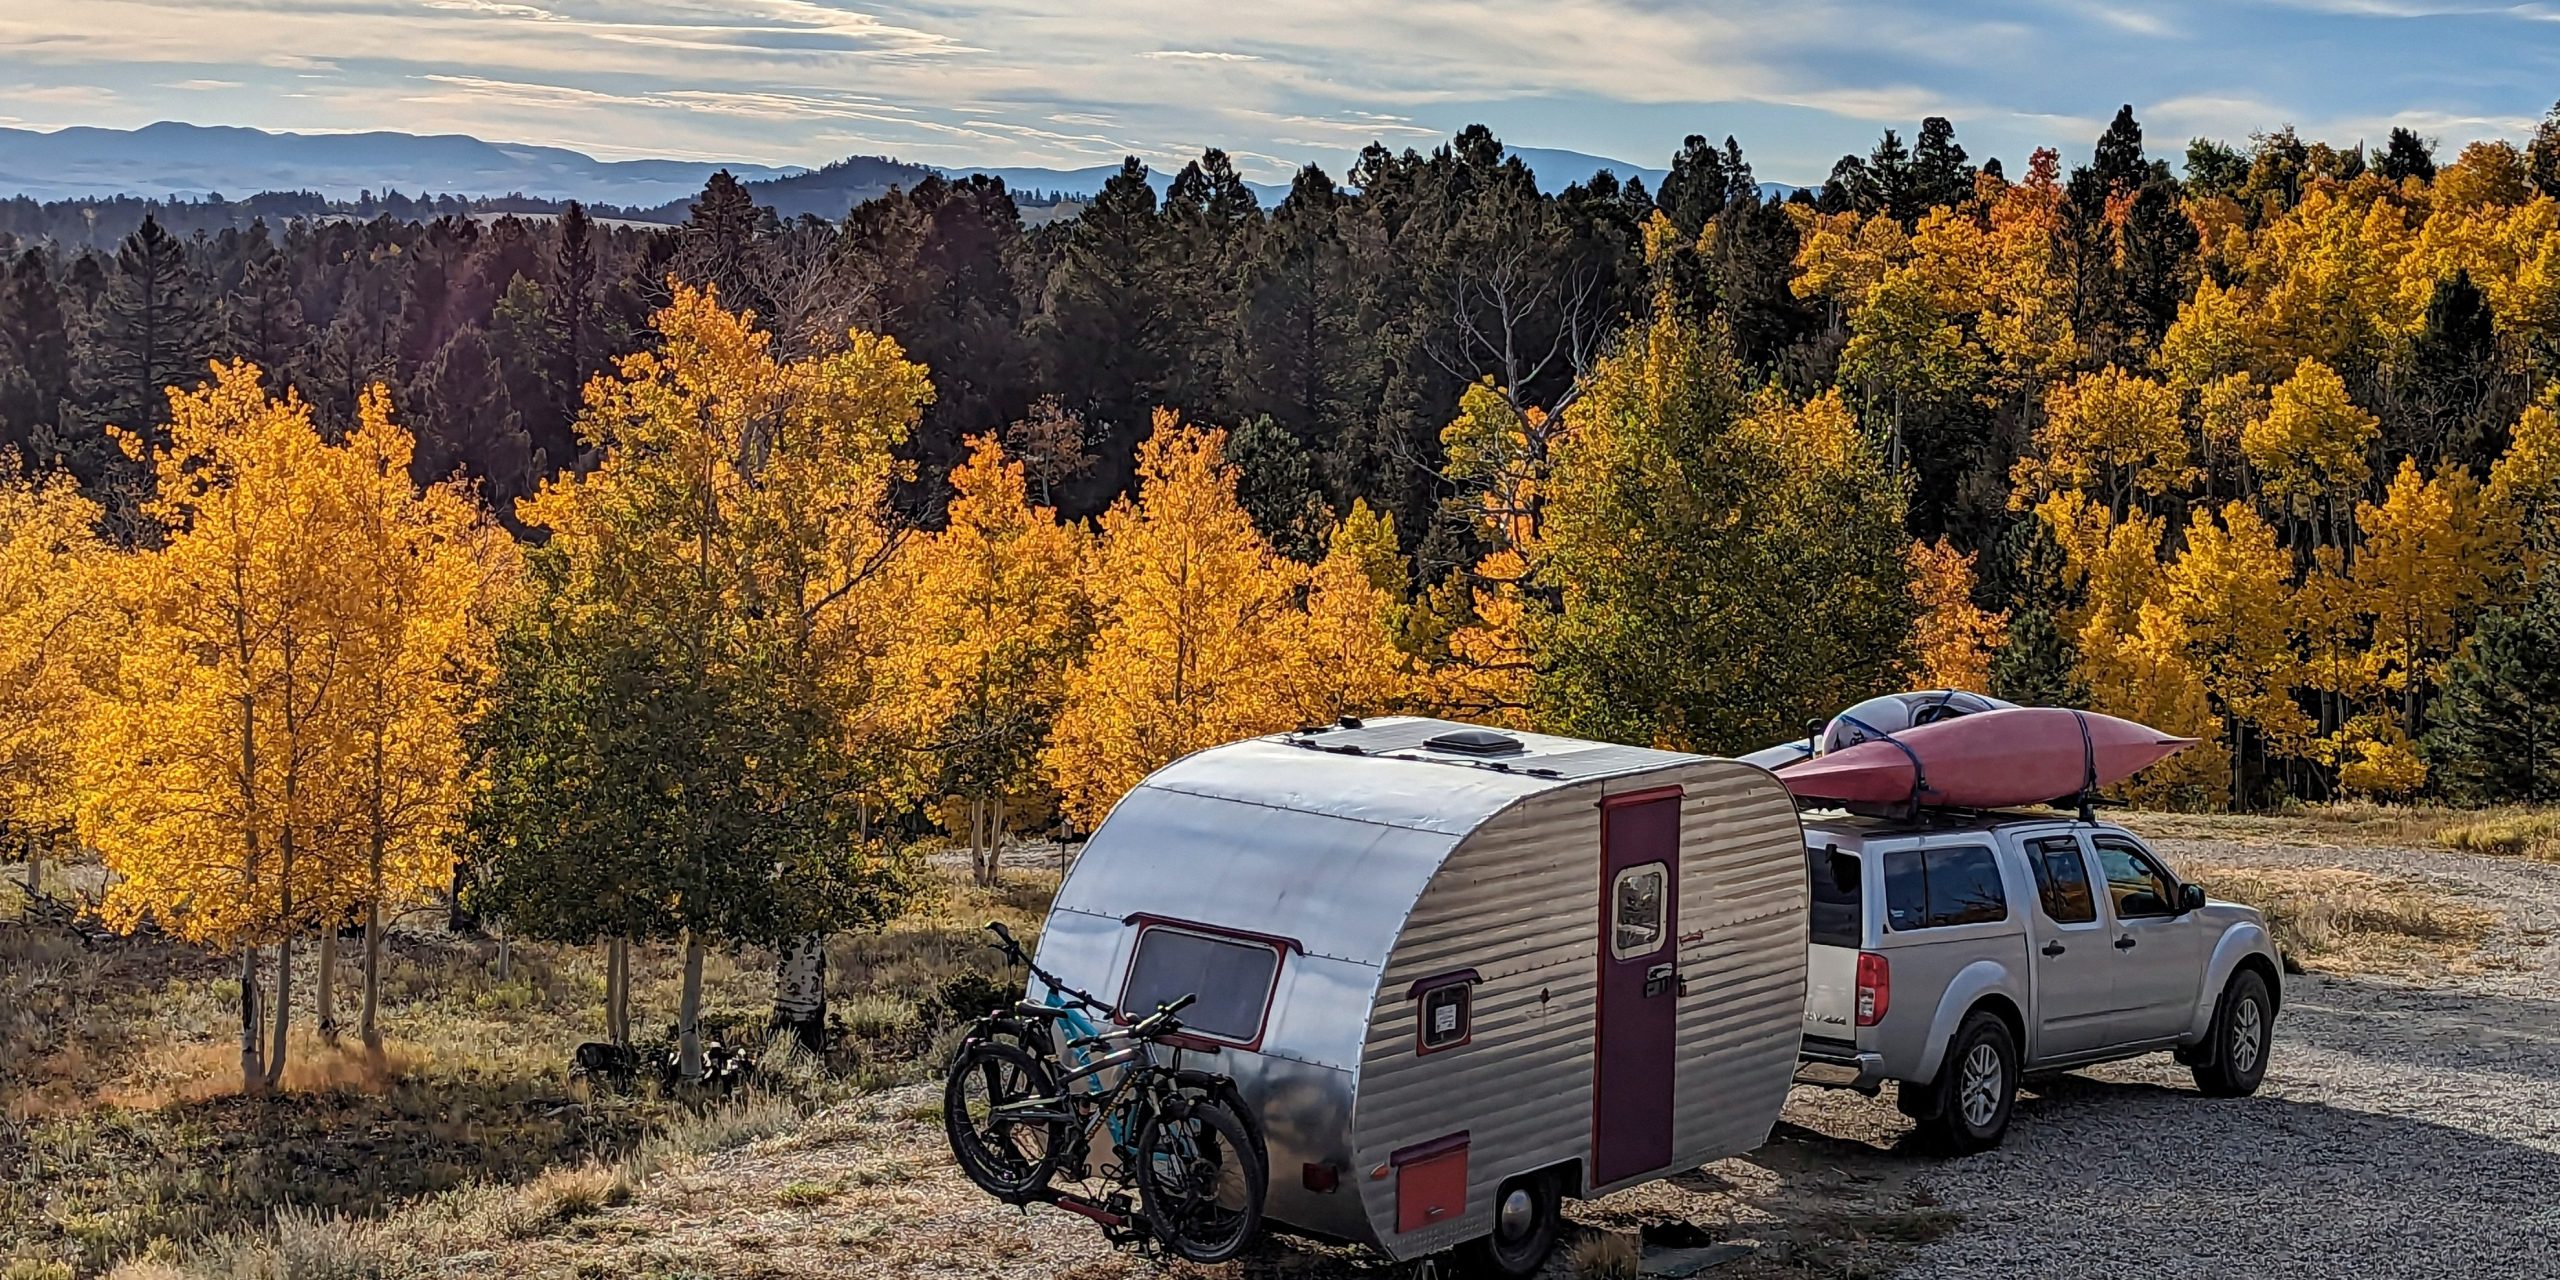
    My wife and I have purchased four different RVs with four different experiences, and it’s always a fun but anxious experience. Is this the right one? Are we going to regret this? What are we forgetting? These are all logical questions, because buying an RV is a big investment, and making the right choice can mean the difference between endless adventures and constant headaches.

    Whether you’re a first-time buyer or looking to upgrade, asking the right questions when buying an RV is crucial to ensure you get the best value for your money. For that reason, we have created this list of the essential questions when buying an RV. (You know, the ones you don’t want to forget.) That way, your purchase process goes a little more smoothly.


    1. When can I have the RV inspected?

    Even if you are a veteran of the RV world, things can happen, and you can miss or forget something during your personal inspection or walk-through. For that reason, getting an independent, certified, and experienced RV tech to come and do a full inspection with a detailed write-up and pictures, if possible, is always the best practice.

    There were issues with our first RV that could have easily been avoided if we had gotten an independent RV inspection prior to purchase. On the other hand, we had four inspections on four different RVs before we finalized our last RV purchase. The difference was night and day, and we felt way more comfortable and confident when we finally pulled the trigger. Sure, this may be one of the most awkward questions when you’re buying an RV (no one likes to sound distrustful), but it’s so important it really should come first.

    Tip: If you request an independent RV inspection, make sure they have no ties to the private seller or dealership you are looking to buy from. Anyone, even an RV dealership, should allow you to have an independent RV inspector come and do a full inspection. If they don’t – run! That is not the RV for you.


    2. What’s the RV’s history?

    If you’re buying a used RV, knowing its history is vital. Request maintenance records and check for any signs of water damage, mold, or structural issues. Ask about previous owners, how the RV was used, the mileage, and any past accidents or repairs. A well-documented history can give you peace of mind about your purchase.

    Tip: It’s helpful to know if the RV was used for full-time living or just occasional trips, as this can affect the wear and tear on the vehicle. Conversely, an RV that has been sitting idle for long periods might have hidden issues like dry rot or engine problems.


    3. What’s the fuel efficiency?

    Fuel costs can add up quickly, especially on long trips. Understanding the fuel efficiency of your RV, or tow vehicle if you are buying a towable, can help you budget better and make more eco-friendly choices.

    Ask about the average miles per gallon (MPG) for the RV if you are buying a drivable, and make sure to confirm it by doing research online. Consider both highway and city driving. Also, inquire about any features that might improve fuel efficiency, such as aerodynamic design or fuel-efficient engines. If you’re considering a motorhome, knowing the fuel type (diesel or gasoline) can also impact your decision based on cost and availability.

    If you are going with a towable, do your research on towing capacity of bumper pull versus fifth wheel / gooseneck towing, and then make sure to understand the same basics of fuel type and mileage for your tow vehicle when towing.

    Tip: Once you know the MPG, calculate how far you can get on a single fill-up. During our first cross-country trip pulling a fifth wheel, we learned quickly that not only do long travel days add up, but diesel gas isn’t everywhere and adding an external gas tank was a necessity for us.


    4. What’s included in the price?

    The price tag on an RV can be misleading if you don’t know what’s included. Are you getting all the accessories, or will you need to buy essential items separately?

    Ask for a detailed list of what comes with the RV. This should include appliances, furnishings, and any extras like awnings or solar panels. Knowing what’s included can help you budget for any additional expenses.

    When buying from a dealership, make sure to see the exact unit you are buying, because a similar looking rig may have several other options included that will add to the price. When buying from a private seller, sometimes they will include hoses, extensions, and extras that can save you hundreds or even thousands of dollars, depending on what you can negotiate.

    Tip: Ask if there are any transferable warranties on the appliances or accessories, as this can save you money on future repairs or replacements.


    5. How are the tires?

    Tires are one of the most critical components of an RV and replacing them can be costly. But not replacing them can be way more costly. Even if the tires look good, they might be past their prime with rot or wear under the surface.

    Check the manufacturing date on the tires – most experts recommend replacing RV tires every five to seven years, regardless of tread wear. Ensure the tires are in good condition to avoid unexpected expenses and safety issues. Ask if a spare tire is included and verify if it is in good condition if it is.

    Additionally, inquire about recent alignments and whether the RV has been stored on concrete or dirt, as this can affect tire longevity.

    Tip: Even if you have newer tires, routine inspections can go a long way. We had some newer tires on our Class B van, but we didn’t check them after some rugged adventures, and a rear blowout really messed up our travel plans and budget.


    6. What’s the storage capacity?

    Storage is a key consideration, especially for long trips, full-time RV living, or traveling with a large family.

    Evaluate both interior and exterior storage options. Check for closets, cabinets, and compartments, and think about where you’ll store essentials like kitchenware, clothing, and outdoor gear, especially if you will be in different climates or terrains during your adventures.

    Ask if there are any expandable storage solutions or if the RV can be easily customized to add more storage.

    Tip: Space is just one part of the storage equation — don’t forget about weight!


    7. What’s the condition of the roof?

    The roof is one of the most vulnerable parts of an RV, and a leaky roof can lead to extensive damage all over your rig.

    Inspect the roof for any signs of damage or wear, and check if any repairs have been performed. Ask when it was last resealed or maintained. Regular roof maintenance is crucial to preventing leaks and extending the life of your RV. Also, consider the type of roofing material used, as some are more durable and easier to maintain than others.

    Tip: Patches can be a sign of previous leaks, and you’ll want to ensure they were properly fixed.


    8. What is the bed like?

    A good night’s sleep is crucial, especially when you’re on the road for extended periods. RVs usually come with less-than-optimal beds when they are purchased, and mattresses are usually among the first upgrades most RVers make.

    Test the bed for comfort and size. If you’re tall, ensure the bed is long enough. Ask if the mattress is included and if it’s of good quality. Lie down on it to test your comfort level. If it isn’t up to your standards, budget for a replacement. Consider the bed’s location and accessibility, especially if you or your travel partner have mobility issues.

    Tip: Make sure to ask if it is a custom style bed or one that can easily be swapped out.


    9. How does it drive?

    From drivable to towable, every RV handles differently, and it’s essential to get a feel for how it drives. A comfortable and safe driving experience is crucial for long trips.

    Always take the RV for a test drive. Pay attention to how it handles, brakes, and maneuvers in various conditions. Test it on different road types, including highways and narrow streets, to get a full sense of its handling.

    This goes for both drivable and towable options, as your tow vehicle’s capabilities really matter.

    Tip: Test the RV’s turning radius, as a wide turn can make it difficult to navigate in tight spaces.


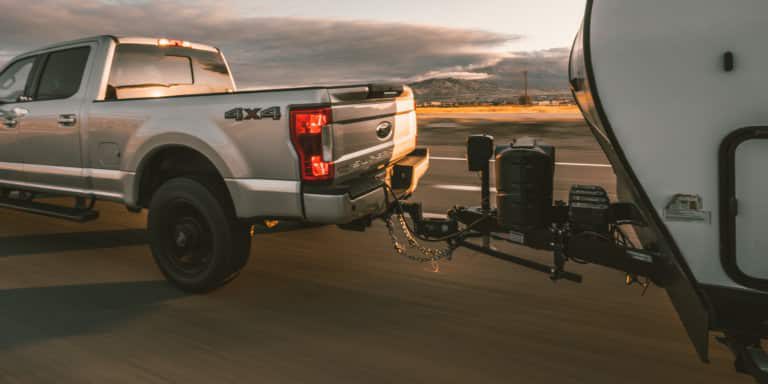
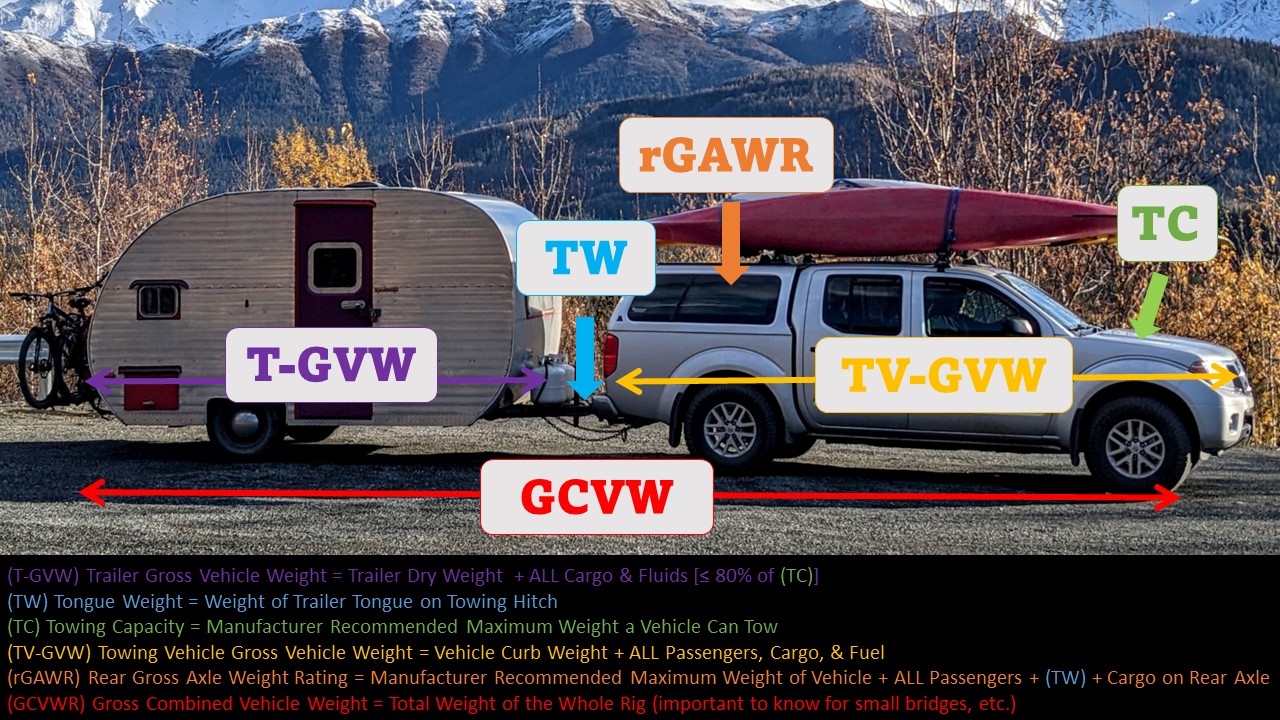
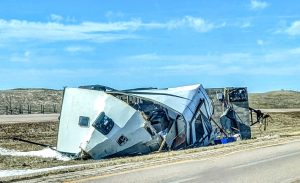
    10. What’s the towing capacity?

    If you’re buying a towable RV, knowing your towing capacity is essential. You don’t want to discover too late that your vehicle can’t handle the load.

    Start by checking the RV’s gross vehicle weight rating (GVWR) and ensure your tow vehicle can safely handle the weight. This information helps you avoid overloading and potentially damaging both your RV and tow vehicle.

    Additionally, verify the towing capacity of your current vehicle and whether you’ll need any special equipment, like a weight distribution hitch or sway control. Also, ask about the brake system on the trailer and ensure it’s compatible with your tow vehicle. The same goes for a drivable if you are hoping to tow something behind it.

    Tip: Always double-check the weight! We purchased our first fifth wheel and truck combo together, but after a short time we upgraded to a new fifth wheel without checking the weight. And of course, it was too heavy for our truck, which resulted in additional costs to upgrade our towing vehicle.


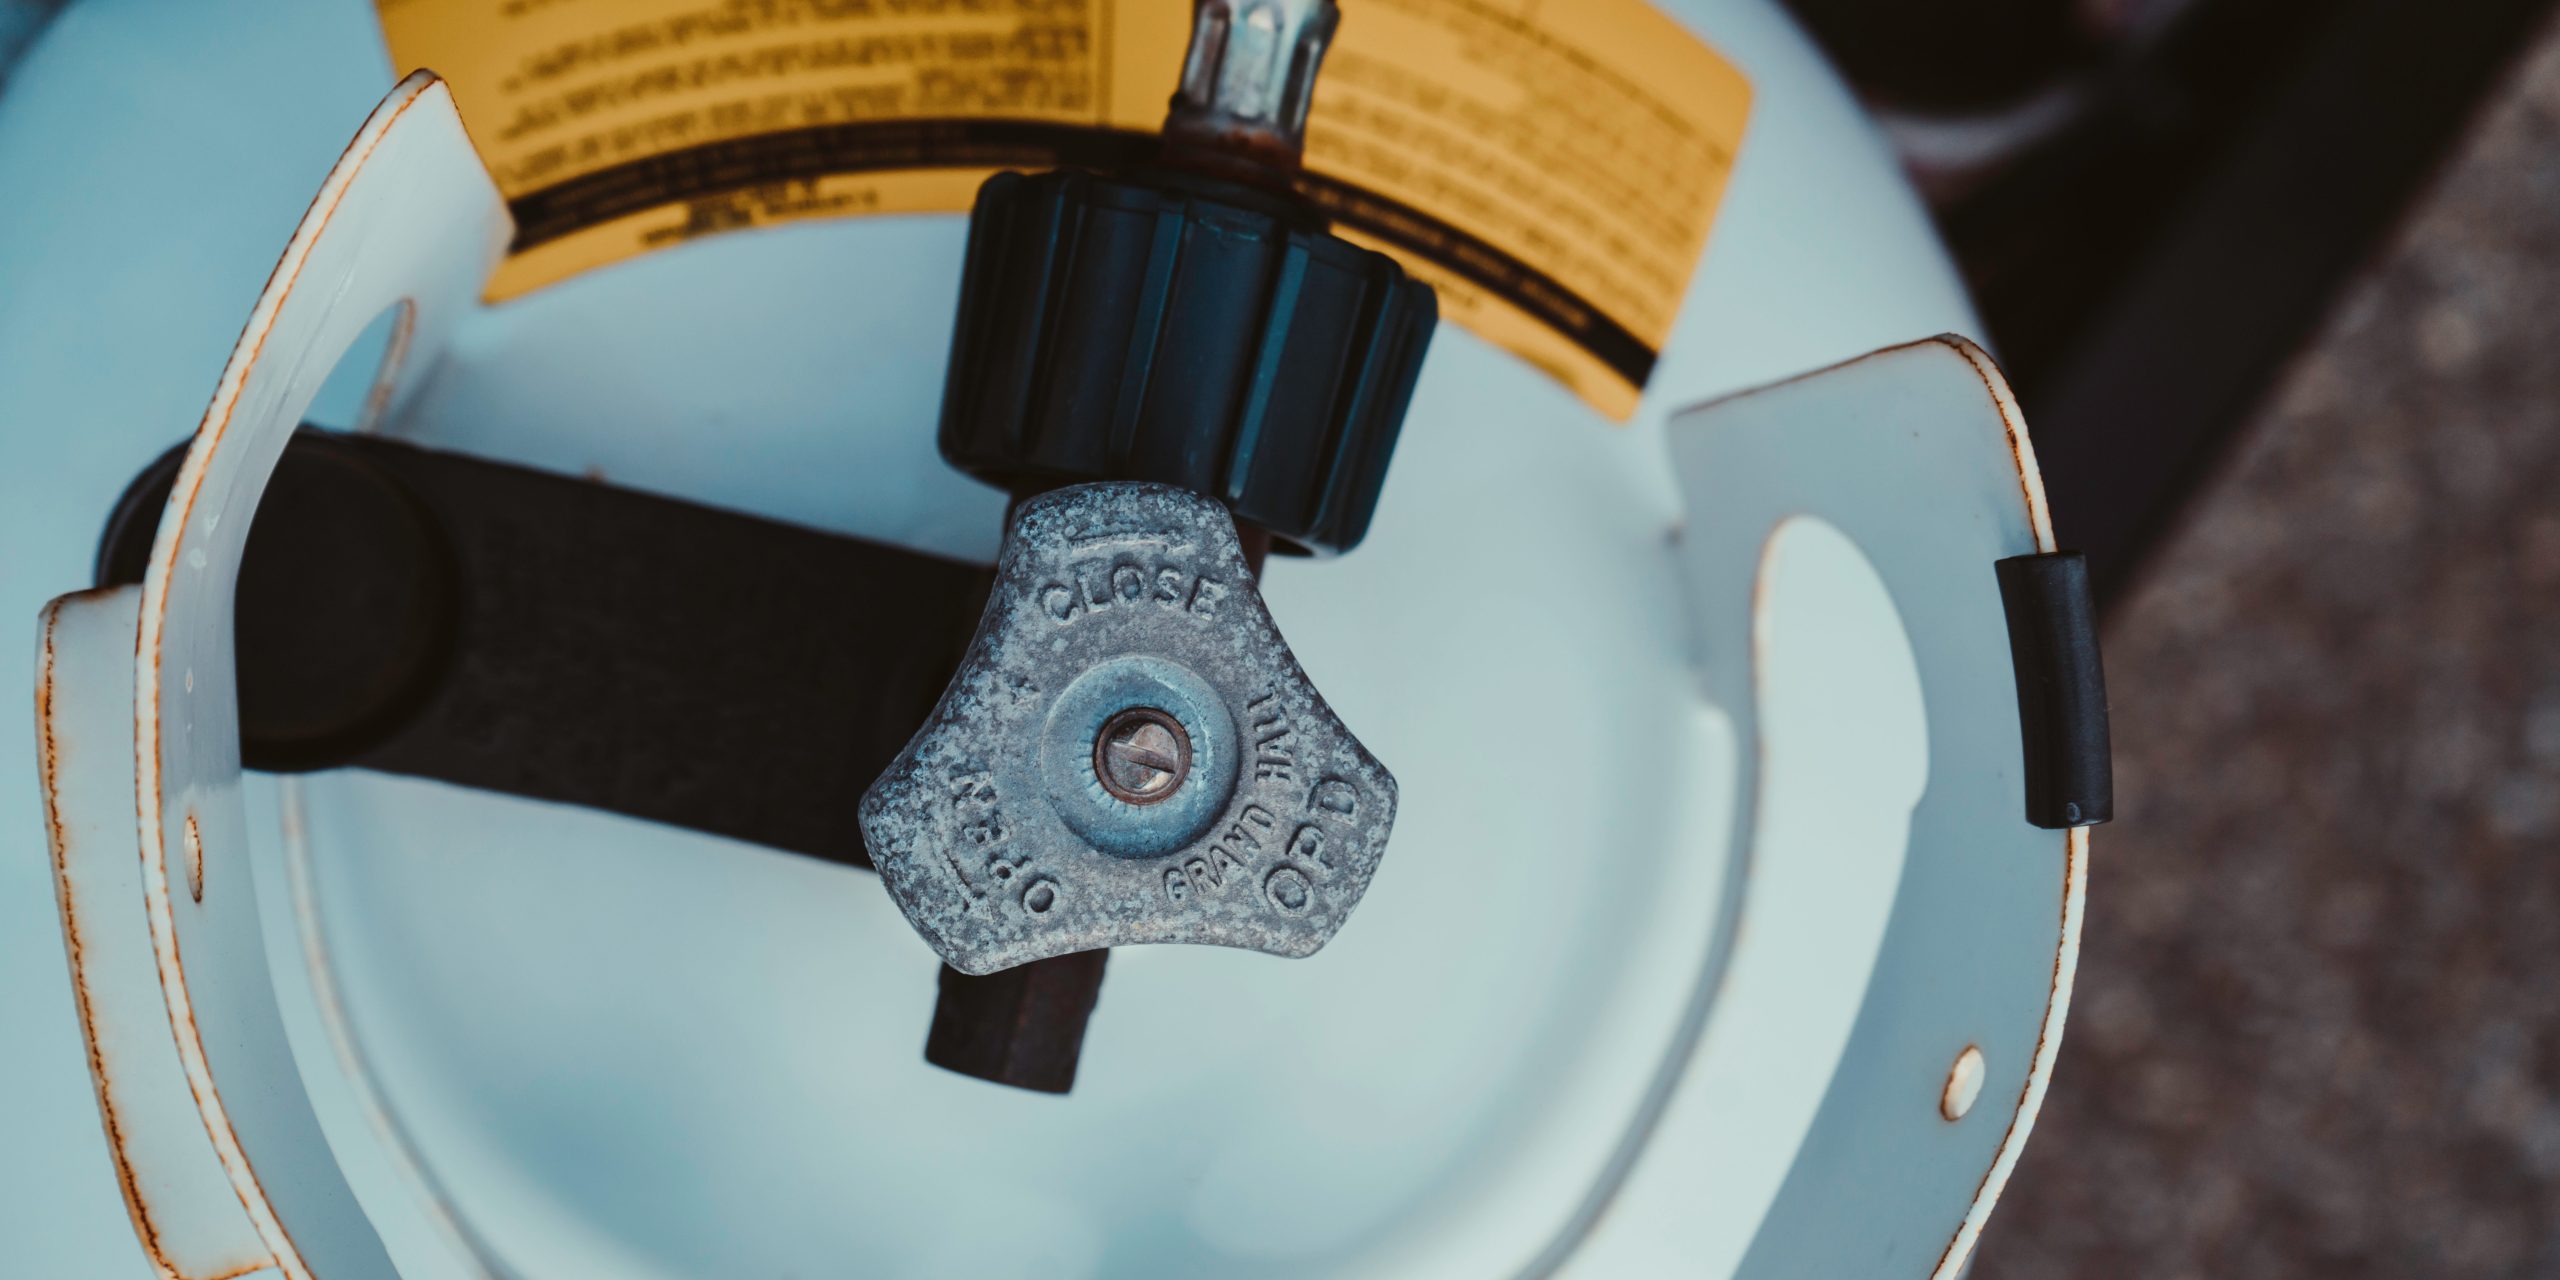
    11. What about the tanks?

    The capacity of the fresh, grey, and black tanks goes a long way in determining how long you can stay off-grid without needing to refill. Knowing the state of the water and tank system is extremely important, because leaking or damaged systems can be expensive and messy to fix.

    Ask about the size of the freshwater, grey, and black tanks and how long it typically lasts based on usage. Consider your needs for cooking, cleaning, and personal hygiene. Also ask about the type of water heater and its capacity, as this will affect your showering and washing experiences. Additionally, inquire about the availability of an external water hookup and whether the RV has a water filtration system.

    Inspect the water and sewage systems, including the tanks and hoses. Check for any signs of leaks or damage around the water tanks and plumbing. It’s also helpful to know the location of the tanks for easy refilling, dumping, and maintenance. Where is everything located and how is the plumbing set up?

    Tip: Find out about and understand the weather conditions that your plumbing can withstand – your tank heaters and insulated vs exposed plumbing are a big deal in cold weather.


    12. Are there any custom modifications?

    Custom modifications can be a double-edged sword. While some can enhance your RV’s functionality, others might complicate repairs or reduce resale value. This can also be one of the easiest questions when buying an RV to forget.

    Ask about any custom modifications and why they were made. Ensure they were done professionally and won’t cause issues down the line. This knowledge helps you understand the RV’s unique features and potential quirks. If possible, get documentation or photos of the modification process to ensure it was done correctly.

    Also, consider how easy it would be to reverse these modifications if they don’t suit your needs. Custom modifications can sometimes void warranties, so check if this is the case with the RV you’re considering if there is any warranty that can actually be transferred.

    Tip: In many cases, if you are not the first owner, then a lot of or all of the warranties are void upon sale or transfer. So verify that as well.


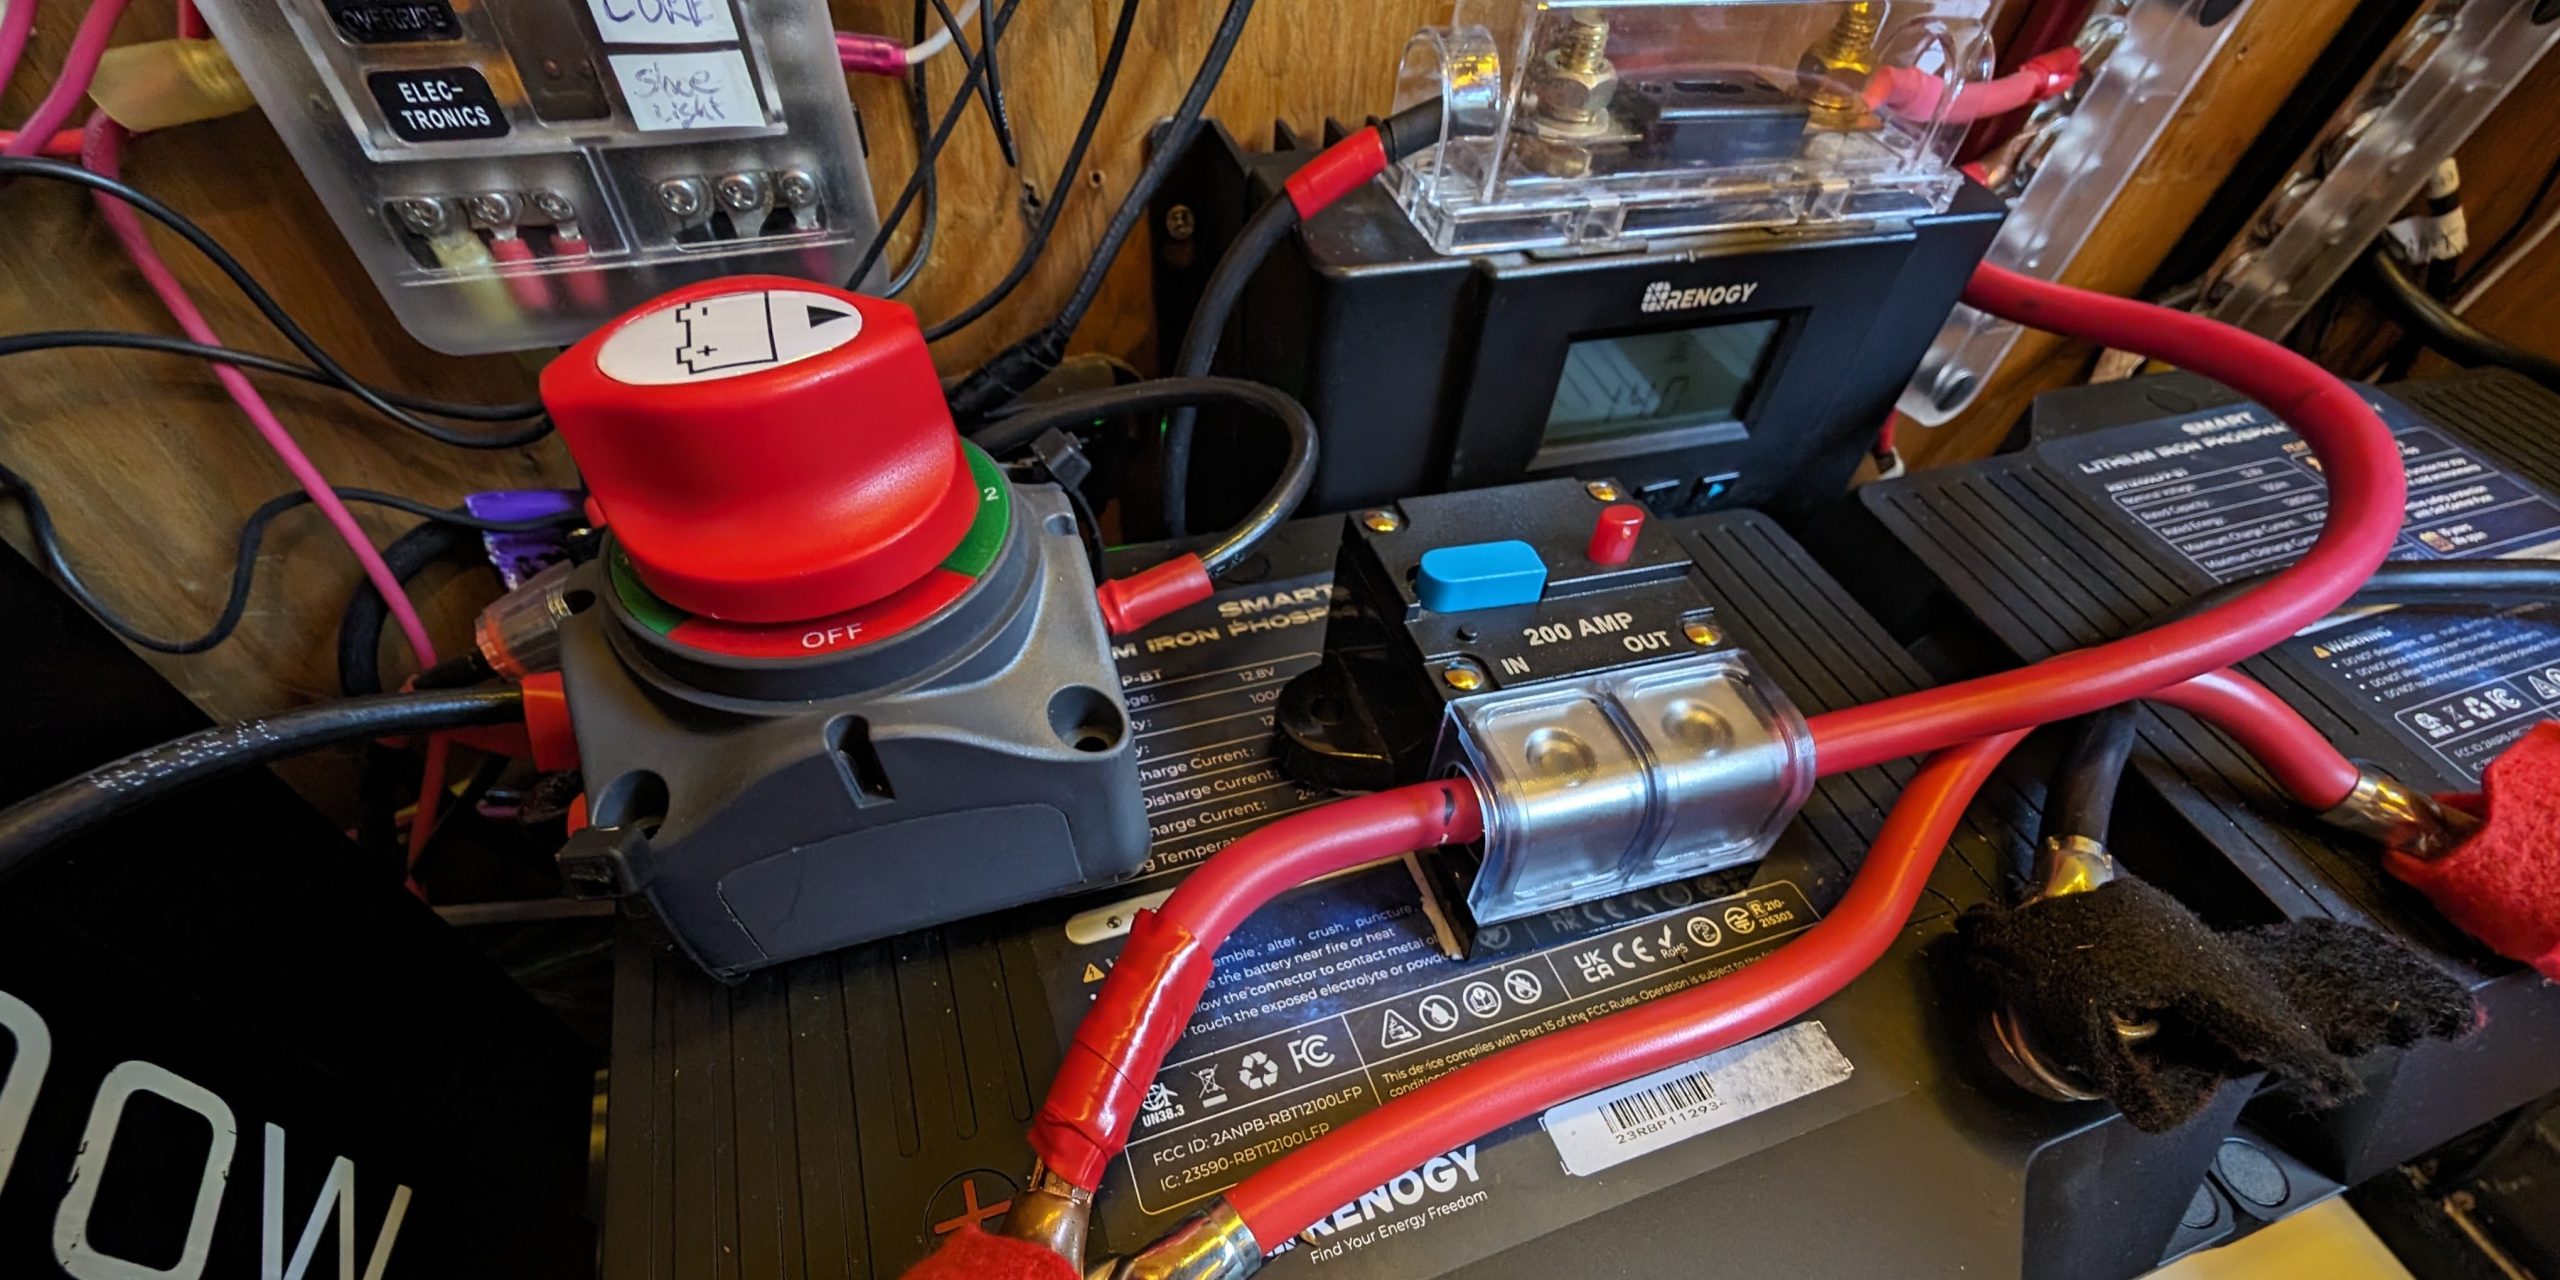
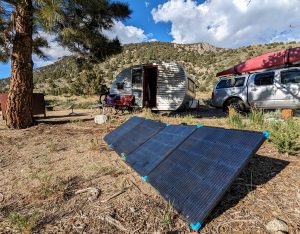
    13. What’s the power setup?

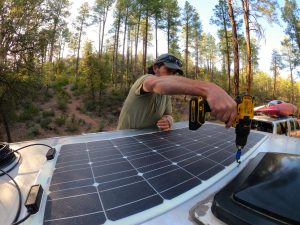
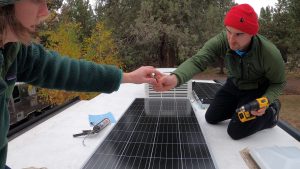
    Your power setup is a huge deal when it comes to livability and functionality, especially if you want to go off-grid. What are the type and capacity of batteries? Is your rig a 30- or 50-amp setup? Do you have a solar package and/or a generator? Are there other charging capabilities? These are important for knowing and estimating your power consumption and battery life when off-grid.

    Batteries: Ask about the voltage, amperage, and size of your house battery system. If you are purchasing a drivable RV, determine if it is connected to your chassis battery and if so, how.

    Amperage: Knowing if your rig is 30- or 50-amp lets you know what kind of cables and hookups to purchase, and it lets you know what you can and can’t run off of your batteries and/or external power sources.

    Power sources: Understanding your external power sources like solar, generators, alternators, or trickle charging from a tow vehicle will help you better estimate your ability to go off-grid and how long you can do so.

    Tip: Batteries degrade with time and use. Verify the batteries are supplying the expected voltage and current, and hold the correct amount of charge.


    Don’t be shy. These questions when buying an RV can save your butt.

    Buying an RV is a significant investment, and asking the right questions when buying an RV can help you make an informed decision. (Not to mention saving you a lot of unforeseen heartache down the road.) So don’t be shy. Ask the questions. By understanding the RV’s history, condition, and features, you can avoid common pitfalls and find a home on wheels that meets your needs. Start your search on RV Trader.