Category: RV Advice

  • FMCA Tech Tip: Purging RV Propane Containers

    FMCA Tech Tip: Purging RV Propane Containers

    When one or more of a motorhome’s gas-burning appliances exhibit strange, random, or difficult-to-diagnose problems, it may signal the need to purge the propane container. Brand-new propane containers also must be purged properly before being filled for the first time. So what is purging? Does it apply to all RV propane containers? How do you know if your container needs such a service? And who can do it?

    For answers, read this how-to guide from FMCA and the “RV Doctor” Gary Bunzer:

    About Propane Containers

    Before answering those questions, let’s define the term “propane container.” Most motorhomes are equipped with horizontal propane containers bolted to the frame of the coach. Typical motorhome propane containers are regulated by the American Society of Mechanical Engineers (ASME), as documented in its Boiler and Pressure Vessel Code. A horizontal ASME container is called a tank. The capacity of an ASME tank usually is expressed in gallons.

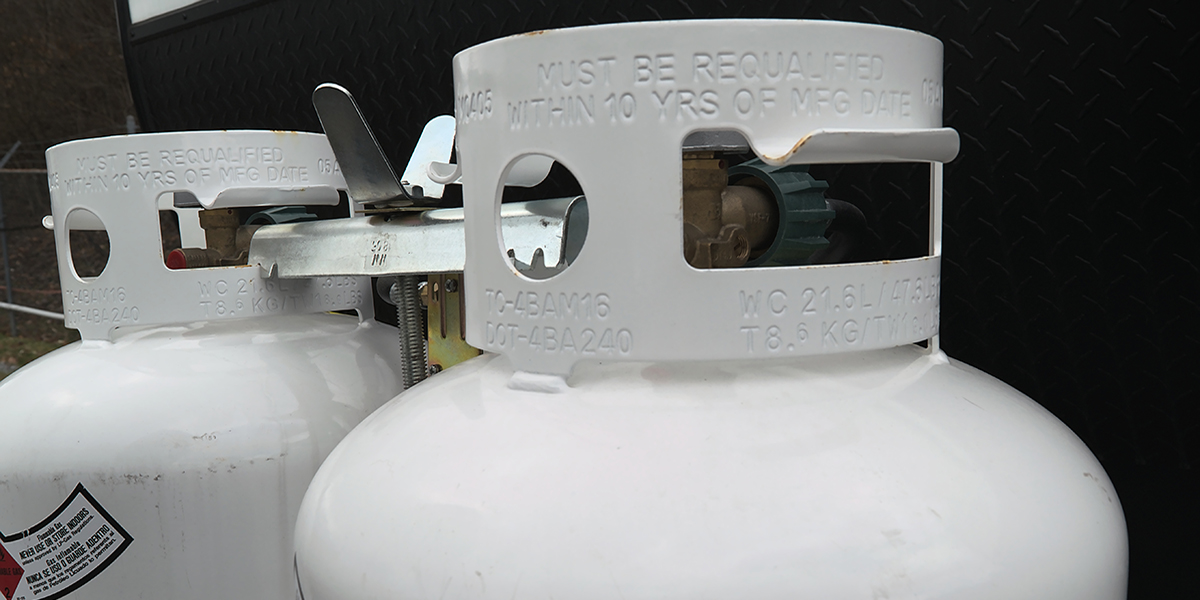
    Some smaller Type C coaches and older motorhomes may be outfitted with upright propane containers installed in a side compartment; it’s the same type of container usually found on towable RVs or in home gas barbecue grills. Such containers (which can be vertical or horizontal) are called cylinders, and are governed by the U.S. Department of Transportation (DOT) within the agency’s Hazardous Materials Regulations. Cylinders destined for Canadian provinces are regulated by Transport Canada (TC). The capacity of a DOT/TC cylinder typically is measured in liquid pounds.

    So, generally speaking, an ASME tank is bolted to the coach, while a DOT cylinder is portable and replaceable. Both types of containers require purging at some point.

    Why Purge?

    New propane containers are hydrostatically tested for leaks before shipment. A container that is destined for an RV, whether it’s a tank or a cylinder, usually is filled with compressed air (or sometimes another inert gas) when it is shipped from the supplier. Air contains moisture and other contaminants. Purging removes the air, moisture, and contaminants; if the purge process is not performed before the container is filled with propane the first time, combustion problems or delivery line pressure irregularities may develop later.

    Unfortunately, most new motorhome buyers don’t know whether their propane container was properly purged prior to that first filling, since a new motorhome usually is delivered to the owner with a full (or nearly full) container of fuel. I suggest asking that question during the walk-through or before officially taking delivery. Ask to see the pre-delivery inspection (PDI) form for validation. It’s in the best interest of both the RV dealer and the buyer to have a proper purging verified in writing before the retail delivery of an RV.

    Purging applies to older propane containers as well. In fact, any time a container has been opened to the atmosphere, for any reason, a new purging must take place before refilling with fresh fuel. Say, for instance, the internal float assembly fails, or the shut-off valve leaks and that component needs to be replaced; the tank must be purged after the replacement, since air has been allowed to enter. And that air contains moisture and perhaps other contaminants.

    The Moisture Problem

    Even a little water lying at the bottom of a propane container can be a problem. Any moisture present from the container to the inlet of the pressure regulator can cause the regulator to freeze up. There are two types of regulator freeze-up, both with negative outcomes.

    One type of regulator freeze-up occurs as the fuel in the container becomes vaporized on its pressurized path to the regulator inlet. The pressure regulator has individual sections where the fluctuating container pressure is reduced in two steps to the delivery line pressure required by the appliances. The propane vapor must pass through small orifices in these two stages in order for the pressure to be reduced sequentially and smoothly. Propane’s “boiling point” is minus 44 degrees Fahrenheit. Below that, it exists in liquid form; above that, it vaporizes. So, any remnant of water will freeze in those small internal orifices and block the flow of propane vapor through the regulator.

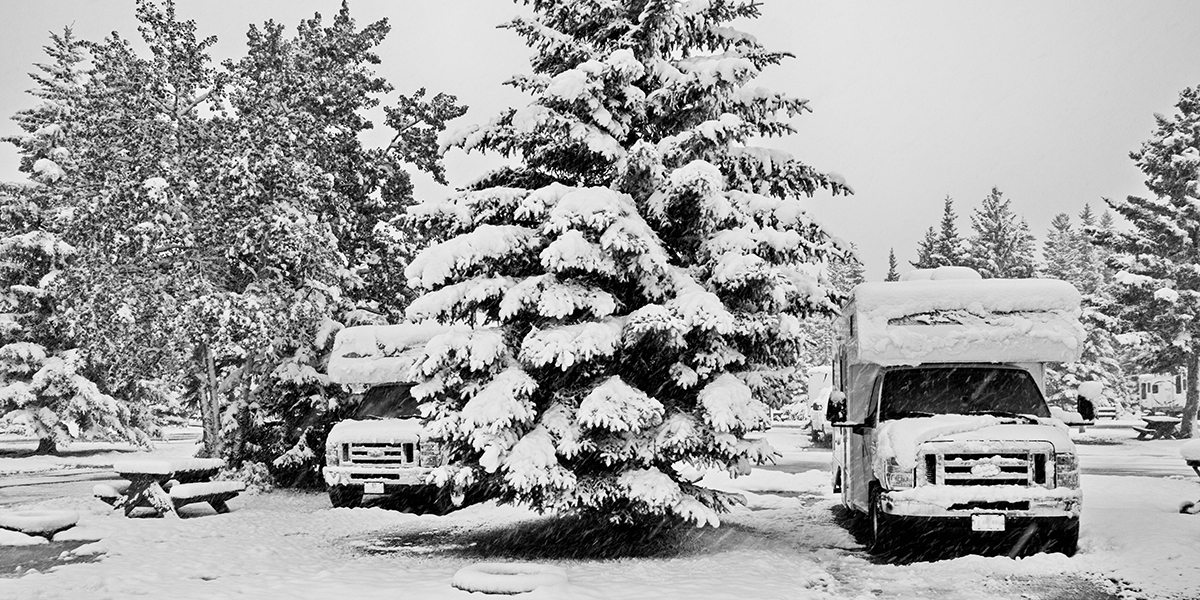
    The second type of regulator freeze-up happens externally during the winter months when mud or water or slush splashes up from the roadway, freezes, and blocks the second-stage atmospheric vent opening on the regulator. If the diaphragm inside the regulator cannot breathe, it cannot regulate, and it simply locks up. That’s why it’s important for the vent portion to be positioned downward and the regulator to be covered at all times during operation.

    The result of either type of regulator freeze-up is no propane flow, and the appliances will shut down just as though the container were out of fuel.

    When To Purge

    A container that has been in use for a while may need to be purged if more than one appliance has operational issues. For instance, the furnace doesn’t ignite right away; the water heater burner sputters; the cooktop burner flame lifts off the burner; or a burner flame is abnormally large or small, or more orange than blue in color. Any operational issue with an appliance is a cause for concern and should be investigated. It simply may be an out-of-adjustment regulator or an appliance in need of cleaning, but it could also be caused by moisture inside the container.

    Who To Call

    Certified and master certified RV service technicians are trained to properly purge a propane container. As an alternative, most propane retailers also can do the procedure.

    As mentioned, new tanks and cylinders typically are filled with air when shipped, but containers already in service will contain propane. In the case of the latter, before purging, it will be necessary to remove or burn off the container’s remaining propane.

    What Owners Can Do

    Since safety is paramount, FMCA recommends an annual test of the pressure regulator, as well as the entire propane gas distribution system, by a certified RV service technician. The condition of the container also should be checked. In addition, the RV owner should test the propane leak detector periodically.

    If the propane’s odorant is ever detected, immediately turn off the container’s service valve and schedule the RV for tests.

    And RVers should always keep a close eye on how well the RV’s appliances are operating. This can be your first sign of a problem.

    FMCA RV Club brings you this monthly tip to Enhance Your RV Lifestyle. FMCA delivers RV know-how to its members. Join today and save $10 — a special offer for RV Trader readers. Learn more at https://join.fmca.com/trader18/.

    This information is for educational purposes. FMCA shall not be responsible nor retain liability for RVer’s use of the provided information. Prior to making any RV service decision, you are advised to consult with an RV professional.

  • FMCA Tech Tip: Winterizing Your RV: Air vs. Antifreeze

    FMCA Tech Tip: Winterizing Your RV: Air vs. Antifreeze

    Unless you’re one of the lucky RVers heading south this time of year, fall’s cooler weather means it’s almost time to winterize your RV. The how-to of winterizing can be a hot debate (pun intended). FMCA has tips to help you decide the right option for your RV.

    About Winterizing

    Winterizing deals primarily with the plumbing system and protecting your RV from freeze damage. All water must be removed from holding tanks, water lines, and plumbing fixtures. Two methods are performed to winterize RV plumbing: using air pressure to blow moisture out of the system or pumping antifreeze through the water lines.

    Which should you use? The answer depends on where you live and the complexity of your RV’s plumbing system.

    Air

    Air is easy to use; just connect an air compressor to the water hose and blow everything out. In theory, the system will be dry. Plus, air is free, so it eliminates the need to buy bottles of antifreeze. Air pushes most of the water out, but residual water can remain in water lines’ low spots where it can freeze, expand, and cause damage.

    In a simple RV with minimal plumbing lines, using only air may not be an issue. But if you live in a place with long, cold winters, using air may not be enough to protect your RV from freeze damage.

    Antifreeze

    RV professionals consider antifreeze to be the best method for preventing freeze damage. Keep in mind that it differs from automotive antifreeze. RV antifreeze is nontoxic and is safe to use in fresh-water systems. It freezes but does not solidify. Instead, it turns to slush, which will not expand to crack fittings or water lines.

    One drawback to antifreeze is that it can be messy and requires buying a few gallons every season. It also can cause water from treated lines to taste bitter.

    More Resources

    For detailed, step-by-step instructions on the winterizing process, click here.

    Join the air vs. antifreeze debate. Check out this video from “RV Doctor” Gary Bunzer.

    FMCA RV Club brings you this monthly tip to Enhance Your RV Lifestyle. FMCA delivers RV know-how to its members. Join today and save $10 — a special offer for RV Trader readers. Learn more at https://join.fmca.com/trader18/.

    This information is for educational purposes. FMCA shall not be responsible nor retain liability for RVer’s use of the provided information. Prior to making any RV service decision, you are advised to consult with an RV professional.

  • FMCA Tech Tip: Disaster-Proof Your RV for Hurricane Season and Beyond

    FMCA Tech Tip: Disaster-Proof Your RV for Hurricane Season and Beyond

    Are you prepared for an emergency while RVing? Unfortunately, September’s history as an active month for hurricanes reminds RVers of the importance of being prepared. Read FMCA’s tips to prepare yourself for emergencies and natural disasters while RVing.

    Evacuation Safety

    Prepare two escape plans. One is for abandoning the RV when you need to get yourself and occupants out safely. The other is a plan for packing/driving the RV away when time allows you to evacuate ahead of a wildfire, hurricane, or other threatening situation.

    Pro-Tip: FMCA’s blog offers resources for evacuating from a wildfire.

    Escape Plan #1

    In the first instance, have a plan for escaping the RV in a variety of scenarios (galley fire, engine fire, RV lying on its side or roof). What is the quickest way to escape? How will you make sure all occupants are accounted for? Will one specific person be in charge of helping pets get to safety?

    In boating, a “ditch bag” is kept handy to grab just before one abandons ship into the water or a life raft. Prep your own “ditch bag” to grab in case of RV disaster.

    Pro-Tip: In your grab-and-go bag, consider including copies of important documents such as insurance policies, driver’s licenses, phone numbers, and credit cards.

    Escape Plan #2

    In the second instance, consider how you would need to evacuate the RV from a location.

    • A few points to think about as you form your plan:
    • How would you handle removing the electric, water, and sewer hookups?
    • If you drive a motorhome, consider if you’d have time to connect the towed vehicle.
    • How long does it take you to retract the awning(s), slide-out(s), and leveling jacks for a quick getaway?
    • If you or your driving partner is incapacitated, can the other person safely pack up the RV and drive you to safety?
    • Do you have a reliable AM/FM radio or weather radio to stay informed of the latest weather or road condition updates? Remember that you may lose internet connectivity in an emergency or extreme weather situation.
    • Do you have a Plan B for dealing with unexpected delays such as a stuck slide-out or sticky awning?

    Consider making an “evacuation checklist.” Decide what items absolutely must be taken care of before you can safely move the RV and what can be eliminated, sped up, or modified.

    Pro-Tip: On your evacuation checklist, list a family member or friend that you could call to let them know your emergency evacuation plans. This person can then alert other loved ones that you have safely evacuated.

    We hope you never find yourself in an emergency situation while RVing. You can’t predict the future, but you can help prepare yourself and your family by thinking about “What if?” scenarios.

    FMCA RV Club brings you this monthly tip to Enhance Your RV Lifestyle. FMCA delivers RV know-how to its members. Join today and save $10 — a special offer for RV Trader readers. Learn more at https://join.fmca.com/trader18.

    This information is for educational purposes. FMCA shall not be responsible nor retain liability for RVer’s use of the provided information. Prior to making any RV service decision, you are advised to consult with an RV professional.

  • Where Can I Buy an RV Warranty?

    Where Can I Buy an RV Warranty?

    You have options when it comes to where you can purchase an RV. The primary two choices are RVs bought directly through a private party, or from the lot of a dealership. Both buying options have pros and cons, and the correct venue for purchase will depend on your needs as a traveler. Subsequently, the options to protect your new rig will differ depending on who supplies your coverage.

    In this post, we explore some key differences between buying an RV through a private party versus a dealership, plus some important factors to note on protecting your investment.

    From an RV Dealer

    There are lemon laws in place for many dealerships, and if you’re purchasing new, you’ll also receive a one-year manufacturer’s warranty for any shake-out issues. For used units, you typically have a 30-day grace period to get any repairs covered.

    But what happens beyond those 30-days, or even the year?

    When you purchase an RV directly through a dealer, you have two options to protect your investment. You can either buy extended warranty coverage through their existing programs, or you can go through an online broker.

    No matter where you purchase your policy, there are some things you should look for to ensure reliable coverage. First, is there an option for personalized quotes? Not every traveler has the same needs, and you don’t want a one-size-fits-all policy. Make sure your purchase includes the components you want protected, and that you’re not paying for what you don’t.

    Next, confirm the person selling the policy is a subject matter expert in the warranty itself, not just the physical RV. Beyond that, post-purchase support can be invaluable when it comes to smooth claims processing. You’ll want to make sure there is someone to go up to bat for you and communicate between all parties involved (including: the administrator, repair facility, and obligor).

    You’ll also want to look at the network of repair facilities the coverage offers. Can you go to any repair shop in America and Canada, or are you limited to a few, or just the dealership? The policy won’t be of much help if you’re in a bind on the road and you can’t get the repairs covered at the local shop, or by a mobile mechanic.

    Another thing to note, is that you’ll have the longest warranty term options with the cheapest price when you are purchasing a new unit. That’s because the brand-spanking-new RVs driving off the lot have the lowest probability for breakdowns in the eyes of warranty companies. If price is a factor for you, consider purchasing a policy before your manufacturer’s warranty runs out to ensure you’re getting the most bang for your buck.

    Through a Private Party

    Once you purchase a used RV, you’ll either find that the original owner has already fixed a majority of the initial issues, or you’ll have an as-is vehicle that needs a multitude of repairs on your own dime.

    The older the motorhome or towable becomes, the more important it is to purchase supplementary protection products like an extended warranty or roadside assistance. These policies can benefit your purchase decision in more ways than one, and truly serve as a tool to assist in choosing a quality rig at a fraction of the cost.

    Unfortunately, the older the rig is, the more susceptible it is to breakdowns. That’s because 3 out of 10 RVs will need a major repair within their first two years on the road. That jumps to 8 out of 10 RVs by the fifth year, and nearly every RV by the eighth year of use! Those odds aren’t great for your budget if you don’t have some sort of additional protection in place.

    The quotes from extended warranties can help determine how often your specific unit will breakdown. Warranty companies are constantly evaluating the risk associated with specific units, and the price of coverage can give you further insight into how frequently you may expect your RV to fail during the lifetime of the policy.

    It’s important to note that an online broker will be the only option for extended warranty coverage after a private party sale. Brokers are often able to offer a wider array of options and age eligibility, making them a perfect fit for many private party shoppers.

    Plus – the RV extended service contract can continue to add monetary value even if you decide to sell your home-on-wheels down the road. It suggests that a rig has been well maintained and any issues or service needed was performed in a thorough manner. Similarly, if your private party purchase came with an extended warranty, it likely suggests the RV has been well cared for.

    Things to Consider When Selling Your RV

    Whether you purchase a warranty from a dealership or from an online broker, make sure it’s fully transferrable. If you sell your RV directly to another RVer, that process should be simple. A small fee, and a few quick signatures should be all that’s required to transfer the remaining policy term to the new owner. If you’re not absolutely certain you’ll hold on to your rig for the remainder of its lifetime, you should make sure to confirm the transfer process with your broker or dealership.

    You have options when it comes to buying your RV, and protecting it long term. The tips above are an excellent way to begin your education on the differences between private party and dealership RV purchases, along with the different roads you can take to protect your investment after you’ve secured your home-on-wheels.


    Article written by Wholesale Warranties, the leading provider of RV Extended Warranties direct to consumer. With a focus on education, customer service and reliable coverage, Wholesale Warranties has established themselves as the premier option for RVers looking to protect the road ahead. To work with a highly trained RV warranty specialist on an RV protection quote for your home-on-wheels, please call 800-939-2806 or visit wholesalewarranties.com.

  • FMCA Tech Tip: Replacing Your RV’s Air Conditioner

    FMCA Tech Tip: Replacing Your RV’s Air Conditioner

    Your RV’s air conditioner(s) lead a tough life. On the roof, they are subjected to the hottest heat that the sun can dish out. They also can be damaged by tree branches when the RV is maneuvered into a tight campsite, and they just love to pick up moisture that can lead to rust. Then add in the constant vibration and pounding from the road…eek!

    Like any component in an RV, especially those with movable parts, air conditioners don’t live forever. Eventually, you will have a failure. Minor items, such as starting capacitors, can be replaced, but the A/C unit itself is generally not serviceable.

    Fortunately, air conditioners aren’t all that hard to replace. You’ll need a few basic tools, some reflective foil tape, and some caulk. The hardest part is getting the new unit up on the roof.

    Background

    Air conditioners are designed to fit a 14-inch-square hole in the roof. That is the industry’s standard roof vent size, which makes replacement easy. Some units drop the air straight through the roof and ceiling directly into the RV’s interior; in others, air passes through ducts before entering the RV’s living areas.

    However the air is ducted, both system types use the same 14-inch-square hole in the roof, and the air conditioner is secured with four mounting screws. Power generally is run through the ceiling to the opening.

    Removing the Old RV A/C Unit

    • First, switch off the circuit breaker that supplies the 120-volt-AC power to the air conditioner so that it is safe to perform work. Set the thermostat to the “off” position, too.
    • Next, remove the existing unit, starting with the fiberglass cover. Remove the four screws that hold the cover in place.
    • In most RV air conditioners, electrical connections and components are inside the cool air plenum to help keep them cool as well. To disconnect these, remove the sheet-metal cover from the plenum. The plenum joints may be taped; if so, use a utility knife to cut the tape at the joints.
    • Disconnect the 120-volt-AC wires. Most likely, you will see the entire control box connected to the thermostat using two wing nuts. Remove the two wing nuts, and put the control box down into the plenum to get it out of the way. There may also be a temperature sensor probe inserted into the evaporator coil that can be removed.
    • Some units have a diffuser in the ceiling. The diffuser must be removed from the interior ceiling, and then the four bolts that hold the air conditioner to the roof must be removed. If there is no diffuser and your RV has a ducted ceiling instead, you will likely see screws installed from the A/C unit and tapped into the steel tube roof trusses.
    • Scrape off any old caulk from the screws, remove the screws, and slide the old A/C unit out of the way.
    • Once the old unit is removed, thoroughly clean the rooftop area.

    Installing the New RV A/C Unit

    • Once the new unit is up on the roof, maneuver it into position. This may require two people to ensure proper placement of the unit on the gasket.
    • Next, cut the foil tape and remove the screws from the new unit. This allows the sheet-metal cover to be removed to provide access to the front mounting holes, as well as the wiring.
    • On most new units, there is a foam gasket designed to compress and seal the area around the access hole so that water cannot enter the RV’s interior. Set the new unit in place and mark the location of the existing mounting holes; to match them, drill into the new air conditioner’s baseplate. (On a design without ducts, that would not be necessary, because the four bolts run right through the access hole in the roof.)
    • To finish the mount, install the four screws, taking care not to overtighten and distort the base. (Overtightening can lead to warping, which can cause leaking, excessive vibration, and fan and/or compressor noise.)
    • Apply a dab of caulk over each of the four mounting screw heads.
    • Retrieve the control box from the access hole in the roof plenum, reconnect the wiring, and place the temperature probe into the evaporator core.
    • Attach the control box to the sheet-metal cover with the two wing nuts, and reinstall the cover. After all of the sheet-metal screws are in place, cover the seams with a new roll of foil tape.
    • Before reinstalling the cover, switch the circuit breaker back on and test the unit.

    FMCA RV Club brings you this monthly tip to Enhance Your RV Lifestyle. FMCA delivers RV know-how to its members. Join today for just $50 — a savings of $10 just for RV Trader readers. Learn more at https://join.fmca.com/trader18.

    This information is for educational purposes. FMCA shall not be responsible nor retain liability for RVer’s use of the provided information. Prior to making any RV service decision, you are advised to consult with an RV professional.

  • FMCA Tech Tip: Guide to Motorhome Lubricants

    FMCA Tech Tip: Guide to Motorhome Lubricants

    Motorhomes require periodic maintenance to stay in good working order. Engine oil changes are the most common procedure, but axles, the transmission, wheel bearings, and other components also must be serviced. No oil or lubricant is one-size-fits-all, so it’s important to make the right choice for each component according to the chassis manufacturer’s specifications.

    Lubricants are designated with American Petroleum Institute (API) or military (MIL) category numbers that identify their suitability for various applications. To choose the proper lubricant, consult your motorhome’s owners manual for the prescribed API service level, and then match the lubricant’s viscosity and rating to your vehicle’s operating environment.

    Ratings

    Two ratings apply to lubricants — viscosity and quality.

    Viscosity

    Viscosity is another term for thickness. An engine is designed to utilize a specific viscosity oil for a given set of operating conditions. That’s why the Society of Automotive Engineers (SAE) determines viscosity grades according to a standardized numerical rating. Always check the owners manual to determine the proper engine oil viscosity for your vehicle. The larger the number, the heavier the oil. For example, an SAE 40 oil is heavier than an SAE 30 oil.

    Viscosity also denotes the ability of the oil to flow at a given temperature. As oil heats up, it thins, flows faster, and doesn’t provide the same level of lubrication as a thicker oil. If the oil is too thick, it won’t flow fast enough to lubricate critical components. SAE ratings reflect the ability of oil to flow at 210 degrees Fahrenheit. The ratings can be useful for determining how an oil will perform in summer, but they don’t take into account the low-temperature performance of the oil in winter. So, a second test is performed at 0 degrees Fahrenheit to assess oils designed for winter use and to designate a “W” rating. For example, 10W oil is thinner than 20W oil, but both are designed for winter use. The thinner 10W oil will flow better in colder temperatures.

    Most engine wear and tear occurs during startup when the motor is turning over but everything is cold and the pistons haven’t yet expanded to their operating tolerances. Oil begins to flow, but by the time it reaches all critical areas, the engine has been running for a few seconds. A lighter-weight oil brings the oil pressure up much faster than a thicker oil. But, once the engine is working under a heavy load, the oil becomes too thin to provide adequate lubrication. So, in the case of a single-viscosity oil, it is better to opt for a heavy oil and live with the startup wear than to use a lighter oil and pay the penalty when the engine is working really hard.

    Multiviscosity oils eliminate that dilemma. A multiviscosity oil has two ratings. For example, a 10W-30 oil provides the cold-temperature performance of a 10W winter oil, yet it retains the high-temperature performance of an SAE 30 summer oil once the engine reaches its operating temperature. This offers the best of both worlds and does a better job of protecting your engine at both startup and when under load.

    Quality

    Oil quality is determined by its chemical makeup and its imbedded additives. Base oils account for about 85 to 90 percent of the formulation. The remainder consists of additives that provide full protection, including antioxidants, viscosity modifiers, dispersants, detergents, antiwear agents, rust and corrosion inhibitors, antifoam agents, and a host of others. API established its rating system to identify the quality of every oil.

    Both API and SAE ratings are marked on every container. Consult the vehicle’s owners manual for the minimum API rating specified for your engine. You always can exceed the API ratings and use a better grade oil, but never drop below the minimum API rating.

    Check The Manual

    A proper maintenance cycle for your motorhome revolves around following the recommended service schedule and matching every component with the correct lubricant. The owners manual specifies the minimum requirements, but keep in mind that exceeding those specs with a higher-quality lubricant generally will yield greater longevity. Taking proper care of your coach will save you money in the long run and greatly improve the odds of trouble-free operation.

    FMCA RV Club brings you this monthly tip to Enhance Your RV Lifestyle. FMCA delivers RV know-how to its members. Join today for just $50 — a savings of $10 just for RV Trader readers. Learn more at https://join.fmca.com/trader18.

    This information is for educational purposes. FMCA shall not be responsible nor retain liability for RVer’s use of the provided information. Prior to making any RV service decision, you are advised to consult with an RV professional.

  • FMCA Tech Tip: What Do I Do If My RV’s Tire Blows Out?

    FMCA Tech Tip: What Do I Do If My RV’s Tire Blows Out?

    A tire blowout is the worst fear of many RVers. What would you do if you found yourself in this situation? Read FMCA’s tips to stay safe on the road.

    Understanding Tire Failure

    According to Goodyear engineers, obstructions (nails, sharp objects, curbing) are the major causes of tire damage. However, many tire failures are caused by progressive damage.

    Each mile your tire rolls down the highway overloaded or underinflated, it may be suffering internal damage that’s not apparent during a casual tire inspection. The day that the tire fails, you may be traveling empty or not moving at all. The tire simply will reach the point where the damage has exceeded its design limits. It may blow out or shed its tread.

    Tires do not heal themselves, so if they are damaged due to underinflation, inflating them to the correct pressure may not prevent eventual failure.

    What To Do If Your Tires Fail

    If you experience a tire blowout, you better have your seat belt on because it can be a wild and bumpy ride.

    Your natural reaction is to apply the brakes, but don’t do it! Michelin Tire Company recommends briefly pushing the accelerator to the floor (if traffic conditions allow) to regain momentum in the direction you are going and then gently taking your foot off the accelerator. Hold the steering wheel firmly and regain control. If you are on an expressway, move into the far right lane as quickly and safely as possible. Allow your vehicle to slow, without applying the brakes, to 10 to 15 MPH before pulling off the road surface.

    Watch this video from Michelin, How To Handle An RV Tire Blowout.

    And — remember — the #1 tip if you find yourself in the middle of a tire blowout is to remain calm. You can’t predict the future, but you CAN prepare yourself for potential emergencies. Knowledge is power.

    FMCA RV Club brings you this monthly tip to Enhance Your RV Lifestyle. FMCA delivers RV know-how to its members. Join today for just $50 — a savings of $10 just for RV Trader readers. Learn more at https://join.fmca.com/trader18/.

    This information is for educational purposes. FMCA shall not be responsible nor retain liability for RVer’s use of the provided information. Prior to making any RV service decision, you are advised to consult with an RV professional.
  • Leveling Your RV Fridge

    Leveling Your RV Fridge

    Does My RV Need to Be Level for the Fridge to Work?

    We were preparing to go camping one weekend and, as usual, I turned on the RV fridge the night before we were leaving to make sure it nice and cold. However, it didn’t get cold. In fact, it actually got warmer!

    I was so bummed! I thought my fridge was broken. So, I grabbed the manual to troubleshoot the situation. I checked and rechecked the on-off switch. I made sure the fridge was getting electricity and even made sure the propane was turned on.

    But nothing worked, and I feared the worst. I thought my fridge was dead and started thinking about packing a cooler for our weekend trip.

    But then I remembered that an RV fridge should to be level to operate correctly – or in my case operate at all. And my driveway, where the RV was parked, is at a fairly steep slope.

    So, I pulled the RV out of the driveway and parked it in the street in front of our house where the road is more level. It wasn’t perfectly level, but it was more level than our driveway.

    And, sure enough, the fridge began to cool rather quickly! So, it turns out that yes, your RV needs to be level for the refrigerator to work correctly.

    Can I Damage the Fridge if My RV is Not Level?

    Yes, you can damage your RV fridge if you run it for more then 30 minutes when it is not level. If the refrigerator is operated when it is not level and the vehicle is not moving, liquid ammonia will accumulate in sections of the evaporator tubing. This will slow the circulation of hydrogen and ammonia gas, or in severe cases, completely block it, resulting in a loss of cooling.

    Some RV refrigerators have an automatic shut off if this occurs, but most do not. The fridge just continues to try to cool, and eventually, the cooling unit will heat up, burn out, and fail. And it doesn’t matter if the fridge is running on electric or propane. The result will be the same.

    How Do I Know if My RV is Level Enough?

    The official answer is that every refrigerator has its own specifications, but in general, your RV is considered level if it is within 3 degrees side to side and 6 degrees front to back. So, what does that mean and how do I figure it out?
    What I have found is that your RV should feel like it is level when you walk inside. You can fill a cup with water and place it on your dinette top or, and as long as the water looks pretty close to level, you should be in good shape.

    You can also place a level on the floor of your RV and make sure at least half of the air bubble remains inside the level markers. These are just rules of thumb, but they should work for most RV refrigerators.

    Can I Run the Fridge While Driving?

    You can run the fridge while you are driving under normal conditions. And you should, especially if you have food in it. Even though the fridge will be out of level at times when you are driving the motion of the RV will allow the cooling gasses to flow within the coils and not overheat the cooling element.

    However, if you are driving up or down steep inclines for more than a few minutes, you should actually turn off the fridge until you get to more level terrain. For example, if you are going up or down a 10% slope for more than 10 minutes, you could do some damage to your cooling unit. So, it’s best to turn off the fridge under these extreme circumstances.

    In summary, your RV refrigerator needs to be as level as possible to operate as efficiently as possible. Just use good common sense and a cup of water on the counter to make sure you are level when parked. And turn off the fridge while you are driving on roads with steep grades of 10% or more for more than 10 minutes. Just remember to turn the fridge back on once you are driving on more level roads!


    Author: Mike Scarpignato, Founder of RVBlogger 
  • FMCA Tech Tip: Steps to Maximize Your RV’s Tires

    FMCA Tech Tip: Steps to Maximize Your RV’s Tires

    For many RVs, tires can be the weak link that disrupts travel if not properly maintained. Quite often, overloading is the cause of tire failure. Follow these simple steps provided by tire expert and FMCA member Roger Marble to increase your chances of problem-free travel.

    Initial Steps

    Once you take these two initial steps, you’ll only need a few minutes each month to maintain your properly inflated tires.

    1. Know the proper tire inflation pressure for your RV.

    2. Ensure that your tires are always inflated to that level.

    But how do you find out what your proper inflation number should be?

    Determining the Correct Tire Inflation Pressure

    First, it’s important to note that the proper inflation level is unique to your RV. Following the suggested inflation levels provided by the manufacturer on the tire certification label is only the beginning. The manufacturer’s suggested tire inflation pressure is based on an assumption, but only you are able to determine the true weight of your RV during travel.

    To learn your RV’s true weight, pack it with all the items you expect to carry on your trip – clothes, fuel, food, water, family members, and pets. Then visit a scale that can weigh your RV and provide weights by individual wheel position. This is important because the required air pressure is based on the load on each individual tire. You also can book an appointment with the Recreation Vehicle Safety and Education Foundation (RVSEF) at most FMCA events to obtain individual wheel weights.

    Once you know the load being carried by each wheel position, you can determine the minimum inflation pressure needed to carry that load. We recommend visiting www.rvsafety.com to help guide you.

    In addition, you can find a “helping hand” by visiting the FMCA forums, where you can find threads specifically dedicated to RV tire maintenance .

    Determining the Cold Inflation Pressure

    You will also want to be sure to determine your tires’ minimum cold inflation pressure (CIP). Visit tire manufacturer websites to find your tire brand and a table that has your tire size. Once you find that, look for the inflation level that carries your load or greater. This is the minimum cold inflation pressure, and it is recommended you go up in inflation by about 10%. Changes in air temperature, for example, can cause minor fluctuations in tire pressure, and increasing the CIP will help to eliminate the need to adjust tire pressure each time these fluctuations occur.

    Measuring Tire Pressure

    When measuring your RV’s tire pressure, try to make sure the tire is cool and in the shade. Ideally, the tires will have not been driven on or exposed to sunlight for at least 2 to 3 hours. That usually means the best time to check your tire pressure is first thing in the morning or late in the evening once you’ve settled in after a day of travel.

    Getting started is always the hardest, but by making tire maintenance — and measuring the PSI of your tires — part of your travel routine, you can greatly reduce the risk of experiencing tire failure while on the road.

    And don’t forget — FMCA members are eligible for discounts on Michelin, BF Goodrich, Hankook and Continental tires. Members have reported saving hundreds on replacement tires! Learn more.

    FMCA RV Club brings you this monthly tech tip to Enhance Your RV Lifestyle. FMCA delivers RV know-how to its members. Join today for just $50 — a savings of $10 just for RV Trader readers. Learn more at https://join.fmca.com/trader18.

    This information is for educational purposes. FMCA shall not be responsible nor retain liability for RVer’s use of the provided information. Prior to making any RV service decision, you are advised to consult with an RV professional.

  • FMCA Tech Tip: RV Spring Cleaning Tips

    FMCA Tech Tip: RV Spring Cleaning Tips

    Spring is in the air! FMCA has gathered a few less-routine RV spring cleaning tips that are easy to overlook when you’re excited to prepare for the season ahead.

    Exterior Cleaning

    • Insects, especially mud dauber wasps, like to build nests in refrigerator burner tubes, rooftop tank vents, water heater vents, and furnace chimneys. Check and remove any obstructions.
    • Spring is a good time to seal your RV’s exterior with a wax or poly sealant. This will provide a barrier to the elements and protect your rig throughout the year. Consult your RV owner’s manual for recommendations for the particular finish of your RV.
    • Windows, door frames, vents, and any rooftop protrusions (plumbing, air conditioner, satellite, or antennas) should all be cleaned. They also need a good bead of sealant to prevent water intrusion. Check for any cracked caulking, and re-caulk any problem areas.
    • Don’t forget to check your RV storage areas. Odds are that dust and dirt have settled here. Sweep out and, if needed, wash these compartments.

    Carpet and Furniture

    • Carefully check your RV’s carpet and furniture. Unfortunately, an RV can be a haven for insects, mice, or other rodents during the cold winter months. Mice have been known to chew through carpet or furniture to make their nests.
    • Wash items that you may just spot-clean throughout the year, such as heavy bedding, rugs, pillows, etc. Before you hit the road this spring, now is the time to take care of items that can be difficult to clean while on the road.
    • Clean upholstery and furniture per your RV owner’s manual instructions. Some finishes, such as suede or leather, need special care. Leather can keep its beautiful finish for years if properly maintained.
    • Spring is a good time to vacuum and steam-clean the carpet. This will help prevent odor problems and is another task that is more difficult to complete while you’re in the midst of the RV season.

    Kitchen

    • Clean the air filters on the microwave oven and stove hood exhaust. Replace as needed.
    • Speaking of filters…there may also be filters on your water lines for incoming water. Check filters for the sink or ice maker, and clean as needed.
    • Clean the interior of the refrigerator with a good disinfecting cleaner. Leave the doors open to allow for air circulation.

    Bathroom

    • Clean the toilet, sink, and shower with a mild cleaner such as lemon juice and baking soda. Try to avoid bleach products, as they can degrade the seals in your holding tanks over time.
    • Check your bathroom cabinets for expired medications and products. Make sure your first aid kit is stocked.

    Removing RV Odors

    The need for odor and moisture control is greatest when an RV is closed up and placed in storage during the off-season. Mold, mildew, and bacteria love to grow in enclosed spaces where the air is not refreshed. Air fresheners help, but they merely mask odors rather than remove them. To remove odors that have a foothold in your RV, consider using an activated charcoal odor removal substance, such as Bad Air Sponge.

    And Don’t Forget…

    Spring cleaning is the perfect time to check the batteries in your fire detector and carbon monoxide detector. This is a simple and important step to protect your family throughout the year.

    Hopefully these less common tips provide ideas as you begin your RV’s spring cleaning. Happy travels!

    FMCA RV Club brings you this monthly tech tip to Enhance Your RV Lifestyle. FMCA delivers RV know-how to its members. Join today for just $50 — a savings of $10 just for RV Trader readers. Learn more at https://join.fmca.com/trader18.

    This information is for educational purposes. FMCA shall not be responsible nor retain liability for RVer’s use of the provided information. Prior to making any RV service decision, you are advised to consult with an RV professional.