Category: RV Advice

  • Portable Toilets and Cassettes: An Information Dump

    Portable Toilets and Cassettes: An Information Dump

    Let’s be honest: No one gets into RV life for the toilet experience. But if you’ve spent any amount of time on the road (like my wife and I in our seven years RVing), you know just how important a good waste setup can be. Heck, if you’ve road-tripped in a regular vehicle and had to use a gas station or fast-food bathroom, you understand and appreciate a good personal toilet setup. You also come to understand that a good toilet experience can happen in different ways — be that porcelain thrones or portable toilets.

    Personally, we’ve always had a traditional black tank system in our RVs. But over the years, we’ve seen just about every option out there. We’ve walked through countless RV shows. We’ve watch and eventually created more YouTube and Instagram demos than we’d like to admit. (And yes, that includes the awkward dump station how-tos.) Of course, we’ve also seen our fellow campers handling their portable setups at sites across the country. Trust us, we’ve seen it all.

    Now, one of the most frequently asked questions we hear from RV newcomers and weekend warriors is about “those removable toilets.” What are portable toilets? How do they work? And are they actually better than a regular black tank setup?

    So today, we’re giving you the full information dump on cassette, portable, and composting toilets in RV life.


    Portable Toilets: For Mobile Business

    Portable toilets are standalone, self-contained toilet systems that don’t require permanent installation or a plumbing connection. Think of them as upgraded versions of what you’d see at a festival, but cleaner, more efficient, and (hopefully) less disgusting.

    You’ll usually find these in smaller rigs like teardrop trailers, Class Bs, or pop-up campers where space and plumbing are limited. Some folks even add them to their vehicle setup for boondocking or off-grid convenience.


    Pros

    • Lightweight and easy to move
    • Great for tent campers or car campers
    • No complicated plumbing required
    • Ideal for quick overnight stops or off-grid flexibility
    • Simple to clean and affordable to replace


    Cons

    • Small capacity means frequent dumping
    • Manual dump process (yes, you have to carry it)
    • Limited ventilation can cause odors
    • Not ideal for full-time or long-term travel
    • Not designed for long-term heavy use


    Cassette Toilets: A More Manageable Dump

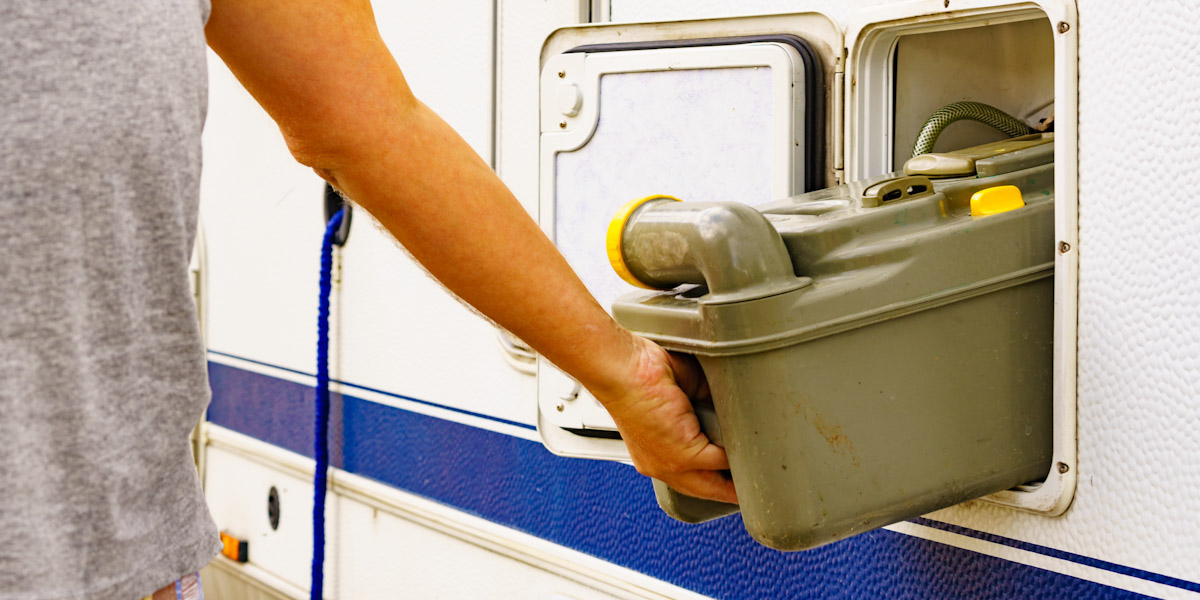
    Cassette toilets are a sort of hybrid. They’re usually permanently built into the RV like a traditional toilet, but they use a removable black tank (called a cassette) that you pull out from an exterior hatch to empty. They’re most common in European rigs and smaller Class Bs, but we’re starting to see them pop up more frequently in other smaller RVs here in the States.

    We’ve toured a lot of rigs with cassette toilets and talked to plenty of owners. While they can be a great space-saver, they definitely come with trade-offs.


    Pros

    • Built-in toilet with minimal space requirements
    • Newer RVs tend to have easy exterior access for removal and dumping
    • Doesn’t require a full plumbing system or traditional black tank setup
    • Great for compact RVs and vans
    • Can be dumped into many public toilets, pit toilets, or dump stations
    • Newer models sometimes include an electric flush and small rinse reservoir


    Cons

    • Small tank size fills quickly
    • Needs to be dumped every couple of days with regular use
    • Public dump stations or restrooms are often required and not always allowed or available
    • Carrying a full cassette through a public area isn’t exactly glamorous
    • Some models don’t have a vent, which can lead to odor
    • Waste tank seals can wear out and need replacing over time


    Composting Toilets: Down-to-Earth Solution

    Another increasingly popular option among #vanlifers, schoolies, and frequent boondockers is the composting toilet. Unlike portable or cassette toilets, composting models separate solids and liquids, using natural breakdown processes instead of chemicals or water.

    We’ve seen composting toilets pop up in a lot of Class B rigs and custom builds at RV shows, and they definitely have a loyal following — especially among off-grid travelers and eco-conscious RVers.

    Pros

    • No black tank required
    • Waterless and chemical-free
    • Solids container can last weeks before needing to be emptied
    • Liquids can be easily disposed of in appropriate facilities
    • Environmentally friendly and great for off-grid use


    Cons

    • More expensive upfront than other options
    • Learning curve for proper use and maintenance
    • Must empty liquids more frequently
    • Venting system requires installation and power
    • Some users find the solids emptying process a bit…personal and disgusting

    Sure: Composting toilets aren’t for everyone, but for those living off-grid or looking to reduce water use, they can be a smart, long-term solution.


    How Portable Toilets Compare to Black Tanks

    This is where we can speak from the most experience. We’ve always traveled with regular black tank systems — and despite the occasional clog, leak, or misread sensor, we’ve appreciated the capacity and convenience they provide.

    Traditional black tanks:

    • Hold significantly more waste (typically 15 to 50+ gallons)
    • Require less frequent dumping (we can usually go a week or more)
    • Can be emptied quickly at any standard dump station
    • Stay permanently connected and vented for less odor

    But they also:

    • Require a full dump station hookup (or macerator setup)
    • Need maintenance, like tank flushing and sensor cleaning
    • Can clog if you’re not careful with TP or water usage (We now use regular TP and have a designated bathroom trash can with a lid for only toilet paper. This has led to—fingers crossed—no clogs in years of use.)
    • Can get messy if hoses or valves malfunction

    Meanwhile, cassette, portable, and composting setups trade long-term ease for short-term simplicity.

    If you’re doing van life, short weekend trips, or traveling solo, these smaller options can be incredibly practical. But for long trips or full-time RVers like us, especially those with pets or extended travel goals that include long boondocking stays, the capacity and convenience of a traditional black tank setup wins out.


    Real-World Observations

    Even though we’ve never owned a cassette, composting, or portable toilet ourselves, we’ve seen plenty in action. We’ve watched folks roll into rest stops with a cassette or composting tank in hand, and while it gets the job done, you definitely need to be comfortable handling your own waste. (And doing it more frequently.) When you’re boondocking for days or weeks at a time, that frequency starts to matter.

    At RV shows, we’ve also noticed that newer builds — especially those aimed at off-grid lifestyles— are leaning toward composting toilets as a space-saving and eco-conscious solution. But again, that system isn’t for everyone, and it takes a bit more involvement to manage.


    Tips for Choosing the Right Setup

    Whether you’re in the market for a new RV or thinking about upgrading your current bathroom situation, here are a few things to keep in mind.

    • Know your travel style. If you’re part-timing or boondocking occasionally, smaller toilet systems can work well. Full-timers? Consider a setup that prioritizes convenience and capacity.
    • Think about where you’ll be dumping. Cassette toilets often require public restrooms, composting systems need thoughtful disposal of both liquids and solids, and traditional black tanks rely on designated dump stations.
    • Check local regulations. Some parks and areas have rules about how and where waste can be dumped.
    • Think about comfort and convenience. Ask yourself how often you want to interact with your toilet — and how okay you are with carrying your waste across a campground or into a public restroom.
    • Watch for wear and tear. Portable and cassette toilets often need new seals, handles, or tanks over time.
    • Consider ventilation and smell. Proper setup, whether black tank or composting, makes a huge difference in odor control.


    In the End, Everyone’s Gotta Go

    RV toilets might not be the sexiest part of RV life or full-time travel, but they are one of the most important. And while we’ll continue rolling with our black tank and clear elbow adapter (seriously, that little transparent piece is a game-changer), we totally get the appeal of cassette, portable, or composting setups — especially for new RVers dipping their toes into the lifestyle.

    At the end of the day, there’s no “right” choice — just the right one for your rig, your travel style, and your comfort level. If you value simplicity, don’t mind frequent dumps, and need something compact, cassette, portable, or composting toilets can absolutely do the job. If you’re looking for convenience, longevity, and less interaction with your waste (we hear you), a traditional black tank might be the way to go.

    Whichever path you choose, just remember: It’s not about the toilet. It’s about the journey — and being able to enjoy it comfortably, confidently, and cleanly.

    And hey, the next time you see someone walking through a gas station towards the restrooms with a weird plastic box in tow… just smile and give them a nod. They’re out there living the dream — one dump at a time.

  • 4 RV Bunkhouses to Bump Up Your Sleep Space

    4 RV Bunkhouses to Bump Up Your Sleep Space

    Sometimes life gives you an unmistakable signal. And if you’re an RV family, a moment may be coming for you — the moment you realize you’re gonna need a bigger RV. And, more specifically, that RV bunkhouses were the solution. I certainly remember when that moment happened to us.

    We were boondocking with our RV in Moab in the summer. My husband and I were traveling with our two small kids, a dog, and a hamster. Moab’s summer heat is like a fiery volcano. Before the dog could go on her walk she needed little boots on her paws so they wouldn’t burn on the sidewalk. She even needed a white shirt over her black body so she wouldn’t overheat in the sun. Everyone was hot, tired, and feeling claustrophobia set in. And while, as RVers, our intention may be to spend most of our time outside, you simply have to accept the obvious sometimes: It’s too brutal to be stay out. You need to get inside.

    On this occasion, that was when I realized: We need more living space in our RV. These kids need an RV with a bunkhouse. 


    The Double Bonus of RV Bunkhouses

    When shopping for RV bunkhouses, it’s important to remember that sleeping arrangements aren’t just for sleeping. Remember, if you are anywhere hot, cold, or rainy, you might be spending a lot of time inside the RV. Your kids will want a space to call their own — somewhere they can decompress from you, each other, and the harsh elements outside. It makes sense. Traveling has a way of pulling the rug out from under a child’s sense of stability. As parents, it’s always healthy to mindful of that, and it’s smart to address it if your kids are going to spending any significant time on the road.

    A big way to make up for a child’s lack of routine and security, is to give them their own space. It doesn’t have to be big. It just has to be their own. And there are some great RV bunkhouses out there that are perfect for a kid’s imagination.

    With that being said, let’s look at four of our favorite RV bunkhouses, starting with one of the best models we’ve seen to combine adult and kid needs.


    Top RV Bunkhouse Combo: Remote Work + Kid Space

    2025 Starcraft GSL Light Duty 304BHS


    The Starcraft GSL Light Duty 304BHS is a heart stopper for traveling families. It combines a beautiful duality of functional living spaces here that check all the boxes — including a place to work remote. 

    Not every family wants to purchase an RV to live full-time in. BUT, if that was ever on your bucket list, this one is worth a look. This RV bunkhouse has three levels. The bottom level doubles as a spacious work table. Remember that thing I said about kids having their own independent space? They can have it here, even if you’re using the work table. The way it is arranged, you can work on the bunk bed while it’s converted to table space, and, at the same time, the kids access the larger top bunk. It has its own little ladder to climb aboard. You can even close the door to your work space while the kids play up top.

    In my humble opinion, it’s quite dreamy. Just picture it, like the perfect sandwich: a triple-tiered bunk with a work table and a top bunk with a separate entrance?! Yes please.  


    Let There Be Light

    My favorite attribute of the space is the natural light that floods the space. A healthy-sized window lives above the table/middle bunk. As a remote-working traveling mother, I find myself drawn to a work space with natural light. (To get the creative juices flowing, I need the help of vitamin D.) Another asset in this workspace/bunk room is the door behind it. It is a surprisingly large area with a door that slides shut to keep the littles from hijacking your brain space. They are adorable distractions, I know, but the sooner you finish your work the sooner you can give them your fullest attention! 

    Added Bonus: For such a large unit, it is quite light and can be towed with a half-ton vehicle! 


    3 More Impressive RV Bunkhouses

    Grand Design Imagine XLS 25DBE

    The Grand Design Imagine XLS 25DBE travel trailer is another showstopper. If your kids are older, they might prefer a larger bunkhouse than the ones that come in so many RVs. In this floorplan, the bunkhouses are each double beds. (A true luxury in the RV world!) The sleeping arrangements are on opposite sides of the trailer. The bunkhouses are at the rear, and the master is in the front of the unit. Living in such tight quarters, having the sleeping areas far apart can be really beneficial for privacy when you’re living in tight quarters. (And sometimes its just nice to have a little breathing room.)


    Highland Ridge Open Range 390TBS

    The 2025 Highland Ridge Open Range 390TBS is a model of luxury. It checks the boxes for decadent living spaces and sleeping arrangements. The open floorplan includes a clever loft space with three sleeping areas for kids. With narrow mattresses and a low headspace, this room is definitely intended for children. Kids need only their imagination to make a space their own, headroom is not a requirement. (My kids seem to prefer tiny awkward spaces for their imaginative fort dwellings. )

    With three mattresses, and possibly space for another, your kids can bring their friends along for a weekend away. There are storage compartments in the loft, so they can keep their belongings in their own space. 

    One thing that often goes unchecked in an RV is the bathroom situation. Sure, more than one designating sleeping space is nice, but, with a sleeping capacity of eight, do you all want to share one bathroom? In the Open Range 390TBS, there are two bathrooms for your daily ablutions. 


    Entegra Coach Odyssey 31F

    The Entegra Coach Odyssey 31F is a motorhome bunkhouse with sleeping spaces in spades. Class Cs are known for their over-the-cab bunk. But this model features a bunkhouse, a master bed, a converting dinette, a tri-fold sofa (that doubles as a bed), and an over-the-cab bunk. If you’re looking for a bunkhouse for your kids, and you want to have visitors, take a look at this floor plan. All those beds mean you can sleep 10 people in this 31-foot Class C! 

    Wow. 


    Set Yourself Up for Success 

    Everyone has a different threshold, and getting to know yours (and not someone else’s) is all part of the journey. For example, the same day I realized we needed a bigger rig, I passed a small van parked at a local market. The sliding door was open. A toddler came tumbling out, followed by a mother with a newborn strapped to her chest. She was simultaneously making breakfast for everyone in her microscopic kitchen, like some sort of Marvel superhero. 

    How does she make it look so easy? Her, and about 2 million other people living their best #vanlife under sunshine and rainbows on social media. (Of course, it’s also possible that those picture perfect moments aren’t so perfect.)

    Regardless of what everyone else’s story is, the key to success is to know your story. Know what your needs are, and don’t be afraid to own them. Be curious about what makes you happy on your adventure, and what makes you mad, scared, tired, and sad. You can’t avoid the latter, but you can try to find a happy place of equilibrium. And RV bunkhouses are a great way to achieve it.

  • How Do I Check My RV Electrical System?

    How Do I Check My RV Electrical System?

    Compared to brick-and-mortar houses, an RV electrical system can be much more complex and diverse. Up front, you should know that that increases the importance of regular checks and maintenance by you the owner. And frankly, that can feel like a lot if you’re not naturally mechanically minded.

    The good news is that you don’t have to be an electrician or engineer to do these checks. You just need to master a few basics and be diligent with your maintenance. And to help you do that, we’ll walk through this step by step.


    The Basic Elements of an RV Electrical System

    RVs will have a 12- or 24-volt DC system. This system powers ceiling vents, water pumps, some lighting, sensors and gauges for water tanks, some small appliances, and your RV starting system. Also, your RV has a 120-volt AC system to provide power for major appliances. (Think of things like refrigerators, televisions, microwaves, air conditioners and coffee machines.) Your electrical system could also be supplemented by solar power through an inverter and batteries and your RV may also be equipped with an onboard generator. 


    Getting Started: Inspecting Your AC System

    The main component of the RV electrical system is the 120-volt AC system. This system, as mentioned, provides power for your larger appliances. Periodically, if possible, you should start your checks with the outlets where your appliances plug-in.

    First, checking for previous evidence of arcing and discoloration of the plugs. The AC system also drives the DC system through a converter charger that keeps your 12/24-volt DC direct current system functioning. Therefore, periodic inspection of the converter charger and the wires that go to and exit the component is recommended. Depending upon the total AC requirements of your RV, you will experience between a 30-amp or 50-amp power cord, an external receptacle or your power cord (that could be hardwired), and an internal breaker panel with matching rated breakers appropriate for your system requirements.

    Personal maintenance and checking of the AC system involves inspecting and checking certain items. These include the power pedestal or other outlet, your shore power cord, and the point at which the cord makes its connection to your RV for previous evidence of arcing. This point of inspection for your power cord and adapters is important prior to going to a new site. That’s because you want to ensure that you have the proper cable or adapter. (A quick phone call to the facility where you’ll be staying is recommended.)

    Also, periodically, you should inspect your breaker panel and breakers for any damage to the breakers. Damage can be indicated by previous evidence of arcing here, along with the wires that connect to them. Look also at your transfer switch that switches between your sources of power: shore power, generator, or batteries through an inverter. Other items to consider when conducting your electrical system inspection are your smoke detectors, carbon monoxide detectors, and your GFCI outlets.


    Backup Checkup: Checking the On-Board Generator

    Besides shore power, another way to power your RV’s AC electrical system is through an on-board generator. RVs with this capability are able to provide their own power. On-board generators can generate AC power. They come in a variety of models. They can run on anything from gasoline to diesel to propane depending upon the manufacturer.

    Personal maintenance on this subcomponent of your RV electrical system first includes the batteries. During this inspection, you are looking for corrosion around the battery terminals, loose connections for evidence of arcing and any loss of battery cable insulation.

    The next item you should check is your air filter to check for any debris and to make sure it has not met its life expectancy. You also want to go ahead and check the levels of each battery, the condition of the oil. Also check the coolant level, the hoses, lines, and radiator, if it has one. Regarding its electrical output, you will want to visually inspect the cord which provides the current from the generator and is attached to the power transfer switch. As mentioned, this switch will automatically select between power sources such as the generator, shore power, or DC to AC inverter. 


    DC Power: Assessing Fuses, Corrosion, and More  

    As we had already discussed, your RV will obtain power by either plugging into an external source such as a house receptacle or a campsite power pedestal, or from a generator. From one these sources, DC voltage is created via a converter charger hooked into the battery bank. The charger converter could have its own set of fuses usually mounted on the outside of the unit. From there, voltage will flow into a centralized fuse box where voltage is distributed throughout the RV to all the DC run items.

    When experiencing any fault at a part of your DC system, always check the fuses first. As a note, many modern RVs have a power control center which houses both DC fuses and AC breakers. Where DC direct current is concerned and depending on the size and class of your RV), you could have either a 12-volt DC or a 24-volt DC system. (The latter can be more efficient than a 12-volt DC system.)

    During an inspection, you are looking for corrosion around the battery terminals, previous evidence of arcing, loose connections, and any loss of battery cable insulation. (As well as the fuses in the fuse block.) In either system, your DC systems will draw power from a bank of 12-volt and or 6-volt, deep-cell batteries that provide a sustained discharge. As mentioned, they will either be charged by a solar power system or a DC charger converter or your vehicles alternator in some applications.

    Just like many other things, no one thinks about the RV electrical system until it breaks down at the most inconvenient time. A good rule of thumb where checking your DC system is concerned is to go ahead and plan it for the same time your oil change. 


    Next: Evaluating the Solar Power System

    If you have an solar RV electrical system, you have the ability to generate electricity to be stored in a bank of batteries. The basic system has the following components: panels, controllers, batteries, inverters, battery isolators, busbars, shunts, and fuses. When checking this part of your RV electrical system, you want to conduct a visual inspection of the panels themselves, the wiring harness, and connections to the charge controller before and after each trip.

    The charge controller regulates the flow of electricity preventing overcharging and ensuring an efficient energy transfer. Next on the list to inspect is the inverter. (That is, if you have not already inspected it in a previous part of your inspection. It will be probably installed near the charger.) The reason we want to check this part of our system more often is because these systems are very expensive and are always exposed to the elements.


    Additional Solar Items to Inspect

    The remaining parts of this system to be inspected are battery isolators, busbars, shunts, and fuses. You should inspect each connection at each isolator on a regular basis. An evergreen example is during the time you change your oil. The battery isolators separate batteries in multi battery applications. This allows each battery to charge alone. What this does for the system is that it protects each battery from discharging into another battery in the bank. You should inspect each connection at each isolator on a regular basis. (Wanna guess my recommendation when that should be? When you change your oil. No surprise there.)

    Another part of your solar system are busbars. These are metal strips that allow multiple wires of the same charge to be connected to a central point. The shunt allows you to measure the amount of electrical current in your circuits. This is installed after your bank of batteries before your charge controller, which monitors your batteries charge and capacity.

    Next in your system, you have fuses. These are tiny but necessary circuitry insurance made up of small pieces of wire that are designed to break the circuit when reaching a level beyond its capacity — circuit rating. Even though these are typically the smallest as part of your system, you should check your fuses first. It could be the simplest cause of an electrical breakdown.


    Regularizing Your RV Electrical System Checks

    Whatever type of RV that you have, you should develop a maintenance checklist. This is always good to break out you before and after your trips. (Also, you know, when you get your oil checked.) The reality is that electrical issues can be very frustrating. However, with a little bit of preventive maintenance and checks, you can avoid many issues. And issue avoidance is key to enjoy your time in your RV.

  • Yes, RV Paint Is Different — Here’s What You Need to Know

    Yes, RV Paint Is Different — Here’s What You Need to Know

    If you’ve ever looked at your RV and thought, “Maybe I’ll just give this thing a fresh coat of paint,” pump the brakes for a second. Because while RVs may look like oversized vehicles or tiny homes on wheels, painting them is a whole different beast compared to your car or living room walls. Yes, RV paint is different. And if you don’t understand how and why, your dream of a DIY facelift could end up turning into a disaster.

    Now, if there’s one thing we’ve learned in our seven years on the road, it’s that many things about an RV — from the plumbing to the paint — is uniquely built for life in this particular lifestyle. It’s not to say that there aren’t any similarities, but some things are simply way different than your normal sticks and bricks home. That includes the exterior paint, which has to put up with way more abuse than your typical vehicle or home ever will.

    So, whether you’re planning a full-on DIY project or just curious why that paint quote was more than your first car, here’s everything you need to know about RV paint, how it differs, and how to make the right decision for your rig.


    Why RV Paint Is Different — and Why It Matters

    Let’s start with the obvious. Your RV is a giant moving box constantly exposed to the elements. Unlike a car that’s parked in a garage or a house that stays still, your RV’s paint job takes a beating. We’re talking sun, rain, dust storms, hail, temperature swings, tree sap, bug splatter, road grime … whew! You name it.

    RV paint is designed to handle all of that. It’s not just about looking pretty, it’s about protection, and here are some of the reasons this isn’t your normal paint job


    RV paint is a specialized composition.

    RVs often use high-end automotive or marine-grade paints, like polyurethane blends or epoxy-based paints. These paints are flexible, UV-resistant, and able to bond to materials like aluminum or fiberglass. That flexibility is key.  Your RV’s exterior expands and contracts with temperature changes, especially if you’re traveling between hot deserts and cool mountains.

    A regular house paint or basic enamel won’t cut it here. It’ll crack, chip, or peel within a season. RV-specific paint, on the other hand, is made to flex and protect over time.


    Surface compatibility requires prep and priming.

    RVs aren’t usually made from the same stuff as your sedan. (And they’re definitely not made like a house.) Most exteriors are fiberglass or aluminum, which both require special prep and paint to adhere properly. Without the right primer and prep work, even the best paint will start bubbling or flaking off before you’ve even made it to your next stop.

    A good bonding primer is crucial — especially if you’re painting over gel coat, which is slick and nonporous. Skip this step, and you’re just wasting time and money.


    UV and weather protection are critical.

    We’re not just talking about color fading. The sun can bake your paint job into a cracked, dull mess. And constant exposure to rain or road salt can lead to corrosion or delamination over time. That’s why high-end RV paints include UV inhibitors, clear coats, and often multiple layers of sealant.

    It’s also why a proper paint job — whether pro or DIY — requires more than just “a good coat.” You’ll need multiple layers and, ideally, a protective topcoat.


    What Kind of Paint You Should 

    Let’s break it down based on your exterior and your goals. (Because not all paint is created equal, and not all RVers have the same needs — or budget.)


    1. Automotive-Grade Polyurethane Paint

    This is the gold standard for most new RVs and professional repaints.

    • Pros: Extremely durable, colorfast, flexible, and resistant to UV damage and chemicals.
    • Cons: Expensive and typically requires a sprayer and a controlled painting environment (i.e., not your driveway or buddy’s garage).

    If you’re going for a full-body paint job at a dealership or RV shop, this is likely what you’re getting.


    2. Marine-Grade Epoxy Paint

    Ideal for fiberglass RVs, especially if you want max durability and weather resistance.

    • Pros: Built for harsh marine environments, excellent adhesion, and resistant to water and salt.
    • Cons: Fewer color options, pricey, and not as glossy as automotive finishes.


    3. Oil-Based Paints

    These are sometimes used on older rigs or for touch-ups and lower-budget projects.

    • Pros: Decent durability, easier for DIYers, and bonds well to metal or aluminum.
    • Cons: Slower drying time, more fumes, and requires regular maintenance.


    4. Latex Exterior Paint (Budget DIY Option)

    A popular choice among RV DIYers looking to freshen up their rig without breaking the bank.

    • Pros: Cheap, easy to work with, lots of color options.
    • Cons: Not built for RV wear and tear, can chip or fade quickly, and often requires frequent touch-ups.

    If you go this route, make sure to use a bonding primer, apply multiple coats, and finish with a UV-protective clear coat. Personally, I would try to stay away from this option unless your RV is in really bad shape paint-wise. (And you’re dead set on the cheapest DIY paint job you can do.) Always remember that in the long run, what starts out as a really cheap option, usually ends up being as expensive, if not more so, in the end.


    Essential, Unskippable Preparation 

    Before you ever open a can of paint, you need to prep your surface like your RV’s life depends on it — because, in a way, it does.

    • Wash thoroughly. Use a degreaser or RV-safe soap to remove dirt, wax, and grime.
    • Sand or scuff. Smooth surfaces like gel coat need to be roughened up to help paint stick.
    • Tape off. Windows, decals, rubber seals — cover anything you don’t want painted.
    • Prime properly. A quality primer designed for RV materials is essential.

    If you’re skipping the prep, you’re just setting yourself up for disappointment and failure.


    DIY vs. Professional RV Paint Jobs

    We’re big fans of a good DIY project, but full transparency — if you’re going for a full-body RV repaint, there’s a reason pro jobs cost up to $10,000. Between the need for equipment, ventilation, multiple coats, and curing time, it’s not a small task. Throw in the fact that if not done properly, you could cause some serious damage to your RV. For us, even though we’re DIYers, we’ve often found that contracting a professional is the way to go.

    That said, if you’re just doing touch-ups or a small cosmetic upgrade, a DIY job with the right prep, materials, and patience can be done.


    What About Custom Graphics?

    If your rig has decals or full-body graphics, repainting becomes a little trickier. Decals can be removed and replaced, but full paint jobs with graphics involve detailed masking and layering that’s best left to pros. The same goes for clear coating and buffing. If you want that showroom finish, it may be worth letting a specialist handle it. (Are you seeing a pattern here?)


    Don’t Forget the Interior

    Interior paint jobs are a different story altogether — and much more beginner-friendly. Because the interior of your RV isn’t exposed to the elements or expanding/contracting as much, you can get away with regular interior latex or enamel paint. Still, prep is important, especially when painting slick cabinetry or laminated surfaces.

    Pro tip: Use a bonding primer and sand lightly before painting cabinets or furniture. You’ll thank yourself later when it doesn’t peel.


    Another Option?

    Another popular option that is not as expensive and can give you that revamped look you’ve been hoping for is a good vinyl wrap. This is a great bang for buck option if you are looking to spruce up your rig for a few more years of use or immediate resale value. If you’d like to read more about this option, just write “More Vinyl Please” in the comments section, and I’ll be happy to write a similar article to this one with a pros and cons comparison section.


    So, Is Repainting an RV Actually Worth It?

    Yes, RV paint is absolutely different. And yes, treating it like you’re repainting your kitchen or touching up your sedan is a fast track to disappointment. But whether you’re looking to refresh your rig, cover up some road rash, or go all out with a custom look, knowing your options can help you get the results you’re after.

    If you’re going the DIY route (which I strongly suggest against unless you’re really confident), take your time, do your research (including the weather, if your RV is outside), and invest in quality materials. And if you decide to leave it to the pros, know that you’re paying for more than just paint. You’re paying for protection, longevity, resale value, and the experience of the professional taking on the project.

    Knowing if it’s ultimately worth it comes down to your budget, skill set, and reason for doing it. Always compare prices on RVTrader.com to see what RVs similar to your rig are selling for, especially in the year and condition you have and are hoping to upgrade to. That said, if you go through with it, here’s to showing off that new look on the open road! 

  • Let’s Talk About RV Slide Lubrication

    Let’s Talk About RV Slide Lubrication

    Do you remember the time in your life when you caught the bug to get away and experience the great outdoors? Most of us probably started in a ripstop tent then dreamed of a pop-up — the gateway camper for a lot of people. But as our families and love of the outdoors grew, so too our RVs and camper needs became more complex. At the center? Space — that age-old camper conundrum. And for those of us who want all the comforts of home with us, the slide-out system was a big innovation. Interior space in an RV with a slide-out literally expands, but so does our maintenance checklist. Enter RV slide lubrication.

    It’s sneaky. You may not have thought about before. But now, if you’re enjoying all that extra space, we need to talk about RV slide lubrication. You know, so your outdoor fun runs smoothly.


    Slide-Out Origins: A Tale of Moving Parts

    You may be surprised to find out that the first slide-out was made by a San Francisco camper builder. His name was Gustav Bretteville, and he developed it in 1915. It was advertised as an Automobile Telescoping Apartment, which sold for $100 and was designed to sit on the back of a Model T Ford Runabout.

    Going back to those origins, it helps us think about the modern-day RV slide-out system. For example, consider that the slide-out is engineered with multiple components. In this “telescoping apartment,” there are motors and actuators. Then racks and rails. And seals and weather protection. And also, pumps, cylinders, flanges, and control systems that all must work in conjunction to extend and retract your RV’s interior space. Those are a lot of moving parts with a lot of friction points. (You see where we’re going with this.)


    Using the Right Kind of Lubricant 

    First, you will want to lubricate your RV slide-outs and components with a silicone-based, slide-out lubricant that is pretty dry. (As opposed to oily.) Then you’ll want to put proper amounts of lubricant on the components of the slide-out. (Look for gears, pulleys, tracks, bearings, chains and or cables.) You will also want to avoid using any type of oil-based lubricants or grease. Those kinds of lubricant attract dust and dirt.


    Identifying Your Type of Slide-Out 

    There are three basic types of slide-out mechanisms, and they all require lubrication. The three types are electric, hydraulic, and tip-out slides. 

    Electric slides use a motor and a rack-and-pinion or cable system to move the slide-out. The rack-and-pinion could require lubrication at the pivot points as well as where the cable systems slide around pulleys if present.

    Hydraulic slide mechanisms utilize a hydraulic pump that extend and retract the slide-out. You’ll see these more often on heavier slides. Due to their stability and strength, they can handle heavier slides with a smoother operation. Some places on these parts could have fittings requiring lubrication.

    Tip-out slides are a much simpler mechanism. They use a hinge at the bottom of the slide-out which manually tips the slide-out. These are found more often on earlier model RVs. On these types, the hinges should also be lubricated on a regular basis.


    How to Lubricate Different Components

    Now let’s talk about the many components that make up the slide-out systems and their required lubrication. First, there are the actuators and motors. These components transfer the motor/pump power into the slide-out movement or hydraulic pumps to drive the slide-out.

    Next, lubricate the hardware, such as tracks and rails . Tracks, often made of aluminum, provide stable paths for the slide-out to move in and out while rails are attached to the slide-out and work in conjunction with the tracks to allow smooth movement also requiring lubrication.

    The next thing you should check to while you are in the area are the seals and weather protection components and flanges. It is highly recommended that you keep your eye on your seals and use products to condition them regularly to prevent drying and cracking.

    Many slide-outs use up to three different types of seals and can be very challenging to find replacements. Seals are vital items on your slide-out since they prevent moisture and debris from entering the RV. The flange is a part of the RV wall that the slide-out seals against, ensuring a weather-tight seal. Here you want to ensure when inspecting your flange that no damage has been caused to them. They should be straight so that they provide even pressure on the seal between the flange and the body of the RV. 


    What to Inspect on Your Slide-Out

    As part of your inspection and to continue your RV slide lubrication and conditioning detail, you will want to look over your control systems. These are comprised of control switches, a wiring harness, pumps and cylinders, racks, framing, and arms. Control switches allow you to extend and retract the slide-out. Your wiring harness connects the control switches to the motors or pumps, and the hydraulic systems (pumps and cylinders) are essential for generating and controlling the hydraulic pressure needed to move the slides.

    Racks, framing, and arms provide structural support and ensure proper alignment of the slide-out mechanism and wear pads protect the slide-out tracks and other components from damage. Many of these components should be inspected on a regular basis and serviced by a licensed RV maintenance facility when necessary. You should always refer to your owner’s manual for specifics as to where and when to lubricate any of the subcomponents of these systems.


    What to Look for as Your Inspect

    Keep an eye out for irregular or uneven slide-out operation, paying particular attention to and listening out for any irregular or improper noises and sounds. Unfortunately, in situations like this, the initial cause can sometimes be attributed to … (you might have guessed it) … lack of RV slide lubrication. If it is all possible, you should employ the use of a friend so that one of you can operate the slide switches on the inside of your RV while your helper can watch and listen to the slide-out you are inspecting.

    If you do discover during this part of your inspection that your slide-outs are not operating in tandem or extend or retract off-kilter, you should seek out your nearest authorized dealer or maintenance facility as soon as possible to prevent any larger issues. Lastly, you should consider the protection of your slide-out underbelly by using a corrosion protection product to protect the metal underneath the slide-out. 


    No-Nos for RV Slide Lubrication

    Finally, since we have been discussing RV slide lubrication and all the things you should do to keep your slide-outs operating properly, know this: There are some things that you should remember not to do. As mentioned earlier, stay away from and avoid using any type of oil-based lubricants or grease.

    Second, it may sound like common sense, but don’t open slide-outs on nonlevel surfaces. This can put undue stress on the mechanism and potentially cause damage. Also, keep in mind that you don’t want to over-lubricate. Just use sufficient lubricant to cover the needed areas.


    A Simple but Important Maintenance Task

    In RVing, a simple truth can be both reassuring and scary: The fact is that many items of RV maintenance are up to you. RV slide lubrication is one of those tasks. Just as with your other maintenance tasks, always refer to your owner’s manual for specifics. (Looks something like this, but, you know … for your model.) Also, it is always recommended to employ your local licensed RV dealer for any maintenance above an owner’s level operation.

  • I Can’t Believe It: My RV Is Infested!

    I Can’t Believe It: My RV Is Infested!

    It’s every RVer’s nightmare. You’re finally settled at the perfect campsite. The slide is out. The dogs are napping, and the stars are peeking out — and then you hear it. The sound no one wants to hear inside their home on wheels: scratching, the pitter patter of really tiny feet, and that scurry across the ceiling. But you know what’s worse than that? Something brushing your face in the middle of the night. When that happens, there is no doubt. Your RV is infested.

    Unfortunately, RV pest infestations are more common than you might think. There are things you can do when storing your RV for winter to help, but nothing is guaranteed. Whether you’re parked in the forest, desert, or even a paved RV park, bugs and critters can — and will — try to find their way inside. And, yes, I’m speaking from personal experience. (More on that at the end.)

    So, if you’re dealing with something similar (I hope you’re not), know that you’re not alone. It happens. But here’s a quick guide on the little villains, how they get in, and what you can do about it if your RV is infested.


    Common Culprits: What’s Invading Your RV?

    Before you go full exterminator, it helps to identify what kind of pest you’re dealing with. Some of the most common RV invaders include:

    • Ants. Often drawn in by crumbs or improperly sealed food. Once they’ve found a route, they leave a scent trail that invites hundreds of their friends.
    • Mice and rats. These guys are pros at squeezing into tight spaces and love the warmth of RV insulation. Once inside, they chew wires, insulation, and even food packaging.
    • Spiders and other insects. Sometimes they’re just tagging along with firewood or crawling up water hoses. Most are harmless, but nobody wants a surprise spider in their bed.
    • Wasps and bees. These can build nests in vents, storage compartments, or under awnings. Not just annoying — these can be dangerous if you’re allergic or have pets.


    Entry Points: How They’re Getting In

    Most RVs, even the best-built ones, have small gaps and entry points that pests can take advantage of. To keep your RV from getting infested, keep an eye on these areas:

    • Underneath the rig. Power cords, water lines, and sewer hoses all create potential access points.
    • Slides and seals. Worn-out rubber seals or misaligned slides can leave just enough space for bugs or rodents to squeeze through.
    • Vents and access panels. Check the water heater panel, furnace vent, and refrigerator access. These areas are often overlooked.
    • Doors and windows. Gaps around weatherstripping or poorly sealed screen doors are prime entryways.


    Prevention: Keeping Them Out

    The best way to deal with RV infestations is to prevent them altogether. 

    • Seal it up. Use expanding foam or steel wool to close up any holes or gaps underneath your RV. Don’t forget around plumbing and electrical lines.
    • Use peppermint oil or dryer sheets. Mice hate the smell. We’ve tucked dryer sheets into cabinets and corners, and while not foolproof, it helps.
    • Keep it clean. Crumbs attract ants and rodents alike. Wipe down counters, sweep floors, and keep food in sealed containers.
    • Inspect before moving. Check your water and sewer connections, outdoor gear, and storage compartments before moving to make sure you’re not carrying new guests from your last stop.
    • Store food properly. Use hard plastic bins for pantry items and avoid leaving pet food out overnight.


    That’s All Nice, but My RV Is Already Infested!

    Already hearing mysterious sounds or seeing droppings? Time to act fast.

    • Mice countermeasures. Set traps. Snap traps or sticky traps are both effective. Use peanut butter or Nutella (yep, they’re bougie) as bait. Avoid poison if you have pets or kids. Not only is it dangerous, but mice may die inside your walls, creating a whole new smelly issue.
    • Ant annihilation. Follow their trail to find the entry point and seal it off. Use bait traps outside the RV near the path. Avoid spraying them directly, as that can scatter them and make the problem worse. Wipe surfaces with vinegar or citrus-based cleaners to remove scent trails.
    • Insect intervention. Spray natural or pet-safe repellents around common entry points. Keep lights off or dim at night when doors and windows are open to avoid attracting bugs inside.
    • Wasp wipeout. Check around slide toppers and awnings before extending. Spray nests from a safe distance at dusk or early morning when they’re less active. Remove any nests once they’re unoccupied.


    RV-Specific Pest Control Products

    If you’re in a spot where infestations are common, here are a few tools we always recommend:

    • Rodent repellent lights. These plug into your 12-volt system or run on batteries and emit a high-frequency sound that deters rodents (safe for pets).
    • Underbelly LED lights. Some RVers swear by LED rope lights or solar-powered lights placed around the bottom of the RV at night to keep critters away.
    • Screen covers. Add mesh covers to furnace and water heater vents to block insects and small rodents.

    *Travel Day Tip: Watch the Slide-outs. Slide gaskets are notorious for harboring pests if you’ve parked under trees or in grassy areas. A quick sweep or vacuum around the slide edges during setup goes a long way.


    Now, Back to That Mouse in My RV (for Your Entertainment)

    Let’s circle back to the little intruder I mentioned. Truth be told, after nearly seven years on the road, we’ve had our fair share of unwelcome visitors. But mice have definitely been the worst. Especially in cooler months, when the little guys are desperate for warmth, we’ve had a few run-ins. But one mouse stands out.

    At the time, we were parked in cooler weather, and I guess it didn’t take long for the mouse to find its way in. We didn’t notice much the first night, but we did wake up to what we thought were a ripped bag of tortilla chips and trash bag the next morning that we thought were from us moving things around in the dark before bed.

    That should’ve been the warning.

    That second night though, our dog Journey launched herself onto our bed in full panic. At first, we had no idea what startled her — until the next night when the same mouse ran passed me while I was sleeping and brushed my forehead at 2 a.m.

    No amount of coffee could undo that. I washed my face for ten minutes straight, then set out every trap we had. Caught him the next night, but we’ll never forget the shock. It was like something out of a sitcom — if that sitcom starred two very grossed-out RVers and a traumatized dog.


    Final Thoughts: Stay Vigilant, Stay Flexible

    Pests in your RV are one of those “not if, but when” situations — especially if you travel full-time or love staying off the beaten path. But the good news is that they’re manageable with a little preparation, a good sense of humor, and quick action when they do sneak in.

    Whether it’s your first RV mouse or the fifth time you’ve found ants on your counter, don’t panic if you discover your RV is infested. Take a breath. Clean it up. Seal the entry points. And get back to what really matters: enjoying your time on the road.

    After all, the only creatures you want curling up in bed with you are the ones you brought with you — preferably the furry, four-legged kind — unless it’s the middle of the night and she randomly wakes you from a dead sleep by landing on your stomach in a panic.


  • Dewinterizing an RV: An Easy Checklist

    Dewinterizing an RV: An Easy Checklist

    It’s time. Finally. Your whole calendar year has been building up to this moment. It’s time to crack open that garage or storage unit. Or to take a stroll to the back forty where you last left your great love for the winter. It’s time to rekindle the flames of adventure. To stoke the embers of romance with the great outdoors beyond the horizon. That’s right: IT’S RV SEASON AGAIN! But, before you get too carried away (who could blame you?), remember: Dewinterizing an RV is essential.

    Like any great relationship, it would be foolish to just hop into the saddle and take off. This old love of yours needs a little work to get humming back into harmony. Because if you were smart (and you’re an RV Trader reader, so we’ll assume yes), you made some careful winterizing tweaks to your adventure-on-wheels before putting her to bed.

    So, let’s take a look at what you need to do and undo when dewinterizing an RV. 


    Basic Tasks for Dewinterizing an RV

    Here’s a checklist of the most elementary dos and undos:


    Flush the pipes.

    Depending on how far into the wintery north you last parked, you might’ve added some nontoxic RV antifreeze to your water system. One of your most important dewinterizing steps is giving that a healthy flush. Turn on your water pump, and let all your faucets vent until the water runs clear. If you’ve got a water heater, turn it on and check that it’s functional. And if you find any residual taste or odor from the anti-freeze liquid, try running some baking soda through the system.

    Because your water system sat stagnant for months, it’s always possible that bacteria may have built up, so you’ll also want to sanitize the system. Here’s our look at water system maintenance, with tips for filling and cleaning. 


    Give your tires a good pump.

    Count on dropping around two to three PSI per month as a general rule, so get out the pump and go to town. Check your owner’s manual for the correct fill pressure.


    Reinstall and charge your batteries.

    Just like tires, your electrical system is likely to lose a little bit of oomph while sitting dormant. So, make sure you’re fully charged. Charge and inspect your backup system too. If you don’t have one, now’s a great time to make sure you’re never stuck without power by picking up an RV-friendly battery charger


    Update your license and registration, please.

    If it’s been months since you hit the road, it’s a good time to double-check that your registration is up-to-date. 


    Change your filters.

    Now’s also the perfect time to get up-to-date on your air and water filter changeouts. 


    Get your motor running!

    Check all your fluid levels, then start that engine! Extreme temperatures can be hard on engines, so let it run for a few minutes. Then look for any drips, sneaky drops, or seeping fluids. 


    Check Off Your Annual Checklist

    Whether you have a Class A motorcoach or a pull-behind travel trailer that oozes your personality, there are plenty of preventative maintenance checks you should be doing annually. Just like my grandma used to check all of her smoke detectors when spring cleaning, now’s a great time to knock some of those annual tasks out. Here are a few you should consider when dewinterizing an RV. 


    Perform a water leak check.

     While you’re sanitizing your water system, turn on your water pump and listen for it to shut off. That means your system is fully pressurized. Listen for the next several minutes to ensure the pump doesn’t kick back on. While listening, check your toilet, shower, and sink for any dripping or seeping water. If your pump does turn back on, you’ve got some leak hunting to do, as you’re losing pressure from somewhere. If your system is leak-free, the pump will stay off. So, if you hear nothing, you’re likely good to go. 


    Check your propane system.

    Open the gas lines and sniff around for any strange smells. Then, fire up each of your appliances to ensure they’re still working properly. 


    Perform a tire check.

    You’ll already be getting pumped up, so check your tires while you’re at it for any signs of wear. Tire issues while on the road can be a HUGE problem, and many problems can be avoided with proper attention and care.


    Visually inspect your RV, camper, or trailer’s exterior.

    Changes in temperature can be hard on all sorts of materials, especially plastic and rubber. Check weatherstripping around windows, air vents, and doors. Look for any developing rust on metal surfaces. And check for cracks in plastics or other facades.


    Test your generator. 

    Check your oil level and make sure your exhaust is clear. Then let ‘er rip, testing for proper performance on each electrical system and appliance. Remember that power is a critical safety feature, and don’t accept anything less than peak, reliable performance.


    Restock safety and emergency supplies.

    Check dates on any expirable materials, including medication. Restock any items you may have used, like Band-Aids, bug spray, or other consumables. Do a double check also of all safety items in case of emergency.

    Regular maintenance is critical to making the most out of your RV, so hopefully you’re putting the work in all year long! Here’s a look at some items you should have on-hand to make regular maintenance a snap.

  • Spotting the Best RV Trailer Suspension Systems

    Spotting the Best RV Trailer Suspension Systems

    It’s inevitable. You’re out shopping for a new travel trailer. You pop into a dealership to check out some floorplans. Almost immediately, you step into the cabin to check things out. All the while, one of the most important elements in your purchase goes unseen and unnoticed: the RV trailer suspension system.

    As a former RV dealer and current full-timer, one of the first bits of advice I share with RV shoppers is to shop from the road up. However, even with that bit of advice, newbies and veterans alike are still often left asking what to look for. What are the best RV trailer suspension systems, and why does it matter so much?

    No worries. We’ll brush you up on what makes a great suspension system and share which ones are the best on the market right now.


    Not to Keep You in Suspense, but Here’s Why It Matters

    In its simplest form, RV trailer suspension systems are there to keep the wheels planted on the road and absorb the bumps that we encounter. For decades, trailers of all sorts have relied on simple leaf-spring suspension systems to do just that. However, these suspension systems do little to minimize the amount of vibration and harshness that is transmitted up to the RV. 

    As a rule, the more harshness and vibration a suspension system can absorb, the less of that is transmitted into your RV. Translation: The less vibration that’s transmitted up to your RV, the less susceptible it is to damage. 

    Think about hitting a bump. The whole RV is jarred. Have you ever come off the road and opened a cabinet only to find it’s a big mess inside? (Even worse, have you ever gone into the RV and found damage?) That should give an idea the beating your RV could be taking.

    We had a friend whose stove literally fell out of the cabinet while they were towing their trailer down the road. I can’t say that this was specifically because their RV had a cheap leaf-spring suspension. But, in fact, that is the system the RV had. 

    So what’s the solution?


    Better RV Trailer Suspension Systems

    Fortunately, there are some newer — and much better — systems than leaf-spring suspensions available now. RV component suppliers are now starting to provide ever-better suspensions for towable RVs. I recently had the chance to ride in several trailers that were towed on a closed track to experience the actual seat-of-the-pants difference these suspension systems made on the inside of the trailer. 

    The difference between even an upgraded leaf spring suspension and some of these newer systems was remarkable. The trailers went from rattling and banging and, quite frankly, being scary to ride in to being much smoother and feeling more secure. I have long been an advocate of these upgraded RV trailer suspension systems, and the ride on the closed track was absolute validation of my suspicions. 

    There are a variety of suspension systems out there now that aren’t just the traditional leaf-springs. 


    Slipper Roller Suspension

    This is a newer adaptation of the traditional leaf-spring suspension. One end of the leaf-spring is bolted to the chassis as has traditionally been done. However, the other end is able to extend and retract without being shackled to the frame. Now, instead, there is a roller mechanism that the spring rides on which is also mounted via a thick rubber bushing. 

    The only RV manufacturer that I know of that’s using this system from the factory is Rockwood and Flagstaff on their 2025 fifth wheels. I actually did get to ride in one of these on the test track. It was significantly nicer than a fifth wheel with a more traditional leaf-spring system. 


    Curt Slipper Roller Suspension.


    Torsion Axle Suspension

    This system has been around for a long time. I got to watch one of these being built at a Lippert chassis factory. And it’s really different. 

    Essentially, there are long metal bars enclosed within a square tube that is also surrounded by a rubber material. The rubber is frozen well below zero degrees Fahrenheit which shrinks it down. Then they insert it into the axle tube with the metal torsion bars. When it comes up to normal temp, you now have a system that does a reasonably good job of absorbing bumps and vibrations. 

    At present the trailers that use this system include: 


    Now … the Best RV Trailer Suspension Systems

    Let me just shoot straight. I think the best RV trailer suspension systems for towables today comes from Curt. (Which is a division of RV component supplier Lippert.) There are two examples of these suspensions, a good and a really good. 


    Curt Touring Coil Suspension

    This new design form Curt is very similar to how the suspension in many cars and trucks operates. There is a coil spring and a shock absorber. The suspension is mounted on a pivot point. This allows it to go up and down. It is controlled by the coil spring and shock. 

    You wouldn’t consider not having shock absorbers on any vehicle out there yet most trailers don’t. This system incorporates a shock absorber at each wheel which dramatically minimizes the vibration and harshness transmitted inside the fifth wheel. 

    At present time this suspension is being fitted to the Alliance Paradigm, Brinkley Model Z, and Grand Design Reflection 150-Series.


    Curt Adventure Edition Suspension

    Taking the Touring Coil suspension system to the next level is the Curt Adventure Edition Suspension. The Touring Coil (just mentioned above) has beams that go across the trailer, so it’s not a truly independent suspension. But the Adventure Edition suspension does not have those beams, which makes it a true independent suspension system for towable RVs. 

    This fully independent axle-less system affords a lot of suspension travel. This makes it really well0suited to towables that are meant to go off-road. In addition t,here are two shock absorbers at each wheel adding even greater control. This translates into really exceptional off-road handling. But even on-road handling and cornering are improved markedly. 

    The downside of this system is that it requires a beefier frame and structure. Also, since it’s a much more involved system, it can add significant cost. 

    The trailers that have this system include: Forest River Ibex, No Boundaries, and R-Pod (optional on some models for all three listed); Ember Overland-Series (standard on all Overland-Series models).


    A Little Story About a Suspension Upgrade

    Recently, a friend of mine upgraded the suspension on their fifth wheel. They went from a basic leaf-spring to an aftermarket slipper spring suspension system. Specifically, they went from a very rudimentary leaf-spring system to the Roadmaster Comfort Ride system. The cost of the upgrade was about $2,500 with installation.

    So, was it worth it to them? 

    To quote them after a day of driving, “This was one of the best upgrades we’ve made to this RV. The difference is incredible.” 

    The fifth wheel handled better and towed much more smoothly. Personnaly, I was able to follow them for about 300 miles and observed their cargo tray on the back. Except for very significant craters in the road — we were on I-40 — the cargo tray stayed pretty steady. 


    The Right RV Suspension System for You

    As mentioned earlier, if you’re shopping for a new towable RV, I always recommend starting at the road and working your way upward. While many RV owners only tow fewer than 100 miles on most adventures, others clock quite a bit of distance on each journey. 

    If you’re someone who is the typical RV owner, as surveyed by KOA, and you only travel 75 miles or so at most, the caliber of the suspension might not justify the big increase in price to get something better than traditional leaf-springs. 

    The reason I write this is that upgraded and better RV trailer suspensions are typically not fitted to the most affordable RVs on the lot. So, the cost of something with a better RV trailer suspension system may not pencil out. Really, it depends on your style of travel. (And your budget.)

    But if you do a good deal of towing, I would absolutely look at what type of suspension a trailer has. This is going to make a significant difference in how long the rig last and the kind of things you’ll find when you open the door after a serious jaunt on our nation’s highways. 


    A Way for Independent Manufacturers to Stand Out

    Also, know that there are some independent manufacturers who do things a bit differently — and a few actually build their own suspensions. So, while I’ve tried to detail the major systems out there, if you’re shopping for something less than mainstream you might find something a little different. And that could be a good thing, too. 

    If, like friends of mine, you finally realize that the leaf-spring suspension on your towable isn’t doing a good job, there are always upgrades. I had mentioned the Roadmaster Comfort Ride slipper roller suspension, but plenty of RVers have also taken their trailers to MORryde and had coil spring independent suspensions installed. Not a cheap modification, but I have yet to hear someone say the change wasn’t worth the price of admission. 

  • Earth Day Ethics: An RV Guide to Leave No Trace

    Earth Day Ethics: An RV Guide to Leave No Trace

    The freedom to live, work, and play in gorgeous natural places comes with an incredible, but simple, responsibility. Living and traveling in our RV for the past 12 and a half years has afforded us some incredible opportunities to spend weeks — even months — in some of the most beautiful, pristine, and remote areas of this continent. (For those of us who crave both adventure and solitude, this is truly RVing nirvana!) Visiting some of the Earth’s most serene places strikes a cord in the heart of the traveler of admiration and affection. That desire — to preserve, to leave no trace when your RV passes on — is a great place to start.

    There is an ethics to traveling. Earth Day is a great reminder that it’s not a burden so much as joy. Personally, as full-timers, without the office or responsibilities of a house calling us back home, we can work, play, and live wherever we desire. Doing so, however, creates an awareness that extended stays in pristine places can have negative consequences on the environment for others and future generations to enjoy.

    So, how can we balance a desire to be out there with our own sense of stewardship for it. Quite simply, we all must accept our role as caretakers.

    Young scouts learn the importance of picking up trash and leaving a place better than they found it. While that’s an important part of the overall ethic of our collective responsibility to the planet, Leave No Trace principles go far beyond just picking up litter. These principles are a commitment to making a difference for future generations as well as the preservation of the biodiversity of a natural area.  

    Let’s talk about exactly how you can live out Leave No Trace in your RV.


    First: Understand How RVs Can Hurt an Environment

    Without careful management, we can have a negative impact on pristine wilderness areas we seek to explore and enjoy. We can pollute the air and waterways, and disrupt habitats with noisy generators, improper outdoor lighting, careless site selection, and trash.  

    In popular natural destinations that attract many RV campers, the repeated cycle of compaction, habitat disruption, and improper waste disposal can lead to significant environmental impacts. Fragile ecosystems, such as wetlands, meadows, and deserts, are particularly vulnerable as these areas often have unique species that depend on specific conditions to thrive. When their habitats are disrupted, not only is the local flora and fauna affected, but there can also be a ripple effect that impacts the wider ecological web of the area.  

    As RVers, we hold the keys to making a significant difference with each choice we make. From the paths we drive to the ways we manage our waste, we either contribute to the problem or become part of the solution.


    Second: Learn the 7 Principles of Leave No Trace

    Sure, if you haven’t practiced these principles before, these may sound like a lot to think about, especially when you are on vacation!  But really, once you learn the seven principles of Leave No Trace and how you can implement them in your RV, they simply become … second nature.  (Pun intended!)  

    Ask any Boy or Girl Scout to recite these seven principles, and they may even sing you a song that they’ve learned to remember them. But, most adults can only name a few. If it’s been a while since you’ve been a scout or scout leader (or if you’ve never been a scout), here’s a quick overview.

    1. Plan Ahead & Prepare
    2. Travel and Camp on Durable Surfaces
    3. Dispose of Waste Properly
    4. Leave What You Find
    5. Minimize Campfire Impacts
    6. Respect Wildlife
    7. Be Considerate of Others


    Sounds simple, right? While most of these principles are common sense, there are some environmental impacts from RV camping that may surprise you. (And yes, there are real temptations! Who doesn’t want to touch a manatee?!

    Now, let’s take the next step and discuss how Leave No Trace  principles can be easily integrated into a RV camping lifestyle to help preserve our special places and keep our wild places truly wild.


    Third: Reduce Your Impact with 6 Simple Tips

    1. Sharpen your campsite selection.

    • Problems. Soil erosion can be exacerbated by the weight and pressure of large RVs on the land. This can lead to compacted soil, which reduces its ability to absorb water and support plant life. In turn, this can lead to increased runoff and erosion. Also, when RVers wander off of established paths or create new ones, they can destroy and disrupt wildlife habitats, contributing to erosion or soil degradation that may take years or even decades to recover. Recreational off-trail choices in the area — from hiking and cycling to motorcycle and OHV use — can leave a serious impact.
    • Solutions. RVers should use established campsites, boondocking areas, and parking areas to avoid damaging untouched natural areas. When these are not available, look for durable surfaces, such as gravel or sand, that are more resistant to wear, and more porous for ground water saturation. Learn to identify cryptobiotic soil when camping in the desert and steer clear of it. It takes decades to regenerate this precious soil upon which desert plants rely, so “Don’t Bust the Crust!” And always stay on designated trails when hiking to prevent soil erosion and protect plant life as well — and only use motorized vehicles on trails or roads designated accordingly.


    2. Avoid campfire hazards.

    • Problems. Boondocking areas are often littered with numerous campfire rings, many containing half-burned wood, or even worse, smouldering ashes. Also, campers often build very large fires, which can stray out of control and cause forest fires. Or they try to burn objects such as wooden pallets, or metal cans and plastic which give off noxious fumes.
    • Solutions. RVers should bring their own portable fire pit/grill and keep fires minimal, especially in fire prone regions. There are many LNT options made by OTZI, Solo, and Primus which leave absolutely no ashes or wood behind. Or camp next to an existing campfire ring and be sure to burn wood completely down to white ashes. Never try to burn materials in the fire unless they are made from paper or wood. Before leaving the area, make sure your fire is “dead out” by dousing it with plenty of water and stirring it to make sure all ashes have cooled. Never leave a fire until the ashes are cold. And, please clean any fire pits in the area that are littered with trash and recycling!


    3. Game-plan your waste water disposal.

    • Problems. Improper disposal of gray and blackwater tanks can contaminate water and soil, posing health risks to both humans and wildlife. Chemicals from soaps, detergents, and human waste can upset the natural chemistry of ecosystems, leading to algal blooms and other negative environmental issues.
    • Solutions. Use dump stations to dispose of the wastewater in your tanks. If you do dishes in bins to save water, filter out any food particles with a small sieve and scatter the wastewater in a different place each day (but never within 150 feet of a water source). This lessens the impact on a specific area. Throw away any food particles in your trash so as not to attract any critters to the area. If limited facilities make it difficult to dispose of waste properly, plan trips into town that align with dump station locations. It’s all about being proactive and planning ahead!


    4. Carefully monitor your trash disposal.

    • Problems. Littering, whether intentional or accidental, can not only be unsightly, it can lead to the destruction of pristine natural areas and have very negative impacts on wildlife. It teaches wildlife to live off of human food/trash rather than find their own.  Just as deadly is micro-trash like twist ties, bread bag clips, Hershey bar wrapper corners, bottle caps, dental floss, and cigarette butts. Wildlife can confuse these tiny pieces of trash as food, and are often found in the stomachs of dead birds and other marine critters.
    • Solutions. In remote areas, RVers should always pack out what they pack in. This means being prepared with trash bags and recycling containers. One way to minimize your trash is to responsibly burn any used paper products and paperboard boxes. Consider reusable or biodegradable products to minimize plastic waste — think reusable water bottles and jugs instead of disposable ones. In all camping areas, always scour your campsite for all trash (including micro-trash) and make sure it ends up in the trash/recycling before you leave.


    5. Decrease your resource consumption.

    • Problems. RVers often use too much water (especially in desert areas) and consume too much power, causing them to run a gas generator for several hours per day. This creates both air and noise pollution, as well as being a fire risk in drier areas.
    • Solutions. Resource conservation starts with using less water and electricity. An appropriately-sized solar powered system for your RV can silently provide all the power you need by garnering energy from the sun, thus eliminating the need for a gas generator all together. Conserving water is easy by taking shorter showers and using a basin for washing dishes, which reduces water usage. Remember, every small action contributes to the larger goal of preserving the environment, and allows you to stay out longer!


    6. Limit your campsite lighting.

    • Problems. RVers often leave bright outdoor lights on all night. Bright, unshielded lighting can affect bird migration, sea turtle hatchlings (when camped near the beach), and night sky viewing in dark sky areas. They can also bother nearby campers who seek out dark areas.
    • Solution. Only use outdoor lighting when necessary and make sure it is shielded so that it doesn’t point upward. Small solar lights or under RV lights are fine to make it safer to move around the campsite at night, but it’s important to turn them off before you go to bed.


    The Joy of Leave No Trace as You RV

    To truly appreciate nature’s unique gifts and ensure their preservation for future generations, it is crucial to understand the effects that our recreational choices have on our planet. By becoming aware of these impacts, and sharing them with others, we can all make informed decisions that align with the seven principles of Leave No Trace. Before you know it, it’ll become second nature for you and your family!

  • Spring Cleaning Your RV — Inside and Out

    Spring Cleaning Your RV — Inside and Out

    It’s that time of year. Many RVers are beginning to make their plans for the season. Of course, that starts with going outside and spring cleaning your RV — an unenviable yet necessary task. So, we thought we’d share some of our best tips for spring cleaning your RV. That way, you can get the dirty work done and let the fun begin as the weather warms up. 

    In spring cleaning your RV, though, you’ll also find that it gives you a great opportunity to reevaluate the things you’re bringing with you. (And, perhaps, replace some of the items that don’t make the cut. Or, even better, sometimes leave some things behind.)

    So, let’s get started!


    Start with a Clean Slate

    In personal practice, the first thing we do when spring cleaning the RV is to literally empty out the entire RV. Yes, all of it. (If you haven’t already done this in winterization, that is.) We pull everything off every shelf in our travel trailer. The we put those items in totes and boxes. 

    As we do this, the boxes get labels. And, to facilitate that, we get a roll of Post-It® Labeling and Cover-Up tape. Essentially, this is a Post-It® note on a roll much like other tape. And it’s really convenient for this task. Like a traditional Post-It note, this comes off without leaving a mess, and, being in a roll, you can use as much or as little as you need. This makes it easy to remember what’s what and what goes into which cabinet. In our case, we also label the cabinet doors with this stuff since it doesn’t leave any permanent reminder of your cleaning efforts. That way box A-1 matches cabinet A-1. 

    Naturally, as we empty the trailer, we realize that many of the items just hadn’t been touched in a while. (That’s a clue.) For example, at one point, we thought it would be funny to have pink flamingo wine glasses. But, quite honestly, they never got used. (Like not even once.)

    Realizing that creates an opportunity for things like donations. I am always really surprised by just how much stuff manages to find its way into our donation box. 


    Clean Up and Wipe Down

    Once all the shelves and drawers are empty, we take our shop vac and clean out the entire trailer. It’s amazing how much dust and grime end-up inside the trailer. But, really it’s a good thing, because  we also use our rig quite a bit. So, it makes sense that dirt is one of the souvenirs we collect on the road. 

    With the shelves and drawers empty, and after being vacuumed, this also gives us the opportunity to wipe down the whole interior as well. It’s wonderful how refreshing the RV seems after this exercise. 

    Wiping down all the surfaces in the RV.


    Do the Extra Checks

    Faucet Filtration

    While going through the shelves and drawers might be obvious, this is also a good time to take the aerators out of the faucets in your rig and give them a rinse. Many of the faucets and plumbing fixtures in your RV have tiny little screens to keep things flowing nicely. But little rocks and other debris can get caught in these over time reducing flow. On most faucets, for example, you can simply unscrew the tip and voila! There you’ll find the screen.

    However, do pay very close attention to these as you disassemble them. (Because you have to put them back on.) Many of these have a certain way that they go together to optimize flow and performance. Putting them back together correctly is the key to optimal water flow. I just take them apart carefully (it’s really easy), rinse them out in the house, and put them back together the way they came apart. 

    There are likely screens in the places where hoses attach to the outside of your rig, too, that might need a little rinse. 


    Mattress Moisture

    Another place many RVers don’t consider —surprisingly — is under the mattress. RVs can be sources of pretty significant moisture. In some cases, that moisture can collect under the mattress. I like to lift the mattress and just make sure it’s dry under there. 

    If your RV has an issue with condensation developing under the mattress (which isn’t unusual in smaller rigs), you might consider something like a Froli Sleep System. This is like a plastic sheet of little springs that raise the mattress off the platform. The interesting thing about these is that you can get various firmness levels to the springs. So, you can also adjust the comfort of the mattress when you install one of these. In addition, you could literally create firmer or softer parts of the bed. Many RVers have told me that they simply put one of these Froli systems under their stock RV mattress and that it makes things pretty comfortable. 


    The Froli sleep system. (Image from Froli)


    Reorganize and Refresh

    Once all those things have been taken out of the camper and it’s time to put them back,  consider changing how they’re storedMy wife, who’s very good at storage hacks, measured out the various cabinets and storage closets. Doing so, she found clear plastic containers — such that everything that’s in there now is in one of those. This does a couple of things. First, it stores those items well. Second, it makes them easy to take out. 

    You can get that can of SPAM that’s at the back of a cabinet or just reach the bread more easily. Whatever suits you. But I like how nice everything looks too. And these individual clear plastic storage totes also just look good and keep things from shifting too much. 

    I also put together one of those shelving units that my wife found for each of the closets in our bedroom. Then we put soft totes in those closets. So, now they’re better organized. Further, we can take the totes in and out as we come home. That means we can load them in the house and just carry them to the RV. 

    There are also baskets in the overhead cabinets for the same reason. 

    Another benefit to bringing everything out when spring cleaning your RV is that you can run all the silverware and containers in the camper through a home dishwasher. For us, we do our best when we’re out on the road, but the dishwasher at home just does a great job. So, this is an excuse to run it all. Emptying things out when spring cleaning your RV also gives you the chance to wash the bedding and towels — all the soft things that normally live in the camper. 


    The drawers and cabinets in our RV got their own reorganizing spring makeover.


    Repeat the Process Outside

    After we empty all the inside and clean and put everything back in a better-organized form, we do the same for the storage bays outside the RV. It’s really shocking how disorganized those outside storage bays get. So, once everything is out, it also gets reevaluated. 

    So, nope: We don’t need three separate sets of wheel chocks. Nor do we need four water hoses. (Three will do.) And that kind of stuff on repeat.

    Taking all the items out of the storage bays on the outside of the rig allows you to do the same thing as the inside of the rig — improve your storage tote game. (Except the ones we place in the outside compartments are those black-and-yellow mini tubs.)

    Being a nerd, I also put labels on all the totes that make the cut back inside the RV. So, there’s one tote with the air compressor. One with a power drill. Another with lanterns — that sort of thing. (It’s really easy to remember what’s in which tote when they have labels on them.)

    Another thing we do is replace the rodent repellant in the rig twice a year. We happen to like the Grandpa Gus rodent repellant. (It has served us very well for quite a few years.) When everything’s out of the RV, and the rig has been vacuumed, we then replace the pouches of rodent repellant, which make the rig smell good to us but, theoretically, not to the varmints. 


    Double-Check Seals and Stuff

    Sealing the Deal

    While we clean the rig, we also inspect all the seals and other breaches on the outside of the RV. You’re supposed to inspect all the seals on the RV every 90 days — and we do — but this is one of the seasonal reminders that it’s time to do this task. 

    I don’t know of any RV that doesn’t recommend inspecting all the seals on the exterior of the rig. While I’ve never had to mitigate a failing seal, it’s still best practice to know what condition they’re in and resolve any questionable seals. Think of anywhere there’s a hole in the sidewall or roof of the RV and know that there’s a flexible sealant there. 

    These are the things that need routine inspections. 

    You might also inspect any propane appliances to make sure that there aren’t nests or other blockages to safe operation. If they look clean in the business end of the appliance, they’re likely performing properly. But many spiders, for example, love the odorant that’s in propane and build webs which can actually cause the appliance to not operate properly — and potentially even become a safety hazard. 


    Inspecting Appliances

    I also use the shop vac to clean out all these spaces so they look clean again. Propane appliances that are free of dust and webs operate more efficiently and more safely. 

    If your water heater has an anode rod, you likely removed that when you winterized your RV. If you notice that it’s deteriorating, that’s normal. But it’s also where those little rocks might come from in the faucet aerators. 

    Since it’s out and easy to look at, see if your anode rod is still usable, or if it’s time for a new one. If there is some wear on it, that’s just normal. It’s a sacrificial element to keep the water heater itself from rusting away. I have a picture of a new one and one that is, truly, completely used-up. 


    Just to illustrate: a new anode rode versus one that is completely used up.


    Bonus Tip: Maybe Freshen Your Spice Rack

    I’ll leave you with this last tidbit. I love to cook. (You know, because cooking meanseating!) So, I have a set of spices just for the RV. Spring is when I go through those and freshen them up. Spices do age out and the temperature challenges that are the inside of an RV plus the vibration on the road can compact them. 

    If you have little bottles of compacted powder instead of spices, it might be worth replacing those with fresh spices. 


    Might be time to refreshen up your spice rack.


    Final Thoughts on Spring Cleaning Your RV

    It’s really refreshing to have your RV well-organized, smelling great, and looking good too. (It makes you want to get out there!)Doing the dirty work prepares you for another season of adventures and doing your best to disorganize the rig, which means that it’ll also be so much easier next spring.