Category: Living

  • FMCA Tech Tip: RV Fire Safety

    FMCA Tech Tip: RV Fire Safety

    Making a plan and having the proper equipment can help to avert disaster. 


    An RV fire can quickly lead to devastating damage, injury, or, in the worst-case scenario, loss of life. Therefore, it’s important that RVers implement a fire-safety plan that includes knowing how to exit the RV, having a sufficient number of fire extinguishers of an adequate type and size, installing devices that warn of dangerous levels of smoke and propane (as well as carbon monoxide), and possibly installing an automatic extinguisher for a refrigerator or engine compartment.

    Escape Options

    When a fire breaks out, your first decision is whether to fight it or flee. Because RV fires can quickly become unmanageable, fast action is crucial. Some RV owners place important items in a pouch that they keep near the door, so it’s easy to grab on the way out. The door, of course, may not be accessible. Emergency exit windows are mandated by law, but crawling through one may be difficult. Some windows pop out, but many can slam shut on you, so you may want to keep handy a pole of some sort to hold the window open. You also might have to deal with a significant drop to the ground, unless a picnic table or bench is below the window. Rope ladders can be purchased, but you must be able to find and deploy the ladder quickly to avoid being overcome by smoke inhalation. Rather than an emergency exit window, some Type A motorhomes have an emergency exit door. Whatever your options, it’s important to have an escape plan and practice it with your travelers.

    Fire Classifications

    A fire needs three elements to ignite: fuel (such as wood, carpet, gasoline, diesel fuel, and propane), oxygen, and heat. Fire extinguishers put out fires by removing one or more of these elements. Although RVs come equipped with fire extinguishers, they often meet only the minimum standards provided by the National Fire Protection Association. Many models are undersized and fall short of what’s needed to put out anything but a very small fire. Before we examine the types of fire extinguishers, it’s important to understand how the fires most likely to occur in RVs are classified.

    • Class A fires involve solid combustible fuels (other than metals), such as wood, paper, cloth, and plastics. These are the easiest fires to put out. Water works well. Ideally, an element (such as soap) is added to the water to break the surface tension and separate the fuel from its oxygen.
    • Class B fires involve flammable liquids, such as gasoline, oil, grease, diesel fuel, and alcohol. Water won’t extinguish such fires, because the liquid fuel floats on the water’s surface and spreads to other areas.
    • Class C electrical fires are caused by energized circuits. If a circuit is live, consider the fire a Class C blaze. The wire itself doesn’t burn, but the insulation and anything surrounding it does. Using water on Class C fires can create an electrical shock hazard. Once the circuit is de-energized, the blaze can be treated as a Class A fire.

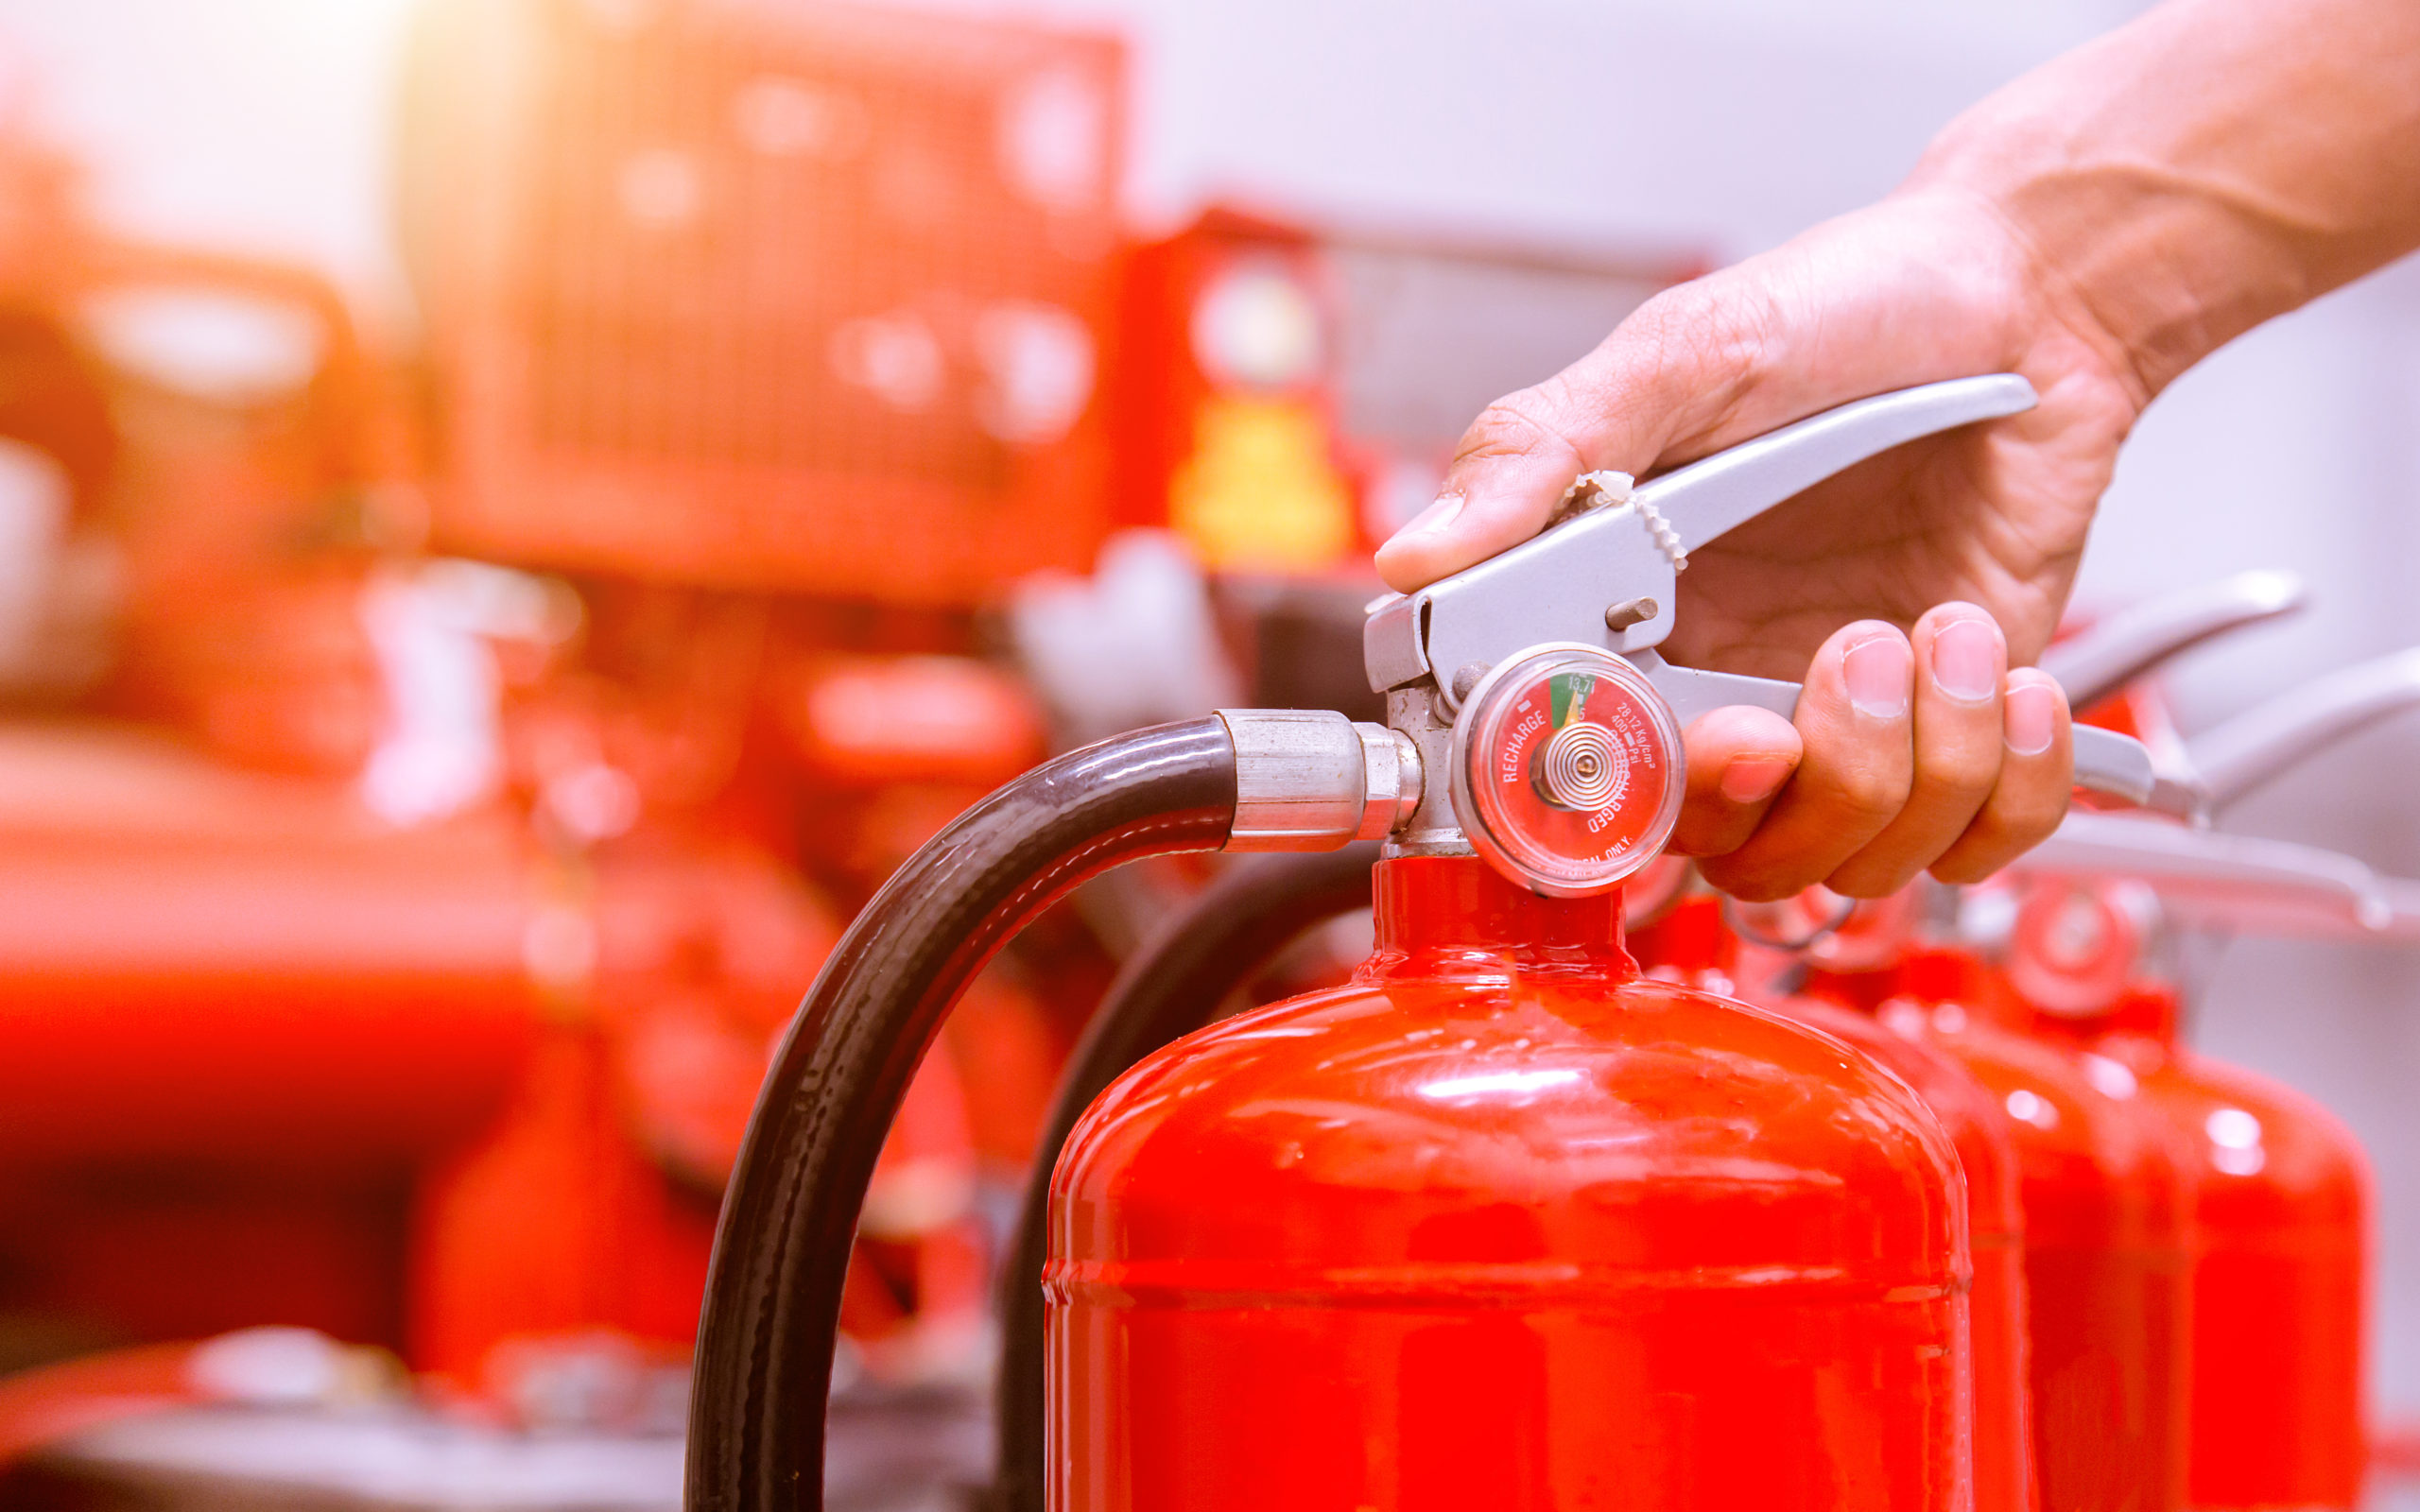
    Fire Extinguisher Ratings

    Fire extinguishers tested by UL, a global safety certification company, are labeled with a rating that indicates the size and types of fires the extinguishers can put out. Each letter stands for a fire classification — that is, Class A, B, or C. The number preceding the letter A is a water equivalency rating, with each A equal to 1.25 gallons of water. For example, a 2A extinguisher is rated as effective as using 2.5 gallons of water on Class A fires; a 3A extinguisher is as effective as using 3.75 gallons of water, etc. The number rating for Class B and C extinguishers represents the square footage that the extinguisher is designed to handle. So, a 10B:C extinguisher can handle Class B or C fires up to 10 square feet. It’s common to combine ratings on a single extinguisher, such as 2A:10B:C.

    Fire Extinguisher Types

    Using the wrong type of fire extinguisher on certain fires can be life threatening. Following is a brief description of the types of extinguishers and the fire-fighting agents they employ:

    Air pressurized water (APW): Extinguishes Class A fires. APWs are large tanks filled about two-thirds with water and then pressurized with compressed air. Pulling the trigger shoots water from the hose and nozzle.

    Carbon Dioxide (CO?): Extinguishes Class B and C fires. The extinguishers are filled with highly pressurized carbon dioxide, which exits through a hard plastic horn and displaces oxygen from a fire, suffocating it. Because the CO is cold as it exits the extinguishers, it also cools the fire. CO generally is not effective on Class A fires because it may scatter burning particles and may not displace enough oxygen to smother the blaze and prevent it from reigniting.

    • Dry Chemical: Extinguishes Class A, B, and C fires. These are the most popular extinguishers among consumers. The dry chemical is a fine powder that is pressurized with nitrogen. The dry chemical interrupts the chemical reaction that occurs among elements of a fire (fuel, oxygen, and heat). Many RVs come equipped with a 3.9-pound dry-chemical fire extinguisher rated at 1A:10B:C. As a fire-fighting tool, it’s undersized, and therefore its usefulness is extremely limited. If you choose a dry-chemical extinguisher, I recommend a larger one, such as a 9-pound 3A:40B:C. One downside of dry-chemical extinguishers is that they leave a mess. The powder extinguishes electrical fires, but it is corrosive to electrical circuits, so once it’s used, electrical components may need to be replaced. In addition, inhaling or coming into contact with certain types of dry-chemical powders can cause irritation to the nose, throat, and lungs, as well as dizziness and headaches. Over time, the dry chemical tends to settle in the cylinder and become packed down. Therefore, every six months, turn the extinguisher upside down and whack the base with a rubber mallet so that the powder remains loose enough to be expelled. Most of these extinguishers come with a pressure gauge that should be checked regularly. If the gauge indicates a recharge is needed, it may be possible to refill the extinguisher, but usually inexpensive throwaway models simply should be replaced.
    • Clean-Agent Gas: Extinguishes Class A, B, and C fires. These extinguishers use an inert gas to interrupt the chemical reaction in a fire and/or remove heat. Halon has been banned in many areas, because it destroys ozone, but environmentally acceptable clean-agent gas alternatives are available. They leave no mess and don’t conduct electricity. Two types of clean agents exist, flooding and streaming. Flooding types are more gaseous, and often are used in enclosed, unoccupied areas where the gas can’t escape, such as computer rooms and engine compartments of boats. When such extinguishers are used in an open or fan-ventilated area, the gas can disperse, allowing the fire to flare up again. Streaming clean agents, such as Halotron 1, are discharged from a portable extinguisher as a liquid and then turn into a gas. This allows the user to stand back from a fire. Although Halotron 1 is approved for use in occupied spaces, inhaling it should be avoided. It should be used outdoors or in an enclosed area that can be adequately ventilated after use. A Halotron 1 fire extinguisher is capable of putting out a Class A fire, but it is not as effective in doing so as a dry-chemical extinguisher. EX:


    • Aqueous Film-Forming Foam (AFFF): Extinguishes Class A and B fires. AFFF is a soap-like foam agent that is mixed with water. The foam blankets a fire, suffocates it, cools it, and prevents reignition. Technically, AFFF can conduct electricity, but in a fire involving high-voltage electrical wiring, the conductors generally short out and trip the circuit breaker, which de-energizes the circuit and removes the fire from the Class C category.
    • High-Expansion Air-Compressed Foam: Extinguishes Class A and B fires. These extinguishers employ a mix of denatured water and a foam. They are more effective than AFFF extinguishers. The foam provides a viscous, nonflammable layer to block air from the fuel. The foam also renders hydrocarbons such as gasoline or oil inert so they cannot reignite. The foam clings to vertical surfaces and produces no toxic gases. Fire Fight Products sells handheld 16-ounce extinguishers, the SS20 ($30 plus shipping), which can be used on small fires, such as on a kitchen stovetop. The best practice is to keep multiple units handy — one in the bedroom, one up front by the entry door, one in an outside storage compartment, and one in the towed or towing vehicle. Fire Fight’s 6-liter SS450 handheld extinguisher ($245 plus shipping) provides significantly more fire-fighting capacity. It comes with a spare can of foam, enough to refill the extinguisher twice. The refill procedure: add distilled water and 8 ounces of foam to the extinguisher, and then charge it with compressed gas. Jim Bounds, CEO of Fire Fight Products, said the company’s fire extinguishers are supplemental fire safety products. Individual components of the fire extinguishers have been tested by UL, but the overall units have not, and therefore they do not carry a UL rating.

    Automatic Extinguishers

    Many RVs have absorption-style refrigerators. They contain an ammonia-based mixture that can release explosive hydrogen gas should the cooling unit rupture and leak. The gas can be ignited quickly by a heat source.

    To control that kind of fire, compact automatic extinguishers that use a clean-agent gas can be installed in an enclosed compartment behind the refrigerator. Fire Fight’s SS30 was designed specifically for this type of application, and it works equally well in generator compartments. Its HFC227 gas can be dispensed through the standard sprinkler-style head or through a remote head attached to the cylinder via a 6-foot-long, stainless-steel braided hose. The cost of the SS30 series is about $250. An automatic extinguisher also can be a good choice for the engine compartment of a motorhome. A leak in a gas-powered coach can result in fuel coming in contact with hot engine parts or electrical components. And in a diesel-powered motorhome, the engine’s turbochargers can reach extreme temperatures, especially when working hard or climbing grades. If a hydraulic fan line or fuel line becomes loose or fails, flammable fluid can spray on the engine bay and ignite.

    One option for engine compartments is an automatic extinguisher using high-expansion air-compressed foam, which coats the fire and reduces the temperature. Fire Fight Products offers such systems in three cylinder sizes: SS100 (2 liters of foam); SS200 (3 liters); and SS300 (4 liters). The head can be mounted directly on the top of the cylinder or can be mounted remotely on stainless-steel braided hoses. The 4-liter system is available with two remote heads to cover larger areas. When the engine is running, a fire may reflash. So, a larger cylinder with a longer run time can allow you more time to get off the road and shut down the engine. Proteng is another company with an automatic fire suppression system. It is available in two versions — standard and heavy-duty. Each is intended to be used in enclosed areas, such as diesel or gas engine compartments, battery compartments, and other electrical areas. The system consists of a polyamide (synthetic polymer) tube that is filled with the clean agent FM-200, which is nontoxic and noncorrosive. When the standard system is exposed to direct flame or temperatures that exceed 158 degrees Fahrenheit, the tube ruptures, releasing the FM-200. The heavy-duty system uses a thicker polyamide tube, which ruptures when exposed to flame or temperatures exceeding 194 degrees Fahrenheit. The length of tube required depends on the size of the area needing protection.

    Fogmaker International AB also offers an automatic fire suppression system for engine compartments. According to the company website, the system dispenses a high-pressure mix of water and aqueous film-forming foam as a dense fog that can decrease temperatures by 700 degrees Celsius (1,292 degrees Fahrenheit) within 10 seconds. The dense water vapor displaces oxygen, and the AFFF prevents reignition of hydrocarbon vapors. A sensor connects to a warning display on the cockpit instrument panel. The cost of automatic systems ranges from about $160 to $900. When a fire in the engine compartment of a diesel pusher deploys an automatic extinguisher, the fire may go unnoticed by the driver for a considerable time. In fact, once the extinguisher is empty, the fire may reignite. Therefore, I recommend that an automatic fire suppression system have a remote alarm that senses pressure loss in the extinguisher. With an early warning of a fire, the driver can safely pull off the road, analyze the fire, and attack it with a handheld extinguisher, if necessary. Most any type of alarm can be used. You can buy a professional alarm or make something as simple as a 12-volt buzzer and flashing light on the dash. Fire Fight offers an optional pressure switch, but you must specify this when ordering a system, because it’s not shown on the company’s website.

    Smoke Alarms

    An effective warning system can be the difference between saving an RV or making a speedy exit while it burns to the ground. The longer an RV is, the more time it takes for smoke to travel from one end to the other, so it’s important to install multiple smoke alarms. They should be mounted on the ceiling or on a sidewall close to the ceiling. Place one in the rear and another in the front of the RV. To avoid false alerts, don’t install one in the cooking area.

    Smoke alarms may utilize ionization or photoelectric sensing technologies, or both. Ionization alarms are more responsive to flaming fires. Photoelectric alarms are more sensitive to smoldering fires, such as when electrical wiring is shorted and its insulation begins to burn slowly with smoke but no flame. In that case, you can shut down the electrical circuit to prevent a full-blown fire. Manufacturers such as Kidde and First Alert make dual-sensor smoke alarms that incorporate both types of sensors in one unit.

    Other Detectors

    If a leak develops in a propane line or if a propane appliance fails, the highly flammable gas can build up inside an RV. Propane is heavier than air, so it settles to the floor where a pilot light or spark can ignite it and start a major fire. That’s why propane alarms generally are mounted very low on an interior wall, next to the floor. Avoid using aerosols such as hair spray and various cleaning agents near a propane alarm, because they can ruin it. Test the alarm regularly. A carbon monoxide (CO) alarm won’t alert you to fire, but the colorless, odorless gas is just as deadly, so we’re including it here. CO, a byproduct of combustion, can come from a furnace with a cracked heat exchanger, or from a vehicle exhaust, or even the exhaust from a nearby camper’s generator. The lighter-than-air gas rises, so a CO alarm should be installed up high. Some RVs come equipped with a combination propane/CO alarm, which is generally located beneath the refrigerator. This is the perfect location for detecting propane but not for CO. If you have such a setup, I suggest adding a ceiling-mounted CO alarm. Some smoke alarms feature a digital LCD display that shows how much CO has accumulated. As little as 250 parts per million over an eight-hour period can be fatal. A good alarm will add up the accumulative amounts to protect you from a slow CO buildup, but less expensive models may sound an alert only if a large amount of CO is present at one time. Keep in mind that alarms for CO and smoke should not be mounted beneath a cabinet. They should be at the highest point in the RV.

    Summary

    When dealing with a fire, it’s important to stay calm, and you’ll have a better chance of that if you’ve rehearsed what to do in any given situation. Discuss and practice how to deal with a particular fire and whether to fight it or just safely exit the RV. Know your escape route and method so you don’t have to figure it out in an emergency. Be sure to outfit your RV with adequate fire extinguishers in multiple locations to cover your needs. Install smoke, propane, and carbon monoxide detectors in places where they will be most effective. Knowledge is power. Attend a fire and life safety seminar at an FMCA convention. You’ll gain immeasurable knowledge to help stay safe in your RV travels.

    Equipment Suppliers

    Fire Extinguisher Recall

    The recall of millions of Kidde fire extinguishers has been widely reported, but it bears repeating. The recall involves models of Kidde extinguishers with plastic handles that were manufactured from January 1, 1973, to August 15, 2017. The fire extinguishers can become clogged or require excessive force to discharge and can fail during a fire emergency. To determine whether you have an affected model and to request a free replacement fire extinguisher, contact Kidde at (855) 271-0773 or visit www.kidde.com and click on the “Product Safety Recalls” box.

  • 7 New Year’s Resolutions Perfect for RVers

    7 New Year’s Resolutions Perfect for RVers

    We’re saying good riddance to 2020 (it was a doozy) and making way for 2021! A new year means a fresh start and people across the world are making resolutions for the upcoming year. You might have a few goals already planned out for 2021, but did you include any RV related resolutions into the mix? We’ve rounded up a few of our favorites that are sure to make 2021 great.

    Go on More Trips

    It’s no secret that RVers love to travel, but are you making time for new adventures? Try creating your very own bucket list of short treks and long adventures for the year and involve the whole family in the research process.

    Take the Long Way

    RVing is all about enjoying the journey, not just getting from point A to point B. It’s often more exciting to take the scenic route as you never know what you’ll find on the road less traveled.

    Attempt Boondocking

    Have you always wanted to try dry camping? Why not try it in 2021? Boondocking can save you money and can be an incredible experience if you’re interested in really going off the grid.

    Make New RV Friends

    Building an RV community is one of the best parts of the lifestyle. Host a socially distanced campfire at your campsite or walk around and meet new people who enjoy similar activities as you do. There also are tons of online RV groups on social media that you can join to chat with like-minded people who love RVing just as much as you do. The RV community is BIG – take advantage of it!

    Plan for a Change in Scenery

    Have you been traveling to the same locations year after year? Branch out in 2021 and go to a new destination. Usually travel to the mountains in your RV? Why not try a beach trip this year? Remember, variety is the spice of life.

    Enjoy Nature

    It can be easy to have the go-go-go mentality when you’re an RVer, but take some time to slow down this coming year and really enjoy the beauty of nature. Snap a few photos, but don’t forget to take a few deep breaths of the fresh air and enjoy the silence and beauty of your surroundings.

    Try Something New

    This resolution can apply to just about anything! From going to new restaurants to stopping at exciting pit stops to activities like white water rafting or rock climbing. One of the best parts of RVing is that it allows you to explore new places and try new things.

    Are you ready to buy an RV and make a few resolutions of your own this year?
    Start your search on RVTrader.com today!


  • The Ultimate Gift Guide For RVers

    The Ultimate Gift Guide For RVers

    It’s hard to believe the holiday season is already upon us! That means it’s time to start shopping for friends, family, and loved ones. Holiday shopping can often be a daunting task, but with our ultimate gift guide for RVers, it doesn’t have to be. We have compiled a list of our favorite items that any RVer would love to receive during the holiday season. Start making your personal wish list today!

    Home, Hearth & Camper

    Happy Camper Custom Doormat This adorable doormat features a vintage camper and can be customized with your family’s name. This doormat can be taken with you on the road or will make you remember your travels while you’re at home.

    Funny RV Dish Towel It’s no secret that parking an RV can be difficult. The saying on this dish towel (“Sorry for what I said when we were parking the camper”) rings true for many RVers. This would be a perfect stocking stuffer for the RVer in your life!

    Organization, Innovative Tools & Life Hacks

    Spice Gripper Saving space in an RV is crucial and this spice gripper can help with just that! Simply stick the clip strips to the inside of your RV cabinets and your spices will be neatly tucked away for the next time you need them. You can cut the strips to custom fit your specific cabinets.

    Hitch Safe – Keep your keys, cards, and money safe with this hitch safe. It is designed to store up to 9 spare keys, cards, and more. You can easily set a combination to keep your belongings safe even when you’re away from your campsite exploring the great wide somewhere.

    Tech & Gadgets 

    Solar Powered Phone Charger – When you’re out hiking or exploring, the last thing you want to worry about is your phone dying. Now you won’t have to with this solar powered phone charger. This phone charger also comes with a compass kit and can also be used as a flashlight.

    Waterproof Bluetooth Speaker – Get ready for crystal clear music to pump through this waterproof bluetooth speaker. Whether you’re hanging out in your RV or you’re crowded around the campfire, this speaker will set the perfect mood. The COMISO Waterproof Bluetooth Speaker provides 20 hours of high-quality sound, and is both lightweight and easy to use.

    Outdoor & Adventure

    Camping Hammock Enjoy the relaxation of the outdoors with this durable camping hammock. The Wise Owl Outfitters Hammock is made out of heavy-duty 210T parachute nylon which makes it incredibly lightweight and portable – perfect to throw in the RV!

    Outdoor Rocking Camping ChairA quality camping chair is essential for any RVer. This chair has a rocking feature that allows you to fully relax after a long day of traveling or adventuring. It easily folds flat for storage and has a mesh back to keep you cool. You’ll want to get one for each family member!

    Cooking & Grilling

    Outdoor Popcorn Popper With this outdoor popcorn popper, you can easily make the perfect bowl of popcorn over a campfire or grill. The popper is made from a material that is extremely durable and can make 3 quarts of popcorn in just 4-5 minutes. The long handle keeps your hands away from the fire so all you have to worry about is having fun.

    Easy Campfire Cooking Cookbook Cookbooks are always a great holiday gift idea and this one is especially great for the outdoor lover in your life! This campfire cookbook has over 200 family-friendly campfire recipes that are easy to follow.

    Glassware 

    Silicone Wine Glasses – These portable silicone wine glasses should be on everyone’s RV wishlist this year. These glasses are unbreakable, lightweight, and perfect for a crisp glass of wine. They are completely dishwasher safe and worry free!

    YETI Tumbler A YETI is an easy gift that anyone can use and enjoy. They are perfect for enjoying a beverage in the great outdoors and they can keep your drink cool for hours. This tumbler comes in a variety of colors and includes a top to keep your drink from spilling.

    Kitchen

    Over the Sink Drying Rack Saving space is crucial in an RV, so clear up countertops with this over the sink drying rack. It comes in a variety of sizes and is resistant to rust. Not only does this handy rack save space while drying your dishes, it also rolls up for easy, out-of-the-way storage when not in use.

    Trailer Shaped Cutting Board Whether you’re slicing vegetables or creating a charcuterie board, a good cutting board is essential. This trailer shaped cutting board can get the job done all while being super cute. The RVer in your life (including you!) will love this rustic, practical gift.

    Subscriptions and Memberships

    America the Beautiful Passes Give the gift of adventure by purchasing an America the Beautiful Pass. This pass is a ticket to more than 2,000 federal recreation sites. The pass also covers entrance fees at national parks and national wildlife refuges. This is the ultimate gift for any RVer.

    FMCA Membership A membership with the Family Motor Coach Association gives member-only discounts and services specifically designed for RVers. It also includes RV education, attendance at rallies, and so much more!


    Novelty

    Camper’s Journal Looking for a creative way to capture all of your camping memories? Look no further than this camper’s journal. You can document all of your camping activities with its easy-to-fill-in journal format.

    Vintage Camper Address Stamp Let whoever you send mail to know that you are a proud RVer with this customized address stamp. The high-quality stamp features a vintage camper and reminds the recipient that home is where you park it!

    Pets & Animals

    Collapsable Dog Bowls Save additional space in your RV by packing these collapsible dog bowls for your furry friends. They are lightweight and easy to store in a backpack if you plan on taking your dogs on hikes or any other outdoor adventures. They may be geared towards puppies, but these bowls will also work if you brought your cat on the road, too!

    Safety Glow Necklace CollarYour dog will stand out from the other pups at the campground with this LED collar necklace. It allows you and others to easily see your pet at night and is great for walks anywhere you travel.

    Kids

    Happy Camper Onesie Even your littlest camper needs some RV swag! This 100% cotton onesie is super soft and features a bright vintage trailer that will make any RVer smile.

    State Sticker Map – This state sticker map is fun for the whole family. Easily mark off the states you’ve traveled to with colorful stickers. The stickers include beautiful graphics of each state and are ideal for tracking your travels.

  • How to Cook Thanksgiving Dinner on a Campfire

    How to Cook Thanksgiving Dinner on a Campfire

    Are you spending Thanksgiving on the road this year? If you’re feeling cramped in your RV’s kitchen (or if your unit doesn’t have one with the necessary requirements), connect with nature this November and try cooking your Thanksgiving meal over a campfire. Check out a few of our favorite, simple recipes that the whole family will love:

    Turkey 

    What You’ll Need:

    • A heavy-duty grill grate that will cover your fire 
    • A kitchen thermometer 
    • Cast iron dutch oven (standard size)
    • 6-8 lb. turkey 
    • Diced onions, celery, & carrots
    • Fresh herbs (we recommend rosemary & sage) & preferred spices
    • 1 cup of chicken broth
    • Butter 


    Instructions:

    • Thaw the turkey, remove any giblets, and pat dry with paper towels
    • Apply butter and spices to the turkey, including under the skin
    • Chop the onions, celery, and carrots into large chunks, and place them in the bottom of the dutch oven along with the cup of broth
    • Place the turkey in the dutch oven and top with sage and rosemary 
    • Cover the dutch oven and cook over your fire for roughly 2-3 hours depending on size (the general rule for cooking a turkey is usually 20 minutes per pound)
    • Use your thermometer – the turkey is done when the thigh meat reaches an internal temperature of 165 degrees
    • Let your turkey rest for around 30 minutes so the meat juices can redistribute
    • Carve and enjoy!


    Time-saving tip:
    Cook your other side dishes while the turkey is resting.

    Campfire Sweet Potatoes  

    What You’ll Need:

    • Sweet potatoes (one for each person)
    • Olive oil
    • Butter
    • Salt
    • Cinnamon
    • Marshmallows
    • Heavy-duty aluminum foil 


    Instructions:

    • Thoroughly clean the outer sweet potato skin and pat dry
    • Pierce the outside of each sweet potato multiple times with a fork and lightly coat with olive oil
    • Wrap each sweet potato individually with aluminum foil
    • Place sweet potatoes on hot coals for 20-30 minutes or until tender
    • Once the sweet potatoes are tender, slice open vertically and add butter, salt, and cinnamon as desired
    • If you prefer marshmallows on your sweet potatoes, roast as many as you’d like and place them on top

    Green Bean Casserole

    What You’ll Need:

    • Cast iron skillet
    • 1 can of green beans
    • 1 can of cream of mushroom soup
    • ½ can of milk
    • Salt & pepper
    • 1 pack of fried onions
    • 1 pack of bacon bits (optional)


    Instructions:

    • Combine the green beans, cream of mushroom soup, and milk in your skillet
    • Season with salt and pepper as needed
    • Simmer over the fire until thick and hot
    • Sprinkle with bacon bits and fried onions before serving
    • Enjoy! (it doesn’t get easier than that, folks!) 

    Rolls on a Stick

    What You’ll Need:

    • Roasting skewers or a clean stick (remove bark)
    • 1 pack of crescent rolls
    • Butter
    • Optional: Whipped cream or jam 


    Instructions:

    • Grab your roasting stick and butter the clean end 
    • Wrap the crescent roll around buttered part of the stick
    • Sit back, relax, and place your roll on a stick over the fire, turning occasionally 
    • In 10-15 minutes you’ll have a perfectly cooked roll
    • Top with butter or, if you’re craving a sweet, top with whipped cream or jam

    Apple Pie Packets

    What You’ll Need:

    • Apples (one for each person)
    • Butter
    • Brown sugar
    • Cinnamon
    • Chopped nuts 
    • Vanilla ice cream 
    • Heavy-duty aluminum foil 
    • Non-stick spray


    Instructions:

    • Cover a square of aluminum foil with non-stick spray
    • Slice and place thinly cut apples on the square of aluminum foil
    • Top the apples with butter, brown sugar, cinnamon, and chopped nuts
    • Wrap the foil packet securely 
    • Place the wrapped packets on the grate over your fire and cook for 20 minutes
    • Top with ice cream and enjoy!


    Time-saving tip:
    For your stuffing and cranberry sauce, we suggest keeping it simple and grabbing boxed stuffing and canned cranberry sauce. Let’s be honest, we all love those as much as the homemade options. Heat the cranberry sauce over the fire in a saucepan & easily cook the boxed stuffing in a cast iron dutch oven.

    It’s not only possible to cook Thanksgiving dinner on a campfire, it’s also pretty easy! If you’re ready to put on your chef’s hat, but still need a new RV to get you to the campsite, be sure to check out all the new and used RVs for sale and for rent at RVTrader.com.

    *Disclaimer: Please follow all state and local laws and regulations regarding fire restrictions and safety. Be aware of drought and brush conditions, always monitor your campfire, and be prepared with a bucket of water to extinguish it fully at the end of enjoyment.


  • Campfire Hacks

    Campfire Hacks

    After a long day of adventure, there’s nothing like coming back to your RV campground to relax by a fire. But if you forgot a traditional fire-starter, you might have a bit of trouble getting one started. Check out our list of campfire hacks that will have your fire blazing just in time to break out the s’mores.

    Corn Chips

    Burning your food usually sounds like a bad thing, but not when it comes to starting a fire. Many chips are made of hydrocarbons and fat, both of which are highly flammable. Kind of makes you wonder why we eat the delicious snack… but to each their own!

    Toilet Paper Rolls & Dryer Sheets

    When you fill a toilet paper roll with dryer sheets, you will have a perfect DIY fire-starter ready to go. You can also use dryer lint instead of sheets. Think twice before throwing out those supplies!

    Wine Corks

    Don’t throw these away after happy hour. Give them a new purpose by tossing them in a sealed container and soaking them in rubbing alcohol. Leave them in the container until you need to light a fire. They are super small and lightweight to carry if you’re on the go.

    Birthday Candles

    No cake required here. Head to the store to stock up on inexpensive birthday candles and wax paper. Wrap each individual candle in wax paper and twist the ends to close. Light the ends of the wax whenever you’re ready and you’ll have a sizzling fire in no time. 

    Duct Tape

    Everyone has duct tape lying around somewhere, but if you don’t already have a roll in your RV, it might be time to head to the store. Duct tape can be used for a huge variety of things, including starting a fire. Just rip up a few small pieces of tape and light them on fire to be used as kindling. 

    Petroleum Jelly & Cotton Balls

    Cover a few cotton balls in generic or branded petroleum jelly and (when lit) you’ve got yourself a guaranteed fire. Cotton alone burns very quickly, but the petroleum jelly slows down the process significantly, allowing your fire to build strength. 

    Hand Sanitizer

    When you’re in a camping setting, having hand sanitizer should always be a packing necessity to keep clean in the great outdoors, but it can also be used as a fire starter. If you put just a little hand sanitizer on a cotton ball or tinder you will see flames quickly due to its alcohol content.


    *Disclaimer: Please follow all state and local laws and regulations regarding fire restrictions and safety. Be aware of drought and brush conditions, always monitor your campfire, and be prepared with a bucket of water to extinguish it fully at the end of enjoyment.

  • 5 Things to Do Before Becoming a Full-Time RVer

    5 Things to Do Before Becoming a Full-Time RVer

    There’s nothing like hitting the road full time – it brings unparalleled freedom. But there are a few things that you need to do before you become a full-time RVer. Check out our tips and tricks for living life on the road.

    Pick the Right RV

    Buying an RV is a huge commitment. That’s why picking the right one the first time is so important. You’ll want to consider these quick tips when buying an RV:

    • Determine Your Budget – How much can you afford? Keep in mind that the cost is not only the initial RV purchase but also insurance, maintenance, operating costs to travel, etc.
    • Determine Your Family Needs – How many people will be traveling with you? Will you be bringing pets or specialized equipment on your adventures? A place to sleep may not be the only requirement your travelers hope to check off the list.
    • Decide on the Type of RV – Next consider the type of RV you’d like to have. RV categories include Type A, Type C, or Type B motorhomes, Fifth Wheels, and Travel Trailers. If you are bringing some equipment like ATVs or golf carts along, the Toy Hauler family is another available option. A good place to start researching the types of RVs is on RV Trader.

    Looking for more detailed guidance? Check out our RV Buyer’s Guide for more detailed information on selecting your perfect RV.

    Minimize Your “Things”

    Living life on the road means taking only what you need with you. Space is typically limited in most RVs so you’ll want to consolidate your items to only the essentials. Getting rid of items is always a bit hard, especially if they have sentimental value, but it’s important to maintain a more minimalist lifestyle in an RV. Try creating a checklist of essential items you’ll need during your travels and be sure to stick to it! If you have seasonal items that you need to store, look into storage facilities that can house these items for you until you need them.

    Be Ready For Anything… Including Maintenance

    It’s important to have a “go with the flow” mentality on the road but it’s equally important to be as prepared as possible. We encourage you to pack a basic safety and tool kit should any problems arise. We also recommend having a budget set aside for any RV maintenance that might be needed as you’re traveling. Maintenance can be costly at times, and you don’t want to deplete your savings at a moment’s notice.

    Find Reliable Campsites or Explore Boondocking

    After long days of travel, you need to find reliable places to park your RV for the night. Luckily, there are thousands of RV Parks and Campgrounds across the country, but they aren’t always the easiest to find along your route. We highly recommend planning your campsites ahead of time or try downloading apps like Park Advisor, Reserve America, or Allstays to find the nearest sites in an instant. If you are looking to save a bit of money on the road, boondocking or “dry camping” is also a great option to consider.

    Prepare to Work on the Road

    To most people, the terms “working” and “traveling” don’t always go together but when you are a full-time RVer, they can go hand in hand. When you’re working from the road, you’ll need to make sure you have a reliable source of WiFi. We recommend looking into buying your own mobile hotspot device so you can have Internet access wherever you find yourself. It’s also a great idea to create a dedicated workspace in your RV to increase focus on the road.

    If you’ve been curious about becoming a full-time RVer, our friends at Live, Camp, Work are hosting their free Make Money & RV Virtual Summit on October 1-5. Their panel of engaging speakers will cover everything you need to know about living life on wheels including remote work, workamping, small business ideas, and so much more. They will also be sharing stories from the road, practical advice, top tips, and insider info all RVers should know. You won’t want to miss this – trust us.

    Interested in this exciting, insightful, and high-value event? Register for the free Make Money & RV Virtual Summit at the link below and get ready to hit the road!


  • Top RV Mistakes to Avoid for New RVers

    Top RV Mistakes to Avoid for New RVers

    The RV lifestyle is filled with fun and adventure, and those who are willing to take the plunge rarely look back. That being said, if you go into RVing without knowing what you’re doing, you may make some mistakes that you will wish you hadn’t. Fortunately, our friends at FMCA have been RV experts for nearly 60 years, and they are here to help you start your journey on a positive note. Get off to a good start by avoiding their top RV mistakes!

    Traveling too far in one day

    This is a mistake most RVers recognize. To discover your personal daily driving limit, you may need to have a few rough days where you overdo it and learn the hard way. A good rule of thumb is the “3 or 3 rule” —arrive at your destination by 3 pm, or drive 300 miles in one day, whichever happens first.

    Buying the first RV you look at

    This might seem obvious for some, but many people don’t know how customizable some RVs actually are and how many different RV floor plans exist. If you “sort of” like the model but you wish there were more kitchen space, or would prefer a larger bathroom, then speak up! If you’re willing to wait a little longer or travel outside your immediate shopping area, you can likely find the PERFECT model for how you plan to use your RV. If you still feel overwhelmed, check out a few RV Buying Tips.
    Check out the latest models on RV Trader.

    Packing too much

    Part of being an RVer is learning how to be resourceful. Packing too much is an easy mistake to make until you learn how to minimize your tools, equipment, and creature comforts. Efficient RVers become resourceful in how they cook, clean, and pack their clothing. For example, if you will never be cooking for more than two or four people, there is no need to bring along every pot, pan, and dish from your kitchen.
    The same goes for your clothes (depending on your laundry machine situation, this may be easier for you) and other camping equipment. Traveling with less is better on your fuel economy, easier to pack and unpack things, and the mental clarity of having less clutter will be very beneficial.

    Winging it without a checklist

    A well-crafted checklist can make your campsite setup or tear-down process run smoothly and consistently each time. This is handy for those of you who are moving around between campgrounds a lot or who camp infrequently and may forget steps in the process without a reminder. If you haven’t downloaded it yet, FMCA has an app that is available for iPhone and Android where you can download premade checklists or create your own customized checklists.

    Not seeking proper RV training

    Owning an RV is a learning process, but you don’t want to jump into it without any knowledge at all. You’ll want to start reading up on RVing ahead of making your purchase and hitting the road. There are hundreds of online forums and Facebook groups that you can join to discuss various important topics with other RVers. If you’re serious about improving your RV knowledge, check out the quizzes, lessons, and educational articles at FMCA University.

    Not planning an RV-friendly route

    If you’re new to RVing, you might not realize that there are certain routes that you simply cannot take due to size and height restrictions. There may be narrow roads, small tunnels, or low bridges along your route. If you aren’t expecting these limitations, you may end up spending multiple hours being rerouted to a safer alternative. There are special GPS devices and trip planning tools that allow you to program in your RV’s size and height so you can ensure that your route will be safe for you to navigate!

    Neglecting RV maintenance

    You should expect to have regular upkeep and maintenance expenses that come along with RV ownership. If you remember simple maintenance tasks such as checking tire pressure before driving, you can prevent larger, more costly issues from occurring and leaving your RV out of commission for days, weeks, or even months at a time.

    Forgetting to secure your belongings when driving down the road

    You will eventually develop a routine for this reality, but it is worth mentioning. Make sure that you place all loose items into drawers, bags, closets, or other secure locations since things tend to shift and move around during travel. This includes all of your toiletries and refrigerated items as well.

    Start RVing without an FMCA membership

    This is the biggest mistake any RVer can make: hitting the road without an FMCA membership! A membership to FMCA can save you hundreds of dollars on RV necessities like batteries, tires, and windshield replacement while connecting you to a plethora of educational resources to ensure your RV experience is easy and smooth.
  • 5 Tips for Roadschooling

    5 Tips for Roadschooling

    Ready to take your family on the road full-time but not sure where to start? Many full-timers choose to educate their children while traveling through a growing trend called “roadschooling.” If you’re considering this alternative way of learning, check out RV Trader’s five tips for roadschooling.

    1. Check Your State’s Homeschooling Laws

    First, you’ll need to keep in mind that there are different homeschooling laws in each state. Look up the rules and regulations for your home state, as well as states you plan to visit if you’re intending to stay for an extended period of time. If you’re a full-time RVer with no permanent residence, you’ll need to establish a home state.

    2. Pick a Curriculum That Works For You

    Luckily, in this day and age, the options are endless when it comes to homeschooling curriculums. There are fully digital options, as well as physical booklets, you can utilize. Or you can do a bit of both! Determine the storage space you have for physical books, materials, and supplies on your RV. Remember, if you choose a digital option, you’ll need to have a secure source of Wi-Fi.

    3. Find & Plan Learning Opportunities on the Road

    Make lessons come to life by incorporating your travels into your educational plans. Field trips aren’t limited when you’re living life on the road. Take advantage of museums, historical landmarks, and any activities that you can find related to the subjects your children are currently studying.

    4. Build Your Roadschooling Community

    You don’t have to go it alone! There are many families out there who have also chosen the roadschool lifestyle and you can find them through online groups, RV events, and homeschooling meetups. This is a great way to share success stories, along with tips and tricks, that other families have learned along the way. 

    5. Stay Positive & Optimistic

    When you decide to make the transition into roadschooling, there may be a few bumps along the way. Whether you try roadschooling for months or years, there will most likely be a learning curve for everyone involved. Stay positive and optimistic during your roadschooling journey and remember to check in with your kids periodically to see how they feel about this new change. 

    Roadschooling can be a great option for families who are looking to RV full-time. There’s nothing like learning out on the road, and we hope that our tips have encouraged you if you’re interested in taking the leap. If you’re looking for an RV with enough space to set up a roadschooling area for your kids, browse the nationwide inventory of used and new RVs for sale on RVTrader.com.

  • How to Boondock: Part I

    How to Boondock: Part I

    For many RVers, boondocking is an enjoyable way to camp. Boondocking refers to free camping without the use of hookups and can be done in a wide variety of places, including public lands, parking lots, membership club locations, casinos, rest stops, and more. This style of camping is often more scenic, more private, more affordable, and, for some, more fun.However, those who are accustomed to camping with hookups to water, electric, and sewer may be unsure of how to dry camp. If you want to try boondocking but feel overwhelmed by the idea of dry camping, then you have come to the right place. Here, we have highlighted all the tried-and-true methods of camping without hookups, as well as, all the applicable tools that can make your experience smoother.

    Water


    In most campgrounds, RVers can expect to be connected to water hookups at all times. This means that water is continuously flowing into your RV and the user essentially has unlimited access to water when connected. When boondocking wherever your RV takes you, you forfeit access to continuous fresh water. You will have to exclusively live off of the potable water in your freshwater holding tank.

    • Start by determining the size of your RV’s freshwater holding tank. The average American household uses 300 gallons of water daily, so learning to live off of a small holding tank is not always easy. In bigger rigs, the tank size is typically between sixty and ninety gallons, although some rigs are made with tanks up to 150 gallons in size. This information can typically be found in your owner’s manual or sometimes even near the fill-up port.

    • After determining your tank size, the easiest thing to do is practice limiting water consumption. Start by using a trickle of water for washing your hands and brushing your teeth, and turn the faucet off in between lathering and rinsing. Do the same for dishwashing, and turn the water off in between use while showering. This will stretch your water-saving capabilities. Start small with shorter trips of two or three days, and work your way up to longer stints. The most experienced boondockers can often last up to fourteen days!

    • The final hurdle for water usage while boondocking is filling your tank. If you are traveling from your home to your boondocking site, you can likely fill your tank before leaving your house. If you are traveling from a campground to a boondocking site, you can also fill before setting off. However, if you are traveling from one boondocking location to another, or simply do not want to travel with the weight of a full water tank, you will need to know where you can safely fill your tank. Keep in mind that you should only ever fill your freshwater holding tank with potable water. Even if you do not drink water from the faucets, you will still be using it to brush your teeth, wash your dishes, and in some cases, provide water for your pets.

    Knowing where to fill up your tank is key. Many gas stations and travel centers have areas for tank filling. Some may charge a small fee, but most are free. If you cannot find a travel center at which to fill up, you can often find stations at national park and state park campgrounds. Even if you are just passing through, many of these locations will allow you to fill with park entrance or for a nominal fee. If none of these options are panning out, you can almost always call a local campground to fill your tank. These will almost always charge a small fee, but it will still be less than a night’s stay and will save you money for whatever length of time you plan to boondock. Freshwater is one of the biggest challenges while boondocking, so once you have mastered this, you will be a pro.

    Power

    The next biggest boondocking hurdle is supplying your own power. At a campground, your RV connects to shore power, which allows you to power your entire RV, charge devices, watch TV, run your air conditioners, etc. Without shore power access, you will need to learn to generate your own power. There are also a number of upgrades you can add to make boondocking much easier.

    No matter what kind of set-up you choose to power your RV while boondocking, you will need to keep in mind the importance of energy conservation. None of these options will grant you an unlimited power supply, and keeping your usage low will be important. You will likely be unable to run air conditioners or high-energy kitchen appliances, but the right set-up will likely allow you to charge electrical devices, such phones and laptops, run your water pump for water usage, and turn on lights in the evening. Consider switching your lightbulbs to low-energy bulbs or installing additional DC lights for more lighting while off grid. Once you have come up with a plan for saving energy, it is time to decide which power option is best for you.

    Start by assessing your current house batteries. These are the batteries that store energy to power the RV “house” (anything non-mechanical) when you are not plugged in. Some RVs come equipped with decent batteries that can store a lot of energy, but many RVs have only simple or weak batteries. If you plan to do plenty of boondocking, you may consider upgrading your batteries to gel, lead acid, or even lithium.

    Once you know what type of batteries you are working with, you will want to determine how long these batteries can power your rig when not connected to power. This establishes how long you can go between charging the batteries. Some folks only boondock for one or two days at a time. If your batteries can hold their charge for a couple of days, and you only plan to boondock in short bursts, you may not need an additional source of power to charge your batteries.

    If you plan to boondock frequently or for longer periods of time, you need to select a method for charging your house batteries when they are low. The two most common charging sources RVers use are a generator or solar power. Many motorhomes, especially class As, come equipped with an on-board generator, making boondocking quite simple right off the bat. However, in the case of many towables and smaller motorhomes, your RV may not come with a generator installed. Luckily, purchasing one and setting it up is fairly simple. There are many generators on the market, each with different abilities and specs. Most run on gasoline, and ones that are already installed in a motorhome are fed directly from the fuel that powers your RV. Be sure to do proper research before selecting one and setting it up to power your rig. Keep in mind that running the generator will charge your batteries and all the electrical sockets, but unless you have an inverter, only DC powered devices (such as lights) can be used when the generator is not running. It’s also important to remember that generators require regular maintenance, such as oil changes and spark plug replacements.

    A generator is not the only option for charging your house batteries. A full solar panel set-up can also do the job. While solar may require a pricey up-front cost, it is a great long-term investment for those who plan to boondock and dry camp often. Solar kits can be purchased through a variety of online retailers, and these all come with different components and wattages. It’s important to do plenty of research to not only determine the correct wattage for your need, but to also ensure you’re getting the best quality items at a fair price. In addition, have your solar system installed by a professional to ensure everything is set up correctly.

    Sewer

    The final consideration for hookups (or lack thereof) while boondocking is your sewer system. Your sewer system consists of both your black and gray holding tanks. The black tank holds waste exclusively from your toilet. The gray tank holds waste water, which includes water from washing dishes, showers, washing your hands, brushing your teeth, etc. At full hookup campgrounds, campers typically run a hose to their sewer to empty their tanks as needed. When boondocking, this option for emptying tanks is not available. It is never okay to dump your waste tanks anywhere other than an official dumping station. For this reason, you will need to adhere to some tips and guidelines while boondocking.

    First, you will need to determine the size of your gray and black tanks. Your gray tank will likely be a bit smaller than your freshwater tank, and your black tank will be smaller than both of them. Any tips for conserving freshwater usage can also be applied to saving gray water tank space. Water that is not used equates to additional space in your gray tank.

    There really isn’t a method for conserving black tank space, and the amount of time it takes you to fill the black tank depends on how many people you are traveling with. Practicing boondocking will allow you to gain an idea of how long it takes you to fill your black tank, giving you insight into generally how long you can remain unplugged. You can also keep an eye on the levels of your tanks using the tank meter. It is often found in the control center and lets you know how full your tanks are at any given time. Once your black tank is full, you should not continue to use it, as this could lead to waste water backing up into your sinks and shower if it has nowhere else to go.

    Finally, as mentioned, you will need to determine where to empty your tanks after boondocking. If you are headed to a campground, you can easily empty your tanks there. However, if you are headed home or towards another boondocking location, you will need to dump your tanks before you arrive. Just like with water refilling stations, there are many travel centers and gas stations that have dump stations for RVers. There is almost always a small charge to use these, and you must come equipped with your own sewer hose. If you cannot find a travel center with a dump station, you can use one at a private, state park, or national park campground. Be sure to call ahead and double-check they will allow you to use their dump station, and plan to pay a small fee for the service. If you are still having trouble finding a dump station, consider using the Sanidumps app. It allows users to locate dump stations in their general vicinity or along a specific route.

    Boondocking is an excellent way to camp in your RV, and knowing how to dry camp is key for anyone wanting to boondock. Follow these basic tips if you plan to forgo hookups. Stay tuned for our next boondocking guide, which will teach you how to obtain internet, dispose of trash, and do laundry when you are not at a campground.

    Do you enjoy boondocking? How do you handle water, sewer, and electricity when you are off grid? Feel free to share in the comments below!

  • Tips and Tricks for Traveling with Pets

    Tips and Tricks for Traveling with Pets

    RVing with pets can be a wonderful experience for you and your beloved furry friends. Check out nine tips to keep in mind when RVing with your pet.


    Prepare Your Pet

    Does your pet do well in new situations and environments? If so, great! If not, going on a year-long adventure right off the bat might not be the best idea. Starting out with a few smaller-scale trips will help minimize the stress your pet might feel on the road.

    Mind the Paperwork

    Bring your pet’s health certificate and vaccination records, since many RV parks require you to have them with you in order to enter the grounds.

    Make a List

    The essentials like food and water are a no-brainer, of course, but be sure to write down absolutely everything you need for your furry friend, including dishes, leashes, a litter box for your cat, waste bags, treats and toys, cages, a brush, and a crate, if needed. Don’t forget medications if your pet takes any.

    Call Ahead

    Get in touch with the RV parks and campgrounds you plan to stop at. Make sure they allow pets, and also ask if they have any rules or regulations regarding pets at their facility.

    Stay up to Date

    Make sure your pet’s vaccinations and shots are up-to-date, with the records to prove it. This will avoid paperwork hangups, but it’s also important in order to keep your animal companion safe from disease as you travel through new areas.

    ID Your Pet

    If you haven’t already done so, take the time to put your cell phone number on your pet’s ID tags.

    Protect Your Pets

    Bring along flea and tick spray, or make sure your pets are already treated before leaving on the RV trip.It’s easy to pick up fleas and ticks, especially in the great outdoors, so ask your vet about treatment for your particular furry family member.

    Be a Good Citizen

    Remember to pick up after your pets in all locations. This is not only polite and courteous, but it also encourages RV parks and campgrounds to keep allowing pets.

    Get Outside!

    Exercise isn’t just important for humans, it’s extremely important for pets to have quality time in the great outdoors (especially during long road trips). Make potty breaks fun for everyone by taking a long walk or playing fetch with your pooch.