Since 2022 Lippert, the largest supplier of parts to the RV industry, has provided classes specifically for RV owners who want to learn more about maintaining and repairing their RVs. This year, the Lippert RV Owner’s School has scheduled four class sessions avaialble at two locations. The first session starts in Dallas, Texas on April 8. The three following sessions are through their Lippert Technical Institute in Mishawaka, Indiana from June 24 through August 19, 2025.
The objective of the classes is to enable RV owners to learn more about the function of systems on their RVs and be able to make repairs themselves. Within the framework of the course are RV owner classes on axles, slide-room systems, and more. Understanding how these systems work and what to do if they don’t can save an owner a lot of time and money.
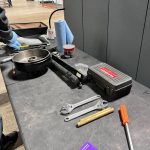
RV owners get hands-on experience at the Lippert Owners Shcool.
An exploded view of an axle at Lippert RV Owners School.
A layout of RV plumbing for students.
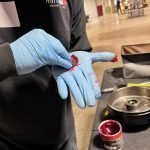
A trainer demonstrates how to grease wheel bearings.
Web-Based RV Owner Classes Also Available
In addition to the in-person RV owner classes, Lippert Technical Institute has a web-based portal. This portal includes instructional material and videos directly from the company to help RV owners on the road with DIY repairs.
Prices for the 2025 classes have not been established yet, but the company’s website has details. Those interested may also request to receive information via an email subscription. Lippert also has a YouTube channelthat covers many of the topics owners inquire about.
In addition to training for owners, the Lippert Technical Institute provides training for technicians. Their course provide certifications in a number of areas. (Personally, this reporter had the privilege of going through the classes which taught a lot about the RV and how to properly maintain it. Completing the course definitely makes one better aware of what to do if things don’t function properly which offers a better RV experience. For those who want to expand their knowledge, this presents an great opportunity to do so.)
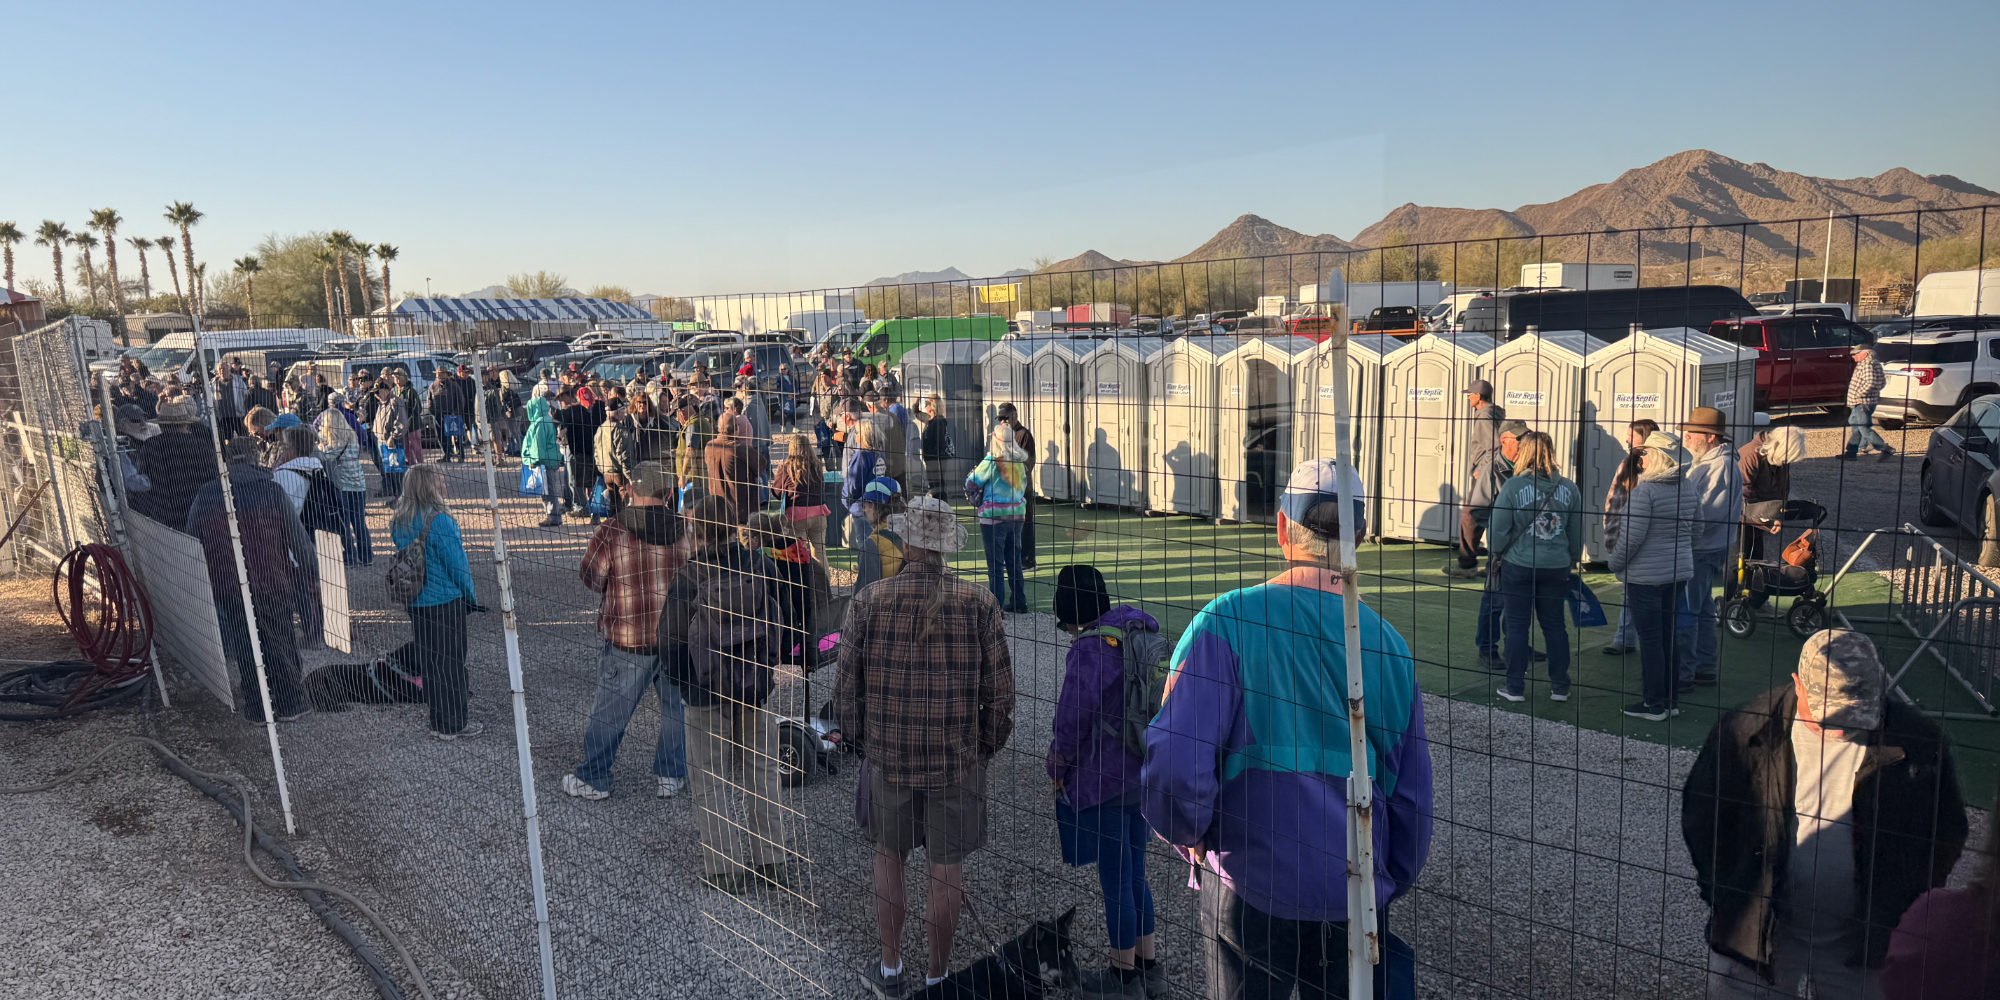
Quartzsite, Arizona is a tiny town most of the year. But each new year, it suddenly swells as an estimated quarter million — or more — RVs raise the town’s population. This flood of campers come for a unique event: the Quartzsite Sports, Vacation and RV Show. Held in a giant tent in January, the Quartzsite RV Show is a must-see attraction for myriad RVers. And as you might imagine, it is both a shopping and social gathering.
Why this sprint into the desert? Many snowbirds are already familiar with Arizona’s combination of pleasant winter weather and the tremendous amount of free camping in the desert on Bureau of Land Management (BLM) land. (Along, of course, with other government-managed lands that offer flat desert surfaces.) There are also a number of RV parks in the area.
What Draws Campers to the Quartzsite RV Show
Last month, the Quartzsite Sports, Vacation and RV Show was held January 18 through 26 — all in a 640-foot-long tent. The event featured everything from solar and RV upgrades to kitchen tools and all sorts of RV products and services, some highly unique. The show is in its forty-second year and is operated by Kimmy King, daughter of founder Kenny King.
Kimmy King, daughter of the founder and current operator of the show, hands out welcome packets on opening day.
Shoppers wander among the vendors in the big tent.
A large number of Content Creators gathered for a meet n greet.
The entrance to the Desert Bar is the reproduction of a church.
Peggy Barthel, wife of the reporter, rides a camel — a symbol of the area’s history.
In addition the surrounding, desert camping appeals to groups of all types who gather annually. Common interests brings the attendees together. (There are even those who like to camp in a clothing-optional environment.) However, many are those who appreciate hiking, rock hounding, off-road travel, and other activities that can be done int he desert.
One such activity is a trip to The Desert Bar. At the end of a very long dirt road, it is only open on weekends. This destination is a huge attraction for RV and ATV owners, as well. The location is completely solar-powered. offer eclectic food offerings, and has live music. One enters it through a replica of a church. As memorable as it is, the Desert Bar is only one of many social gathering spots at the Quartzsite RV Show that are frequented by campers.
Interestingly, many who are regular attendees of the Quartzsite RV show, noticed that there seemed to be fewer Canadians campers this year. These snowbirds, who are fixtures in the area, were not returning this year due to the unfavorable exchange rate of the Looney.
Flea Market and Pop-Up Bars, Minerals and Nomads
In addition to the Quartzsite Sports, Vacation and RV Show, there is a another show nearby. That would be Tyson Wells, a 25-acre outdoor show with 2.2 miles of aisle frontage with vendors in tent. Under the array of canvas, shoppers can find anything from wood carvings and water filters to tools campers may not know they even need — until they see them. RV parts are also a part of the spread. It’s a flea market of super size. And it is tailored for audience that loves the RV lifestyle.
At Tyson Wells, there is also a vendor who sets up a very large tent that is as large as some grocery stores. It is stocked almost as well. Many of the provisions are canned and shelf-stable, but there is a selection of fresh items as well. Beer Belly’s Adult Day Care, a pop-up bar, is another social hot spot, especially for returnees.
Before the RV show, there is a also gem and mineral show. The show appeals to “rock hounds” and draws yet another unique group to Quartzsite. They are just one of many. The Rubber Tramp Rendezvous come too. This large group of people choose to live in a variety of vehicles and follow YouTuber Bob Wells, who gained additional fame in the movie “Nomadland.”
The show’s big tent includes workshops and seminars, but there are also quite a few booths representing workamping opportunities. These range from guarding gates at oil fields to working in amusement parks. Many local places that offer jobs in campgrounds.
California Fires and Canadian Currency Depress Desert Numbers
While this year’s show had lower foot traffic, there do appear to be good reasons. As mentioned, the smaller number of Canadians may be related to the reduced value of Canadian currency. The devastating fires in Southern California may also have impacted attendance. Show owner, Kimmy King, says, “There’s no doubt that foot traffic is down.” Even so, the Quartzsite RV Show still had a strong showing. It’s not hard to imagine why. Quartzsite is truly a unique phenomenon. It is both an annual social gathering as well as an escape from colder climates for many thousands of RVers.
If I’m being honest, winter camping has brought my wife and I some of the fondest and most stressful memories in RV life. Winter campingin an RV can be magical — snow-dusted forests, cozy nights by the heater, and the tranquility of off-season travel. But when your RV starts to feel like an icebox, the dream can quickly turn into a chilly nightmare. No one is enjoying anything if their RV is freezing.
Whether you’re braving subzero temperatures or facing an unexpected cold snap, this guide will help you tackle freezing conditions and keep your RV warm, functional, and comfortable.
Why Is My RV So Cold?
RVs are not always built with harsh winter conditions in mind. Thin walls, minimal insulation, and draft-prone windows make it easy for the cold to seep in. Add to that any gaps or cracks in seals, and your RV can feel more like a refrigerator than a cozy home. But don’t worry — there are plenty of solutions to keep the cold at bay.
Step 1: Inspect your RV for drafts and leaks.
Cold air creeping in through cracks and seals is one of the main culprits when it feels like your RV is freezing. Start by inspecting these critical areas.
Windows and Doors. Look for drafts and gaps around frames. Use weather stripping or non-sag to create a tight seal. If you want to know what sealants to use in different situations, you check out this RV sealant article.
Roof and Vents. Examine your roof seams and vents for cracks or deteriorating sealant. Self-leveling sealants are a go-to solution for patching these areas.
Slide-Outs.Check the seals around your slide-outs for damage or wear. Flexible sealants can quickly fill in any gaps and flex with movement.
Pro Tip: Use a flashlight or incense stick to detect drafts. Shine the light or waft the smoke near seals. If you see light or the smoke moves, you’ve found your culprit.
Step 2: Add insulation where it matters most.
Insulating your RV is crucial to fighting those freezing temperatures. Here are some quick upgrades to help trap the heat.
Windows: Cover windows with reflective insulation like Reflectix to prevent heat loss. For added coziness, hang thermal curtains or shades.
Underbelly. If your RV will be parked for an extended period of time and has an exposed underbelly, add foam board insulation or skirting to block cold air from circulating underneath.
Vents and Skylights. Foam vent cushions can help seal off these areas, which are often significant sources of heat loss.
Floors. Use small area rugs or mats to insulate floors and create another layer between your feet and the cold floor.
Pro Tip: Even something as simple as a draft stopper or “door snake” under your entry door can make a big difference.
Step 3: Heat your RV efficiently.
The key to staying warm isn’t just generating heat — it’s keeping it from escaping. Here are the best ways to heat your RV.
Furnace. Your built-in furnace and is your first lines of defense, but furnaces can drain propane quickly. Make sure they are well-maintained and use propane sparingly, because in some cases it is your only heating and cooking source.
Heat Pump. Some rigs have a heat-pump combo with their A/C unit, and if you have a good generator or are connected to shore power, they can be a great source of warmth.
Portable Heaters. Electric space heaters are a great backup for maintaining warmth in small areas. Look for energy-efficient models with safety features like tip-over protection. Know that they draw a lot of power, so if you are off grid, then always monitor your battery levels.
Heated Accessories. Heated mattress pads or blankets can make your sleeping area toasty without overworking your furnace. A regular heating pad that you find at a pharmacy is also a cheap but effective option for warming up under the covers at a lower electric draw.
Pro Tip: Use a combination of heating sources to distribute warmth evenly while conserving energy. Know that propane and electricity can drain quickly if you are off-grid and using these methods. So, setting the temperature for a bearable level like 60 and wearing layers helps to conserve resources.
Step 4: Protect your water system from freezing
Frozen pipes and tanks are a winter camper’s worst nightmare. Here’s how to keep your water system functional.
Heated Hoses. Invest in a heated water hose to keep your fresh water flowing. Plug it in before temperatures drop.
Tank Heaters. Install heating pads on your freshwater, gray, and black tanks. These will prevent freezing even in frigid conditions.
Insulate Exposed Pipes: Wrap exposed pipes in foam insulation or heat tape to keep them from freezing.
Pro Tip: If it’s particularly cold, leave a faucet dripping slightly to keep water moving through the system and prevent freezing.
Step 5: Plan for power and propane.
I touched on this before, but keeping your RV warm in freezing temperatures often means relying on power and propane. Here’s how to stay prepared.
Stock Up. Always carry extra propane tanks if possible and/or fill up often to prevent running out.
Monitor Usage. Track your propane and power levels closely so you never run out of heat or battery power.
Portable Power. A good solar/battery setup or portable generators can help ensure you’re never left without power for heaters, electric blankets, et cetera.
Step 6: Stay comfortable inside.
Finally, don’t forget about creature comforts to make your RV feel like home, even when the weather outside is frightful.
Layer Up. Wear several layers of clothing to stay warm without overworking your heating system.
Hot Drinks or soup. For us, nothing beats a cup of hot coffee in the morning, but hot cocoa or tea on a cold night goes a long way in the winter—keep a thermos handy to enjoy throughout the day. Personally, I’m a big soup guy too, so any tasty soup for lunch or dinner helps warm me from the inside.
Extra blankets. Adding extra blankets and throws around the rig always helps, and it’s a great way to get cozy for movie night. Whether it feels like your RV is freezing, or not, it’s a good idea to keep these on-hand if you’re a four-season RVer.
Curtains. In some RVs, adding something as simple as curtain to separate a cold room from one that you are trying to warm can save on resources and keep the temperature where you are more comfortable.
Warmly Embrace the Winter RV Adventure
Yes, winter camping in an RV has its challenges. But with proper preparation, it’s an experience like no other. From snowmobiling Yellowstone to skiing and snowboarding just steps from our home on wheels, we have had some amazing winter RV experiences. That’s why recommend trying it — at least once. And if you follow these tips on how to insulate your rig, prep your heating sources, seal up drafts, and keep your resources in check, you will be able stay cozy and enjoy the magic of winter landscapes. Embrace the adventure, and remember: A well-prepped RV is a happy RV, even when the temperatures dip below freezing!
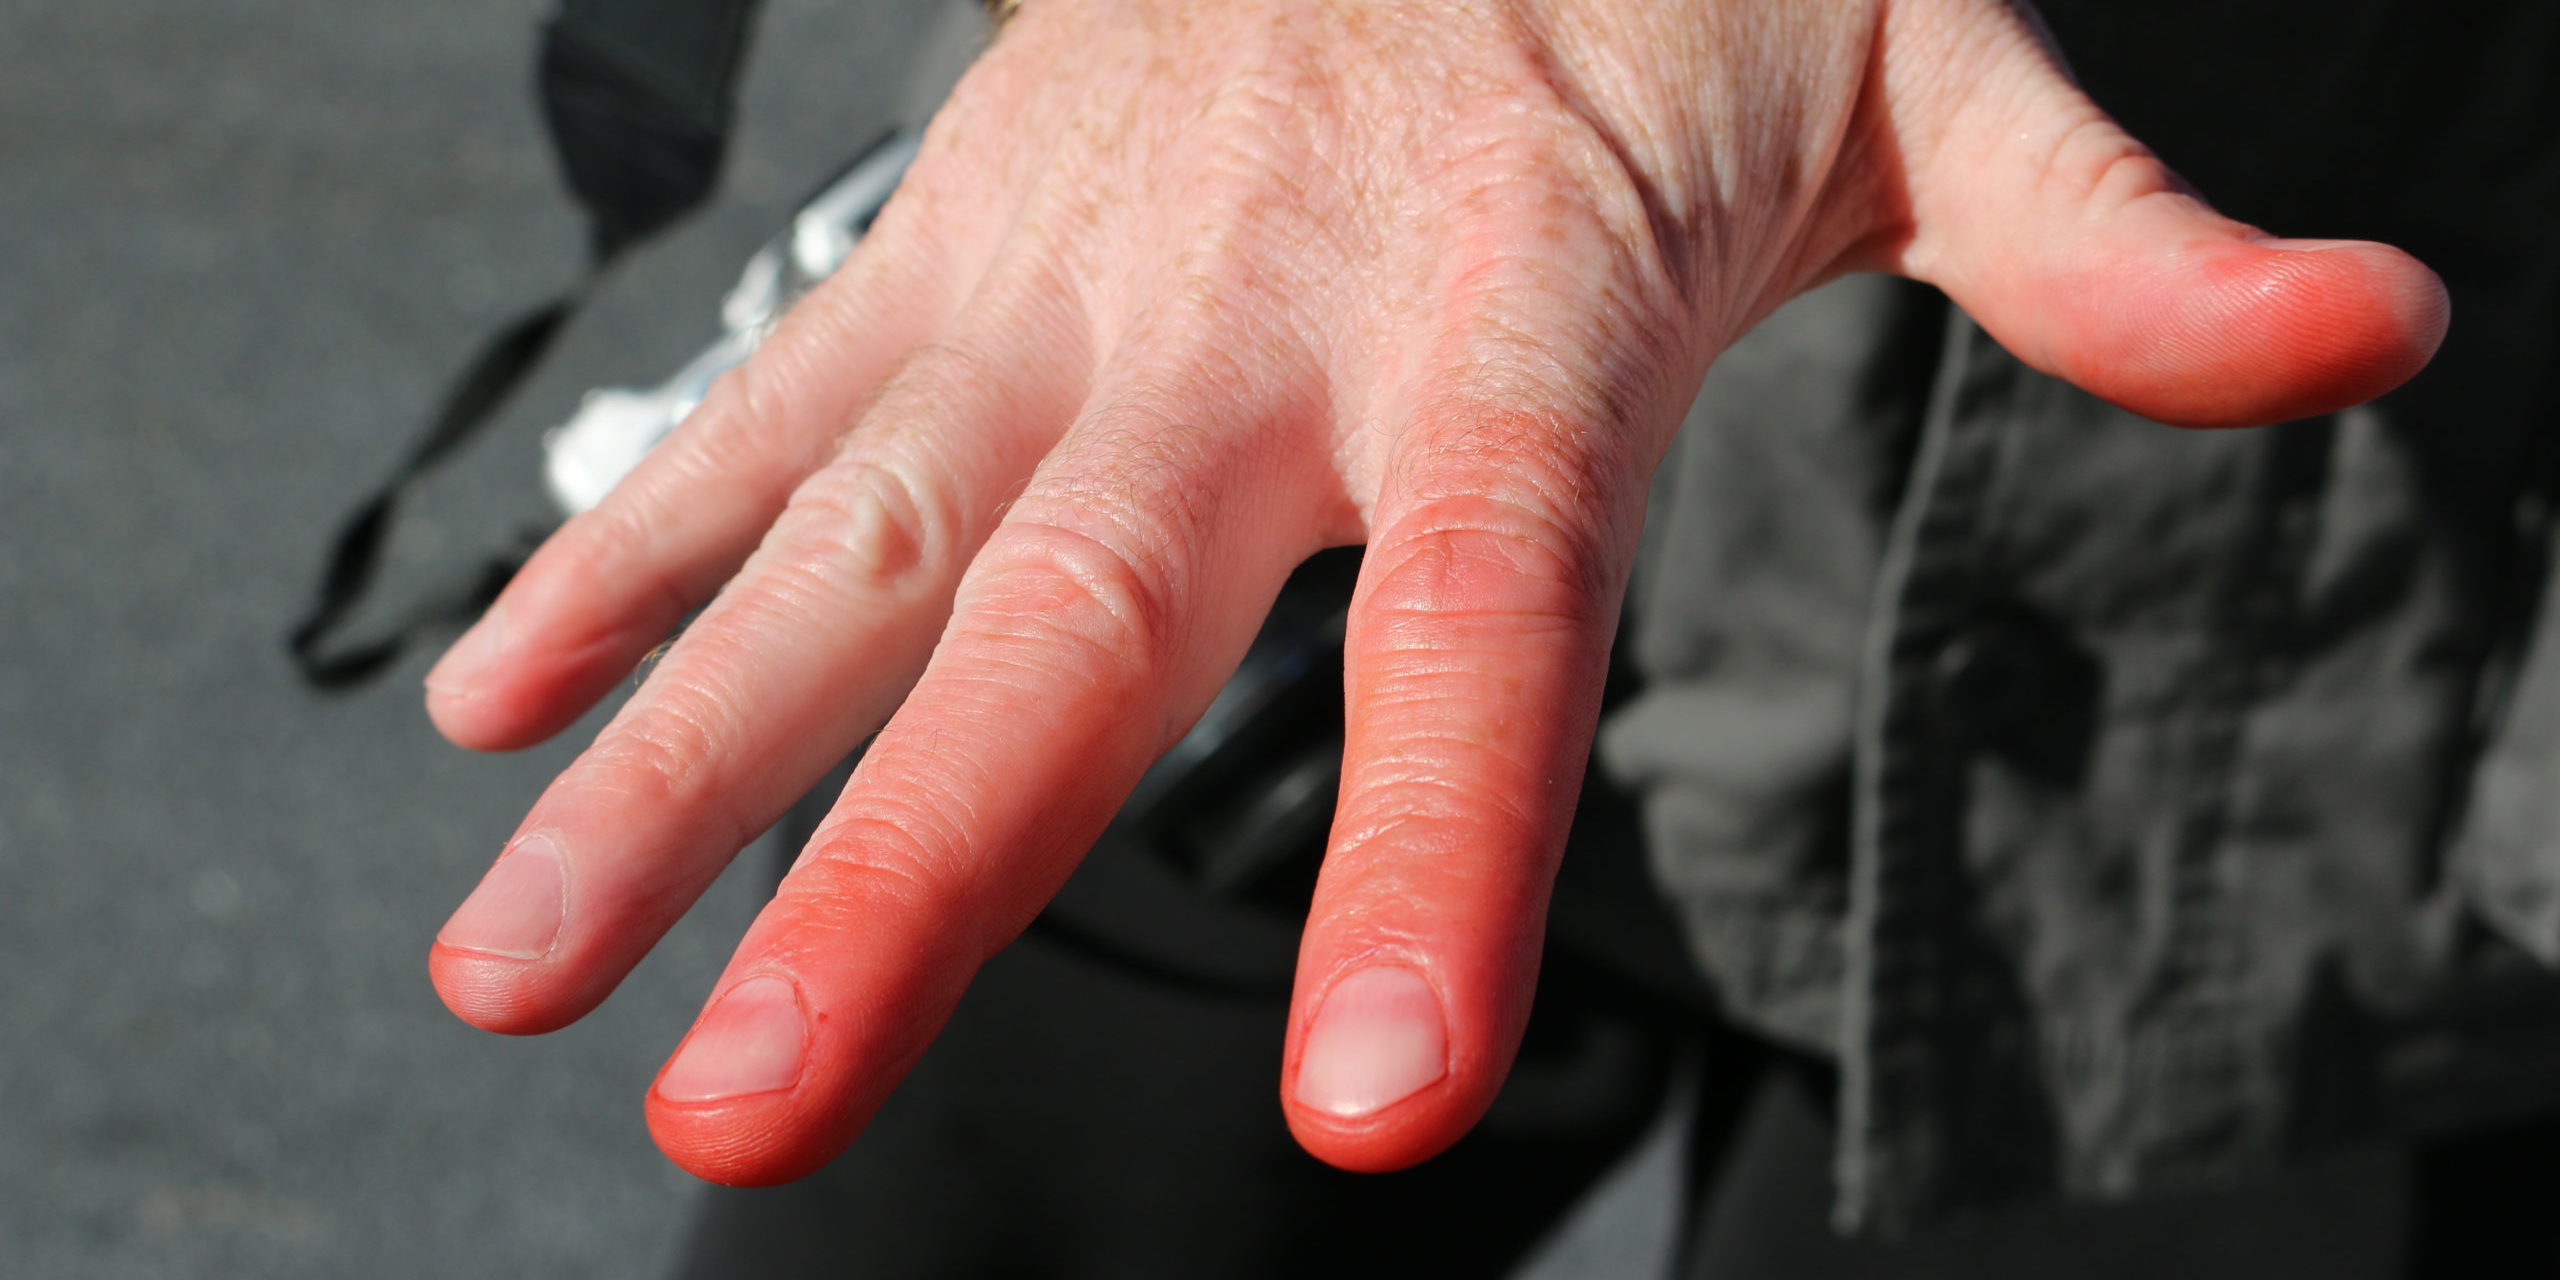
Winter RV camping offers a ton of benefits for both winter sports enthusiasts and those who just want to get away and enjoy serenity amidst epically beautiful landscapes. However, the importance of being well-prepared can’t be overstated when it comes to camping in frigid temperatures. That’s because if you aren’t prepared, cold weather can bring very serious health risks. One of these is frostbite. This critical condition happens when your skin freezes in sub-freezing temperatures. So, having a handle on frostbite 101 is a big deal for four-season RVers.
In this guide, we’ll get you spun up on what frostbite is, how to treat it, and — most wisely —how to prevent it. Because, let’s face it, you’re not braving the winter’s brutal nature to simply sit inside your RV. Because you’re “up there,” you’re also likely going to be “out there” — seeing things other campers are missing.
What Is Frostbite?
The term “frostbite” describes an injury that happens when exposed or unprotected skin is frozen by sub-zero temperatures. As injuries go, it’s a serious one. And that’s not only because it’s extremely painful. As a matter of fact, in the worst cases of frostbite can result in a loss of tissue and the amputation of affected body parts. Frostbite affects insufficiently unprotected skin including:
Ears
Nose
Lips
Cheeks
Fingers
Toes
And it’s not just exposed extremities that can be affected. If temperatures dip below freezing, frostbite can occur on covered, exposed, or wet skin. So, a big part of frostbite 101 is keeping an eye on those danger areas. Let’s talk more about that.
Recognizing Frostbite Symptoms
Frostbite most frequently affects toes, fingertips, and the outer edges of ears. The first signs of frostbite are color changes to affected areas. It’s important to know the visual signs so you can let your fellow campers know they have it. Affected patients don’t feel it at first because the condition numbs the affected skin until they’re in a warmer environment. That’s when they start to feel pins and needles, itching, pain, and/or the weird “waxy” sensation that’s unique to frostbite.
Here’s the complete list of frostbite symptoms to watch for:
Patches of skin in shades of red, white, blue, gray, purple or yellow, depending on how severe the frostbite is (It should be noted that color changes can be difficult to see on people with darker skin.)
Numbness
Cold, hard, waxy-looking skin
Clumsiness due to numbness or joint stiffness
Pain
Blistering after rewarming
Identifying the 3 Stages of Frostbite
Frostbite doesn’t just suddenly freeze your skin solid. Instead, it affects exposed skin and underprotected extremities in stages.
1. Frostnip
At this stage, affected skin will be reddish and will start to feel numb or tingly.
2. Mild to Moderate Frostbite
Also called superficial frostbite, this is when skin color changes slightly and can start to feel warmish, even though it’s well on the way to freezing. The affected area will sting, burn and swell as it’s rewarmed. In addition, there might be blistering as skin rewarms.
3. Deep Frostbite
As more layers of skin freeze, frostbite symptoms become more severe. Frozen areas lose color, turning white or blue-gray. Rewarming may produce large blood blisters. At this stage, skin cells die off, causing skin to turn black and hard as they do so.
Administering First Aid for Frostbite
It’s crucial to treat frostbite in its earliest stages to help prevent tissue death and loss. That means if you or someone else is experiencing numbness, tingling, skin color changes, or any other signs of frostbite, you need to start treatment immediately.
Here’s what you should do:
Get into a warm place.
Remove any wet clothing or footwear.
Remove jewelry from affected areas.
Warm the affected area by soaking in warm water (100- to 105-degrees) until it starts to feel warm. It’s important not to apply heat at this stage. Applying heat from a hairdryer, heating pad, or other appliance (even at the frostnip stage) can cause intense pain and may lead to further tissue damage in frostbitten skin. Warming areas affected by frostbite should always be slow and progressive.
Never rub affected areas.
Loosely bandage affected areas with sterile dressings.
Separate affected fingers and toes by placing sterile gauze pads between them.
Offer non-prescription pain relievers.
Seek professional medical care as soon as possible.
Smoking and drinking alcohol can cause changes to blood circulation. Therefore, both should always be avoided when recovering from frostbite.
The Best Course of All: Preventing Frostbite
Fortunately, it’s easy to prevent frostbite — especially if you have an RV. Frostbite 101 all starts with some basic, common-sense fundamentals what to do.
1. Dress for the weather.
Avoid tight clothing
Dress in layers of moisture wicking materials topped with a waterproof hooded jacket to stay dry and conserve body heat.
Waterproof mittens can keep hands warmer than gloves, especially if you layer gloves underneath them.
Use pocket hand warmers in gloves and (where possible) inside boots.
Wear a knit hat that can be pulled over your ears.If it’s really cold out, use the hood of your jacket to protect your head and neck.
Keep track of how long you’re outdoors using a timer if necessary.
Stay indoors (with that furnace cranked up!) or by the campfire for up to 30 minutes.
3. Avoid alcohol if you plan on venturing into the cold.
Drinking alcohol or smoking should be avoided if you plan to be outside in cold weather.
As mentioned earlier, drinking can cause changes in your blood circulation, which is important to stay warm.
The Importance of Frostbite 101
Frostbite is a serious condition — one that’s well worth avoiding. That being said, each year, hundreds of outdoor enthusiasts have parts of their ears, fingers and toes amputated because they didn’t properly prepare for frigid temperatures. It’s also worth knowing that the risk of frostbite increases when the wind chill falls below negative 27 degrees Celsius. (That’s negative 17 degrees Fahrenheit for my American friends.) Taking the precautions against frostbite mentioned in this article will help you reduce the risk while you enjoy all the wonders of a winter getaway.
Canada is known as “the Great White North” for a good reason. Much of this beautiful country is covered under a blanket of snow from November to May. Winter camping in Canada demands a level of preparedness and sense of adventure that RVers won’t need any other time of year. That’s because although preparation makes RV living better any time of year, a Canadian winter can kill you if you aren’t properly prepared.
The Two Big Mistakes People Make
Mistake No. 1 – Not Driving Away from Bad Conditions
The first mistake people make is staying in Canada where winter weather often features blizzards and temperatures get as cold as 40 degrees below zero. (Especially when there are warmer destinations in the south.) When you think about it, one of the best things about an RV is that it has wheels. That means you can drive it or tow it to warm places like Florida, Texas, California or Arizona, where you can avoid winter altogether. This, of course, is know as snowbirding.
Mistake No. 2 – Assuming It’s Just Too Cold to RV
Alternatively, the second mistake when RVing in Canada is thinking that you can’t RV in Canada in winter because it’s too cold. The truth is frigid winter temperatures aren’t the norm on Canada’s southwest coast. This area is renowned for its mild, rainy winter climate. Not only that, but the further west you go, the milder the climate is. For example, in Victoria, British Columbia, the average winter temperature hovers around 9 degrees Celsius in the winter months. (That’s 48 degrees Fahrenheit my American friends.) That’s as warm as Canada get in winter.
As a matter of fact, Vancouver Island (as far west as you can go in Canada) offers a mild climate that has made it a popular destination for Canadian snowbirds. But warmer winter temperatures aren’t all that Vancouver Island offers. Snowbirds love this 285 mile long island for its lush rainforests, incredible wildlife viewing, and pristine sandy beaches.
However, there are still lots of reasons why people choose to RV in the Great White North in winter. Many Canadian snowbirds, who normally head south for winter, may delay their annual migration south until the Canadian dollar increases in value. But with that being said, many skiers, snowboarders, and other winter sport enthusiasts, find having a cozy “chalet on wheels” very practical. And then there’s the diehard camping fanatics, who enthusiastically brave the elements, to enjoy the peaceful and bug-free atmosphere of winter camping in Canada. Other RVers use their RVs as affordable accommodation at remote job sites. Or as a portable guest cottage. Or as a full-time home on wheels.
With the right RV, the right equipment,and a lot of preparation, RV camping can be an easy, affordable and fun winter activity, wherever you happen to be in Canada.
So, are you ready to discover everything you need to know about winter camping in Canada? Let’s dig in!
What to Pack for RV Camping in Winter
If you’re going winter camping in Canada, there are some items that are essential to have for both comfort and survival. This list includes basic items you need to have, but you’ll want to add to it according to your own specific needs.
Cold-Weather Clothing
Dressing in layers is the most important part of staying warm when it’s cold out. You’ll need a base layer, a mid layer, and an outer layer. Each clothing layer will help trap and retain body heat to keep you warm and toasty. Merino wool is the best choice for your base layer, and every layer on top of that should be wool or synthetic. Your outer layer can be a puffy down or synthetic jacket.
For most of Canada, you’ll need to have a hood that has adjustable cords. Moisture absorbing materials should always be avoided since moisture keeps you cool. That means don’t pack cotton clothing (like T-Shirts and jeans) because cotton absorbs moisture instead of wicking it away. Here’s what each camper in your party will need.
Here are our recommendations for essential gear you’ll want to have with you when you camp in winter. This is by no means an exhaustive list, but it has all the essentials specifically geared for winter camping.
A hand held hair dryer or heat gun to thaw frozen pipes.
Portable fire pit
Fuel for portable fire pit
Tire chains for RV or tow vehicle drive axle wheels and trailer
Choose the Right RV for Winter Camping
Winter camping in Canada’s winter temperatures is demanding. Unless you’re camping around Victoria, you’ll want to have a four-season RV. Four-season RVs have specific features which help to ensure you stay cozy while enjoying amenities that include running water in the bathroom and kitchen. Many features of an all-weather camper typically include:
Snow tires or tire chains help provide traction on roads made slippery by snow and ice. If you plan to drive your rig anywhere in Canada in winter, you should have them. The mountainous province of British Columbia requires all vehicles to have snow tires between October 1 and April 30. Also, tire chains are a legal requirement in the province of British Columbia for vehicles over 16,000 pounds during those same months.
Prevent Water from Freezing in Your RV
Some RVers who camp in colder temperatures winterize their water system and carry bottled water onboard. The question that begs to be asked is: “Where’s the fun in that?” After all, the reason most of us have an RV is to have all the comforts of home with us. The truth is, there are things you can do to keep water flowing in your RV, even when it’s cold outside.
Wrap city water connection with heated pipe insulation.
Connect to city water using a heated water hose.
Use RV skirting to keep the temperature under the RV above freezing .
Add tank heating pads to exposed holding tanks.
Use an RV sewage hose heater to prevent sewage from freezing and forming the dreaded poopsicle.
If you’re camping where there’s no city water connection, keep your freshwater tank full so that it’s less likely to freeze.
Employ RV Skirting
Your RV will stay a lot warmer in winter if you use some form of RV skirting to block cold air and wind from getting underneath your RV. There are different ways to do this and it doesn’t have to cost a lot. RV skirting can be custom made or constructed of insulating boards. Here are the top ways to skirt an RV.
Insulated vinyl RV skirting is a fantastic option for RVers who park in one spot for several months over winter and then travel in the RV when it’s warm out. That’s because it can be rolled up and stored in basement cabinets when you travel. However, vinyl RV skirting is usually installed using snaps or twist locks that require drilling into the exterior cladding of your RV.
The best skirting is custom fitted to your specific RV make, model, and year, but you can also buy a custom made DIY RV skirting kit online to do the installation yourself. Here are three companies that custom make RV skirting.
EZ Snap Direct. Custom, no-drill DIY RV skirting that installs using no-drill snaps.
RV Skirting.com.Custom RV skirting with a patented nail-down strap system.
Air Skirts are insulating air bags that resemble giant cigar tubes. They are made to fit snugly underneath RVs of varying dimensions. They’re an easy DIY because you simply put them in place and inflate them using an air compressor. Like custom vinyl skirting, Air Skirts can be a fantastic, portable option for those who spend winter in one place and travel in the warmer months.
DIY RV Skirting (~ $100-$500)
It’s easy to make your own RV skirting from insulating foam board, plywood, Reflectix bubble insulation, or any combination of these. This DIY upgrade requires little skill, other than measuring and cutting. Some building supply retailers even offer onsite material cutting services, so you don’t need your own saw or blade.
Prioritize a Great RV Heating System
No matter where you RV in the Great White North, you’ll want to have an operational RV heating system. It’s a good idea to service your RV furnace and propane system before winter hits. This means cleaning the furnace itself as well as air ducts and using a manometer to ensure there are no propane leaks.
You’ll also want to have lots of propane on hand and a means to keep propane bottles warm enough to keep the propane from freezing. If you RV in Canada, you owe it to yourself to invest in an RV propane bottle blanket that will keep your propane evaporating (and flowing) even in the coldest weather.
Why Consider Winter Camping in Canada
Winter RVing in Canada can be a lot of fun and very rewarding. However, like everything else in life, preparation is key here. When it comes to RVing in cold temperatures, this includes having a four-season RV equipped with snow tires. It’s also important to have the right gear with you, so you can stay comfy and cozy.
Come winter, every RVer is looking at one of three choices. You can winterize your RV and store it for the winter and let it enjoy liberation. Second, you can fly south toward warmer parking spots in the great snowbird migration. Or thirdly, you can stick it and enjoy the spectacular and solitary splendor of winter camping. But if you’re going to go with Door No. 3, you need to make sure you have an all-weather camper that can handle the elements.
So,, whether you’re shopping for a new RV or trying to determine the cold-weather viability of your current one, you need to ask some questions. Specific ones. Because if you plan to take your RV into nature’s freezer, you need to be dead sure that it can handle what’s coming.
Which leads us to a simple but very important question.
Really consider: What is winter?
This might sound like a ridiculous thing, but remember: I don’t know you. Or, more specifically, where you live or plan to camp. Location has an enormous impact on what winter looks like. Recently, I wrote an article on fish house RVs. These specialized trailers are designed to be used on frozen lakes where temperatures can get well into the sub-zero range. Yet some of these trailers will happily provide hot and running water. All this to say, the conditions you’re hoping to camp in can make a tremendous difference in how your RV performs.
In New Mexico, where I live, the nights can get into the teens at the very coldest times, but then days warm up to the 40s and even 50s. Knowing that overnight temperatures are occasionally below the point where water freezes (32 degrees Fahrenheit), I’m not worried. But if temps routinely stay below the point of freezing, that presents a bigger challenge. And if the temperatures are well below the point of freezing, that’s a different discussion altogether.
Knowing the kind of conditions you’re going to be facing when it comes to cold can help you make a decision on what to prioritize.
Take cold-weather stickers with a grain of salt.
Despite the fact that most RVs are made in Indiana (where temps can get well below freezing), there really isn’t an industry standard for winter-ready campers. While many RV companies will put a bragging sticker on their RVs — that might be something like Arctic Package, Polar Package or any other branding — that effectively has no actual industry-wide meaning. That’s not to say that those RVs don’t have great, custom-designed, winter-tested features. They probably do. But it also means that the manufacturer is making their own certification. (Which most will brag about and explain in detail on their site. Which is actually very helpful.)
All that being said: Don’t worry. You can easily figure out how well your RV is set-up for winter and we have those tips here.
Ask about the manufacturer’s testing process.
There are a handful of companies that I’m aware of that actually test how well an RV can do in both freezing and high-temperature environments. One of those companies is Keystone RV who have their own climate chamber. Another is Truma, a German-based component supplier.
The limiting factor here for Truma is that they will gladly run a manufacturer’s RV through their climate testing chamber, but the RV company does need to use Truma components. The test they perform is pretty exhaustive. They’ll get an RV down to sub-freezing temperatures and then see how quickly their systems can raise the temps to comfortable levels. So, if your RV came with Truma components, it’s a great question to ask the manufacturer if the RV has been through this process.
Another company that tests and certifies their RVs is Jayco. Jayco sends their trailers to a climate testing facility that RV supplier Dometic owns to certify the winter-readiness of their rigs.
There may be other RV companies who have found a way to test their RVs and, if they’re willing to certify those results, that should certainly gain a lot of favor with you as a potential all-weather camper buyer. But there are RV companies who build very robust winter-ready units that don’t provide certifications at all. Which is fair, because there is no industry-wide standard.
Testing an Ember RV in the Truma climate chamber.
Understand PEX plumbing has winter-resistant limits.
RVs are now almost all plumbed with PEX pipes. PEX is a plastic-like plumbing material that is pretty good at resisting damage in some freezing conditions. But the ability for a PEX pipe to withstand the cold, again, depends on how cold.
And, oftentimes, the failure point isn’t as much the pipe as the fittings. The RV industry is notorious for using low-quality fittings and that’s typically the failure point of an RV’s plumbing system.
Inquire how the heated underbelly is heated.
Many RVs state that the underbellies of these RVs are heated and that’s a true statement when they make that claim. But know that this heat is provided by the furnace, so you have to be running that. In many cases if you’re comfortable inside the RV, the holding tanks are protected by the furnace.
But many RVers choose to use electric space heaters instead of the furnace. Which will mean that the enclosed underbelly isn’t benefitting from the furnace’s heat. While an RV’s furnace can certainly have a thirst for propane, this could be partially due to the fact that it’s doing extra duty heating the underbelly.
Now, get your checklist of questions ready.
If you’re shopping for an RV that’ll stand-up to winter’s chill, here are some of the questions I would look for and use as a guide.
How are the outdoor shower fittings protected?
Many RVs simply have a thin plastic door over the outdoor shower. A few have an insulated compartment door. There are fifth wheels that put the outdoor shower fittings into the heated front compartment.
Remember: This isn’t about you taking an outdoor shower in the cold of winter. It’s about the exposure of the fittings (which house water) to freezing temperatures. The fact is that the outdoor shower fittings can be the weakest link in an otherwise winter-ready RV.
If the RV you have doesn’t have a way to protect the outdoor shower, consider adding shut-off valves before the water gets to the outdoor shower.
How are the sewer/gate valves protected?
No matter how well the holding tanks are insulated from the cold, if the sewer or gate valves (or fullway termination valve) is exposed to the elements, that’s where you’re going to have issues. Some RVs have these enclosed in the underbelly of the trailer so they don’t freeze. Which is a big thing to ask about if you’re shopping for an all-weather camper.
If your current RVis not enclosed in the underbelly, you might pour some RV-safe antifreeze into the black and gray tanks after you’ve dumped them. This will cause the pipe that extends into the elements to at least have antifreeze in it.
Are there tank heating pads?
Many newer RVs have holding tanks with 12-volt heating pads on them. These are pretty nifty because they activate once the temperatures hit a certain point. (Often around 40 degrees Fahrenheit or below.) So, even if you leave the switch for these turned on, they don’t draw power unless it gets cold enough.
If you have these, there’s usually a switch on or near the control panel to activate them. If you don’t, they’re not horribly difficult to install. They simply stick to the holding tanks. But they can only do so much as these are essentially a pretty thin sticker of heat that doesn’t provide incredible warmth, though it’s not bad.
Does this RV have an enclosed underbelly?
More and more RVs, even many budget-focused travel trailers, have enclosed underbellies. In the simplest case. all an enclosed underbelly means is that there is a layer of what looks like plastic cardboard that encloses the underside of the trailer. This may provide minimal insulation but doesn’t provide much.
Is the enclosed underbelly heated? And if so, how?
In many cases, larger and higher-end RVs come with a heated and enclosed underbelly. This is a next-level step as it takes the enclosed underbelly and provides heat into the space. The way this is accomplished is with a specific duct from the furnace into the underbelly compartment. This can make a big difference in how cold the temperatures can be before you have to worry about freezing pipes.
But, again, there’s no universal standard so some underbelly compartments are simply covered with the corrugated plastic, which is that plastic cardboard-looking material, and some have further insulation. Asking how the underbelly is constructed therefore can also be enlightening.
OK, but what if I already have an RV I love? Can it become an all-weather camper?
This is common, so if you’re reading this and you already have the RV you love, you have company. And the good news is that there are indeed ways to protect your RV’s plumbing system.
First of all, if you’re only using the RV occasionally, you can still camp in a winterized RV. While you won’t be able to take advantage of the plumbing systems in that RV, the rest of the rig will be fine to use. (Which may not be ideal, but it is possible.) Of course, many of us buy an RV so we have a toilet in the middle of the night. If your RV is winterized you could flush the toilet with RV antifreeze, which will help keep the contents of the black tank from freezing.
If you’re camping for a longer period of time, many RVers will put some sort of barrier around the bottom of their RVs. From cardboard to hay bales and even specifically-designed inflatable solutions, RVers have reported that blocking the winds from blowing under their RVs is a good way to help keep things from freezing.
A Rockwood GeoPro with a skirted underbelly.
In addition to blocking the pathway of the winds, some RVers also place a small electric heater under their RVs after they’ve put a wind barrier. But use caution so that you don’t create a hazardous situation doing this.
Of course if you have a heated underbelly favor using the furnace, so that it can do it’s job. (We keep an eye on our propane tank levels with these propane tank monitors.)
Again, depending on conditions, a heated water hose could solve the problem of keeping the water flowing from an outside source. But some RVers just fill their freshwater holding tank and use that.
If you’ve been shopping for an four-season RV, you’ve probably heard the term enclosed underbelly. Beyond the idea of an RV hiding its #DadBod, the exact image this conjures up for new buyers just may be … a bit vague. Yes, we know it’s supposed make the RV warmer. But what does it really mean when an RV has an enclosed underbelly? Also, does this guarantee that it’ll be great for winter camping?
Well, don’t sweat. We have some answers on what an enclosed underbelly can mean to each RV. And, even better, we’ll share some things you should look for, particularly if you are considering camping in colder climates.
What is an enclosed underbelly? (Asking for a friend.)
The way an RV is built might be a surprise for new buyers. (Or even ones.) It’s probably different than some people assume. If we’re talking about towable RVs, like fifth wheels and travel trailers, typically the chassis arrives at the RV manufacturer’s assembly line in bare form. From there, it is typically flipped over, and holding tanks, plumbing, and wiring are installed. Being upside down makes it easier for the team to put these items in. In some cases, the suspension and wheels are also put on at this point.
Once everything is in place, it had been traditional that the chassis was flipped over. And then the rest of the assembly process proceeds. But, as we’ve become better consumers and demanded more of our RVs, many RV makers go an extra step here.
In some cases, a climate barrier is put on under the tanks. Then a plastic material (that looks like plastic cardboard) finishes it all off. The space between the underside of the RV itself and the floor that you walk on is called the underbelly and basically occupies the space between the frame rails.
RVs are built from the inside out. The underbelly resides between the floor and underside of the chassis. This photo is from an Alliance RV factory tour.
So, what’s included in an enclosed underbelly?
Once again, it’s important to know that RV companies each choose their own processes and systems. So, there isn’t an industry standard for what goes into an enclosed underbelly. Some RV companies take elaborate steps to keep the holding tanks from freezing. Others don’t. So, it’s natural for you to find yourself asking questions, and comparing brands and options. Which is better: arctic package or four-seasons package or … this other one?
Despite the fact that most RVs are made in Indiana (where temps can get well below freezing), there really isn’t a standard for winter-ready campers. While many RV companies will put a bragging sticker on their RVs that might be arctic package, polar package, or any other branding, that effectively has no actual meaning. (Speaking broadly, of course, across the industry.)
What’s under an enclosed underbelly? Take a look.
How can I find out what an RV model has?
If it’s important to you that your RV is protected from the weather, particularly the cold, then your best bet is to go to the RV manufacturer. (Especially versus a dealership.) Some of them will have a diagram of how their RVs are built. (Some even with cool specifics.) So, if you’re shopping for your next RV, check the RV manufacturer’s website. If they have a great cold-weather package, odds are that they will — wisely — brag about it. You might also reach out to the company itself. Som RV companies even still disseminate information via printed brochures, which you can request.
Of course, a well-informed RV dealership may also be able to provide accurate information. But, as with many things, even if you accept their word still verify the information they share with you. And the manufacturer is the best place to do that.
Here’s a cross-section of an underbelly, courtesy of Grand Design RV.
What features should I ask about?
Let’s start with the basics. It’s pretty standard that an all-weather camper will have a layer of insulation and what is called a radiant barrier. (This looks somewhat like a sheet of aluminum foil.) But some RV companies go beyond this.
In some cases, an RV manufacturer will install holding tank heating pads. These pads are typically operated by the 12-volt system in your RV and can provide some heat to the holding tanks. That way, the contents don’t freeze.
Many times these heating pads are temperature-activated, so that they only come on when the temps in an underbelly go below a certain point. That temperature is often around 40 degrees Fahrenheit. (Or 5 degrees Celsius.) If your RV has this feature, you can often just leave the tank heaters turned on if there’s a chance of colder temperatures. The heating pads will activate as necessary.
Heating Pad Nuances
Almost always, there will be a switch someone on or near your other RV controls that activates and deactivates these heating pads. Many RVs state that the underbellies of these RVs are heated, and that’s a true statement when they make that claim. But know that this heat is provided by the furnace, so you have to be running that.
If your RV has this built in and if you’re comfortable inside the RV, the holding tanks are protected by the furnace. But many RVers choose to use electric space heaters instead of the furnace. That will mean that the enclosed underbelly isn’t benefitting from the furnace’s heat. While an RV’s furnace can certainly have a thirst for propane, this could be partially due to the fact that it’s doing extra duty heating the underbelly.
Are there downsides to an enclosed underbelly?
The climate barriers built into many RV’s underbellies can keep the living space of the RV more comfortable. They provide a climate barrier between the outside world and the interior of the RV. In fact, it’s pretty unusual that I look at any RV, and the holding tanks are exposed to the elements. (Interestingly, that wasn’t true even a few years ago.)
But one of the downsides to these enclosed underbellies is that, if there is an issue, someone has to crawl under the RV and lower the underbelly material. Often this is screwed right into the frame.
From there, you’ll have to battle the underbelly cover. Then the radiant barrier. And then the insulation. All that just to check for leaks or other issues should you suspect something’s awry.
If the repair technician is you, then you get to deal with this. Even if you’re paying someone, then you’re paying their hourly rate to deal with all this.
California RV specialists hunt for a leak within an enclosed underbelly.
If you’re four-season camping, it’s the right decision.
Since there is no one standard for what an RV company does when enclosing the underside of their RVs, the more you know the better off you’ll be. While there are some disadvantages to having the underbelly enclosed, the advantages far outweigh those in most cases. Especially if you plan to be out in the elements. With an enclosed underbelly, your RV is typically more comfortable to be in. And your holding tanks are protected from the elements in some fashion.
Being aware of what the manufacturer of your RV has done matter. That includes which materials they’ve used. And whether or not the RV has holding tank heaters. And if the furnace is ducted into the space.
There are absolutely RVs that are very well-suited to cold weather camping, but not all are. Knowing the difference can keep you out of hot water — or perhaps make sure that the hot water flows in your RV.
When winter camping calls, your RV’s ability to stay warm and weatherproof becomes the cornerstone of comfort. Whether you’re navigating snow-covered forests or enjoying a quiet lakeside retreat, the unsung hero of your camper’s winter readiness is its RV sealant.
Making sure your RV is buttoned up effectively protects against cold drafts, moisture, and potential long-term damage. (And sealing up your RVcan involved more than just RV sealant.) But to get the results you want, you need to know the basics. So, in this article, we’ll focus specifically on the different types of RV sealant, when and where to use them, and some top product recommendations to make your winter RV adventures cozy and trouble-free.
Why RV Sealants Matter in Winter
As almost all RV owner know (or will soon find out), winter conditions can be brutal on an RV. Ice, snow, and fluctuating temperatures challenge even the most well-maintained rigs. Gaps in seals can allow freezing air or water to creep in, leading to drafty interiors, moisture damage, or even structural issues. This is where RV sealants come to the rescue, acting as a barrier to keep your RV protected and insulated. They help keep the weather out and the comfort inside of your home on wheels.
Types of RV Sealants and Their Uses
The world of RV sealants can feel overwhelming, but understanding the key types and their applications will help you choose the right product for each job.
1. Self-Leveling Sealants
Best for: Horizontal surfaces like your RV roof. Self-leveling sealants are designed to spread evenly as it cures, creating a smooth, watertight seal on flat areas.
Top Pick: Dicor 501LSW Self-Leveling Lap Sealant
Why It’s Great: This sealant is a go-to for sealing seams and vents on rubber or TPO roofs. It’s UV-stabilized and resists cracking, which is essential during winter freezes and thaws.
Pro Tip: Apply on a clear, dry day to allow proper curing before exposing it to snow or rain.
2. Non-Sag Sealants
Best for: Vertical surfaces like sidewalls, windows, and doors. Non-sag sealants are formulated to stay in place without dripping or sagging, even on inclined surfaces.
Top Pick: Geocel ProFlex RV Flexible Sealant
Why It’s Great: Known for its flexibility, ProFlex works well on fiberglass and aluminum and withstands temperature extremes.
Pro Tip: Use masking tape around your application area for a cleaner finish, especially if working on visible sections like windows.
3. Butyl Tape
Best for: Underneath fixtures like vents, skylights, and window frames. Butyl tap is pliable, adhesive tape that conforms to irregular surfaces for an excellent initial seal.
Top Pick: 3M Butyl Tape
Why It’s Great: Ideal for creating a strong base seal before applying a lap or non-sag sealant over it.
Pro Tip: Always remove old butyl tape before reapplying to ensure a secure fit.
4. Silicone-Based Sealants
Best for: Non-porous surfaces, such as glass or metal. Silicone-based sealants provide excellent water resistance and flexibility, but not suitable for areas exposed to high UV light or on rubber roofs.
Top Pick: Permatex Clear RTV Silicone Adhesive Sealant
Why It’s Great: This sealant is a reliable option for quick fixes on windows or mirrors.
Pro Tip: Use sparingly, as silicone can be challenging to remove and is incompatible with some RV surfaces.
5. Specialty Sealants for Extreme Conditions
Best for: Areas exposed to heavy wear or harsh weather. These specialty sealants are formulated to handle extreme cold, water immersion, or high movement.
Top Pick: Sikaflex-221 Multi-Purpose Sealant
Why It’s Great: Known for its durability, it adheres to multiple surfaces, making it versatile for tough jobs.
Pro Tip: Allow extra curing time in colder temperatures for maximum adhesion.
6. Flexible Sealants for All-Weather Versatility
Best for: Sealing joints and cracks that require flexibility and durability. These sealants are weatherproof, paintable, and adaptable to movement. All of which make this kind of RV sealant ideal for RV surfaces prone to shifting or flexing.
Top Pick: Flex Caulk Waterproof and Weatherproof Sealant
Why It’s Great: Flex Caulk stands out as an all-purpose, heavy-duty sealant perfect for RV use. Its flexible, weatherproof formula makes it an excellent choice for sealing around windows, vents, trim, or any area exposed to movement or environmental stress. The built-in trigger applicator simplifies application, ensuring a precise and clean finish without needing extra tools. Once cured, Flex Caulk dries to a paintable surface, blending seamlessly with your RV’s exterior for a polished, professional look.
Pro Tip: Plan your application based on weather conditions, as colder or humid environments may slightly extend curing time. For larger projects, keep a damp cloth handy to smooth out edges and achieve an even seal.
My Personal Must Haves
With space being a premium in an RV, if I could only have two on the road, it would Dicor Lap Sealant and Flex Caulk. Both are easy to apply and super reliable. We recently used Dicor for our full solar and electrical upgrade when installing new solar panels. Its self-leveling properties and durability made the process seamless and gave us peace of mind for long-term weatherproofing. You can check out the full installation in this video on our Instagram.
We also use Flex Caulk around the RV in a pinch because it works well and comes with a squeeze handle. So, it is quick and easy to use on the go. There is no caulk gun needed.
When and Where to Apply Sealants
Proper application is just as critical as choosing the right sealant. Here’s a breakdown of common areas that benefit from RV sealant maintenance.
Roof Seams and Vents. Check for cracks or peeling sealant, especially around vents, skylights, and air conditioning units. Use self-leveling sealant for the best results.
Windows and Doors. Inspect for gaps where cold air or moisture could seep in. Non-sag sealants or butyl tape work well here.
Underbelly and Storage Compartments. Look for potential openings where road debris or water might infiltrate.
Slide-Out Seals. Ensure the rubber seals are in good condition and supplement with a compatible sealant for gaps.
Additional Tips for Winterizing with RV Sealant
Preparation Is Key. Clean all surfaces thoroughly before applying sealant to ensure proper adhesion.
Temperature Matters. Most sealants cure best above 50 degrees Fahrenheit. So, plan applications during milder winter days or indoors.
Inspect Regularly. A quick monthly check of your seals can save you from expensive repairs down the line.
RV sealants may not be the flashiest part of RV maintenance, but they’re undoubtedly among the most important. With the right RV sealant and application, you can ensure your RV stays warm, dry, and comfortable all winter long. Whether you’re boondocking in snowy mountains or parked at your favorite winter campground, a well-sealed RV is the key to worry-free adventures. Don’t overlook this essential step. Your RV (and your wallet) will thank you!
For those with a wanderlust for RVing into truly special places, consider this: There is only one Everglades ecosystem — on the planet! Located along the south and southwestern coastline of Florida, Everglades National Park is the largest subtropical wilderness in the United States.
This national park preserves a fascinating landscape for RV travelers. Ecologically, it provides important habitat for numerous rare and endangered species. In fact, the Everglades ecosystem has protected the southern Florida coastline from battering hurricanes for millenia. Inside its bounds, it boasts a colorful diversity of flora and fauna. It’s pretty exotic. From Jurassic Park stuff. to fascinating geology and human history, all of this combines makes a visit to this park a delight for visitors of all ages!
As you might have guessed, this national park is accessible by both land and water. Therefore, it offers unique opportunities for both casual explorers and experienced outdoor adventurers. (As well as limitations where you can drive to.) Whether you are interested in hiking, driving, paddling, cycling, or taking a boat tour, there is something here for everyone.
One Scenic Drive
While there is no designated park loop road, the Everglades have a 45-mile drive through the park from the park’s Homestead entrance station to Flamingo. The whole route is a beautiful, endless river of sawgrass dotted with tree-topped hammocks as far as the eye can see. And, of course, it’s also an opportunity to get first sighting of the wonderful wildlife ahead.
Must-Visit Trails
Canoe and Kayak Trails
Paddling opportunities are found in two distinct parts of the park. These range from a few hours to several days. It all depends on length and complexity of the trail. But we list this first for a reason. Frankly, the best way to see the park is from a human-powered watercraft!
That being said, if you are planning a self-guided overnight trip, you must obtain a wilderness backcountry permit. Campers can make advanced reservations through Recreation.gov. Advanced reservations are available on a rolling basis, three months in advance of the start date.
Gulf Coast Paddling Trails. Accessible from Everglades City on Florida’s west coast. Private boat ramps are available in Everglades City and Chokoloskee for a fee. Alternate launch sites include the Rod & Gun Club, Outdoor Resorts of Chokoloskee, and Chokoloskee Island Park and Marina. Note: At the time of publication, the public, non-motorized launch on the Gulf Coast Visitor Center grounds was closed for construction.
Flamingo Paddling Trails. Ranging from beginner to advanced trails, these can be accessed from launch areas in the Flamingo marina or along the main park road as you approach Flamingo. This is located 38 miles from the park entrance station in Homestead.
If you don’t have your own equipment or are new to kayakingand canoeing, no worries. You can join a guided, naturalist-led, eco-adventure through the Everglades Institute.
Biking Trails
There are five biking trails throughout the park: Shark Valley Tram Road (aka the Everglades Loop), Snake Bight, Rowdy Bend, Long Pine Key Nature Trail, and the L-67 Canal Road. E-bikes with fully operable pedals and an electric motor of less than 750 watts are permitted on trails and public roads wherever traditional bicycles are allowed.
Hiking Trails
A wide array of land trails offer visitors opportunities for both leisurely walks and extended hikes. The Flamingo and Pine Island trails are accessible from the main entrance of the park near Homestead, Florida. The Shark Valley trails are closer to Miami off of U.S. 41 (aka “Alligator Alley”).
Anhinga Trail. This self-guided, less-than-one-mile round trip trail offers a lot of bang for its buck! It winds through the sawgrass marsh on an elevated boardwalk. From there, you may see alligators, turtles, anhingas, herons, egrets, and many other birds —especially during the winter. This is one the most popular trails in the park because of its abundance of wildlife. Difficulty: Easy.
Mahogany Hammock Trail. This self-guided, half-mile boardwalk trail is a great way to get a taste of the dense, jungle-like hardwood “hammock.” Lush vegetation includes gumbo-limbo trees, air plants, and the largest living mahogany tree in the United States. Difficulty: Easy.
Coastal Prairie Trail. This 15-mile round trip hike allows you to step back in time as you walk this old road once used by cotton pickers and fishermen. Open prairies of succulent coastal plants dotted with shady buttonwoods surround you as you make your way west from the Flamingo Campground to Clubhouse Beach. A permit for backcountry camping is required to pitch a tent for the night here. Difficulty: Moderate/Difficult.
Air plants in the Everglades.
An ahinga.
A snowy egret.
An egret and his gator neighbor.
Lazy gators.
Can definitely feel like Jurassic Park at times.
RV Parks & Campgrounds
There are just a couple RV campgrounds within the park boundaries: Lone Pine Key Campground (open November to April, non-electric sites only) and Flamingo Campground (open year-round, with both non-electric and electric sites). But RV camping is also available in the greater Homestead Florida City areas, as well as in or near Everglades City. There are also a handful of Harvest Hosts and Boondockers Welcome options in the area for self-contained RVers. (Note: At the time of publication, Bayside Campground was closed for the 2025 season.)
For a truly unique camping experience, try renting a glamping, safari-style tent situated on an elevated platform. They come complete with bed, fan, electricity, and shared bathroom. Or rent a fully-equipped houseboat and eat, sleep, and tour in style. For an even more adventurous night out, book a guided, overnight kayaking or canoeing trip via the Everglades Institute to experience the Everglades backcountry with a guide. (They’ll show you the good stuff.)
Seasonal Advice
Winters are normally dry and mild, with occasional fronts bringing wind and a bit of rain. (Which means that the Everglades National Park is a great outing for Florida snowbirds.) If you are visiting in the “wet season” (from May to November), expect temperatures in the high 90s. With humidity over 90 percent. And a heat index of over 100 degrees Fahrenheit. Afternoon thunderstorms are an impressive sight and can be expected daily with heavy rainfalls that typically subside quickly.
Wet conditions and higher temperatures bring significant changes in the Everglades National Park landscape. As water levels rise, animals disperse making wildlife viewing more challenging. Insects such as mosquitoes and biting flies can be prolific in some areas, making outdoor pursuits uncomfortable without repellent or mosquito netting.
So, RVers will need to take care of the basics. Stay hydrated. Wear cool loose-fitting clothing. Bring rain gear and bug shirts, and use sun protection such as hats, sunglasses, and sunscreen. As with many national parks, one visit is often not enough to see and explore all of what Everglades has to offer. And, with Everglades National Park within easy reach of Biscayne National Park, Big Cypress Preserve, and Dry Tortugas National Park, you could easily plan a few weeks in this area and never run out of places to explore!
Insider Tips!
Guided Tours
Tram Tours. The two-hour Everglades Tram Tour takes you through the Shark Valley section of Everglades National Park. Naturalists provide insight into the ecosystem and point out some of the hidden aspects of the Everglades that help to make this region a world-renowned wetland. The open air vehicle allows visitors to view wildlife within the sawgrass prairies on either side of the tram.
AirBoat Tours. These unique boats are the perfect way to get out on the water and for a better look at the wildlife and their habitats that make this region so unique. Cruise among the mangrove forests and sawgrass as naturalists point out the various animals that make the Everglades their home.
Boat Tours. Ninety-minute to two-hour tours take you through backcountry canals and creeks, out into Florida Bay, or through the Ten Thousand Islands near the park. Each tour is unique to the habitat in which it travels. As you go, naturalists share their knowledge and passion for the Everglades ecosystem.
Sunrise in the Everglades.
How about that for a sunset?
Popular Activities
Bird Watching. Everglades National Park is a bird watcher’s paradise. Check out the Homestead, Shark Valley, and the Gulf Coast (near Everglades City) for a wide variety of trails, ponds, and open water which provides crucial habitat for over 300 bird species. We witnessed thousands of egrets alighting in the mangroves at sunset in the Shark Valley Observation Tower along a Ranger-led program that was simply sensational!
Ranger-Led Programs. From paddling and birding to trail strolls and slough slogging, experience the park through a Park Ranger’s eyes and learn about the flora and fauna that make this park such an incredible and important resource. Ranger tours are offered in every major area of the park; see the website calendar for details.
Traveling in an RV across the regions of America on the interstate can leave a person mystified. Among chain restaurants, there is a distinct lack of diversity of food. Indeed, if you were to drive on Interstate 40 from Wilmington, North Carolina to its western terminus in Barstow, California, there would only be a slight deviation in the food available just off the highway exits. However, if you deviate slightly from your intended route — following the coastline like a good snowbird this winter — you’ll find that the culinary landscape changes dramatically. Suddenly, you have access to locally sourced seafood. Which means that you can fire up some extraordinary seaside recipes — the comfort food of the weary snowbird.
It’s common knowledge that the best seafood is local. And it’s best consumed where it’s caught, by the seaside. Nothing beats sitting on a rickety picnic table near some boisterous seagulls and diving into a simple but elegantly prepared soft-shell crab sandwich — just outside of the small shack which prepared it only a half mile from the dock it was sold. Pair that with an ice-cold pilsner and some greasy french fries or hush puppies, and you’ll find yourself in the middle of a Jimmy Buffet song!
Finding that local seafood dive is part of the fun, but with your own great seaside recipes, you can make this experience happen any time in your RV. (You could even cook the fish you catch.) For us, as a pescetarian and a vegetarian traveling the coastline, we search out places that not only offer great seafood, but also plant-based protein as well.
These five seaside recipes make both of us happy — and will be great comfort food for any snowbird hugging the coastline
Impossibly Good Jambalaya
This low-country favorite, hails from Cajun territory. But it is widely claimed across the Gulf Coast. We jazzed up this basic Jambalaya recipe with some vegetables, beans, additional spices, and plant-based sausage. It’s the perfect base for any type of protein you want – Andouille sausage, blackened tofu, shrimp, chicken, catfish, or plant-based meat. (We really like Impossible spicy Italian sausage for this one!)
Ingredients
2 pounds raw peeled shrimp or (4 Impossible sausages*, sliced) 2 tablespoon olive oil 1 small red onion, chopped 1 cup baby bella mushrooms, sliced 1 red bell pepper (or Green) 4 garlic cloves, minced 1/2 cup celery, chopped 1 cup broccoli, chopped 1 cup cauliflower, chopped 1 15-ounce can red beans (or pinto beans), drained 1 15-ounce can cannellini beans, drained 1 5-ounce can Hatch green chilies, chopped 2.5 cups water 1 teaspoon veggie broth base 1 15-ounce can tomato sauce, no salt added 1 15-ounce can fire-roasted diced tomatoes 1.5 teaspoons Italian seasoning 1/2 teaspoon fennel seed 1 teaspoon garlic powder 1 teaspoon cayenne pepper 2 teaspoons red pepper flakes 1 cup long grain white rice
*We enjoy several plant-based sausage brands, but love Impossible for this dish. One of the major reasons is for its mouth feel. While plant-based, it is not low in fat. The coconut and vegetable oils give this sausage a satisfying burst of juicy richness. It even chars over a grill similar to traditional Andouille sausage. If you’re looking to cut down on meats, this is one to give a try!
Instructions
Roast sausages, shrimp, or other protein, in a pan or over an open flame. Keep warm, then slice.
In a large Dutch oven over an open fire, heat oil over medium heat. Sauté onion, bell pepper, mushrooms, celery, and garlic, stirring frequently.
Add the broccoli and cauliflower to the Dutch oven and sauté until al dente.
Add water, diced tomatoes, tomato sauce, green chilies, and all of the spices.
Bring to a boil and add rice. Cover and simmer until rice is tender, stirring frequently so nothing sticks to the bottom.
Add beans and protein. Cover and simmer five to seven minutes longer or until well heated, stirring frequently.
Good Ole Southern Hush Puppies
No trip to the coast is complete without consuming a basket of these deliciously toothy balls of fried batter. Serve hot enough to burn your fingertips in a heaping basket right in the middle of the table, alongside any number of dipping sauces, or small pats of butter, or just pop them into your mouth whole. The Kitchn recipe gave us our start, but we find that our own recipe is the one we love the best.
Ingredients
1 1/2 cups fine- or medium-grind cornmeal 1/2 cup all-purpose flour 1 1/2 teaspoons kosher salt 1 1/2 teaspoons baking powder 1/2 teaspoon baking soda 1/2 teaspoon granulated sugar (optional) 1/2 small yellow onion 1 large egg 1 cup buttermilk 4 cups peanut or vegetable oil, for deep frying Salted butter, for serving
Instructions
Prepare a draining plate with several layers of paper towels.
Prepare dry ingredients.
Prepare wet ingredients and add to the dry. Grate onion into the batter, and mix well. Let stand for 15 min.
Add enough peanut oil until you have 1 1/2 inches of oil in the pan, and heat to frying temperature.
With a tablespoon, or small ice-cream scoop. If you want to get fancy, place a golfball-sized lump of batter into the oil.
When golden brown, remove with a slotted spoon or spatula and place on the paper towels to drain excess cooking grease.
Dutch Oven Maryland Crabcake
People will argue about their favorite crab cakes, but I’m a strict East Coaster here and will always go with Maryland. The large lumps of crab seasoned to perfection aren’t overpowered by anything, so their sweet fleshy texture and taste can shine through. Just enough crackers or bread crumbs to hold them altogether and you’ve got yourself a real treat! We made our beginning with a recipe from Chef Dennis, but we’ve made a few changes to suit our tastes.
Ingredients
1 pound fresh jumbo lump crab meat* (vegetarian option below) 1 large egg ¼ cup mayonnaise 1 teaspoon dijon mustard 1 teaspoon Worcestershire sauce 1 teaspoon fresh lemon juice plus more for serving 1½ teaspoon Old Bay seasoning 1 teaspoon fresh parsley chopped 2/3 cup cracker crumbs from around 15 saltines (or panko bread crumbs)
Instructions
Whisk the mayonnaise, egg, mustard, Worcestershire sauce, Old Bay seasoning, and lemon juice in a large bowl.
Add the crab meat to the mixture and gently fold it into the sauce just until moistened.
Add the cracker crumbs and parsley to the crab meat mixture and continue to gently mix the ingredients until the cracker crumbs have been incorporated into the crab meat mixture.
Cover and refrigerate for at least 30 minutes.
Divide the crab cake mixture into six portions, again with the ice cream scoop if you’re fancy. Form the crab cakes into round, slightly flattened cakes and place crab cakes on a baking sheet lined with parchment paper.
Refrigerate the crab cakes until ready to bake or pan fry.
Preheat the Dutch Oven in the fire, with coals on the lid, until it is approximately 400 degrees. (See note at bottom of article for temperature approximations.) The RV oven is also an option, if your rig has one, or pan fry over medium heat.
Place parchment paper into the Dutch oven and return the lid.
Bake for 15 to 18 minutes until the crab cakes reach an internal temperature of 165 degrees, using a stick thermometer.
Remove from the oven and serve with tartar sauce, spicy aioli, lemon wedges and your favorite sides.
*Replacing Tofu for Crab Meat
Many vegetarians love to adapt familiar seaside recipes to accommodate their dietary needs or preferences. And firm tofu is a great stand in. It might be less expensive and satisfy that hometown hankering until you can return to the Chesapeake for the real thing, too.
Pat dry a 1 pound block of extra firm tofu with paper towels.
Using a box grater on the largest cheese grating side, grate the extra firm tofu.
Add the grated tofu into the recipe steps above, substitute veganaise if desired.
You might want to increase the spices slightly to accommodate the tofu.
Mouth-Watering Crabcake Benedict
Nothing says “fancy brunch” better than an exceptional bennie. And every Sunday brunch restaurant along the seashore will serve some version of this mouth watering delight. So, why not prepare on of the best seaside recipes at your own campsite? (We adapted this recipe from giant eagle and made it our own.)
Ingredients
1 ounce fresh chives 2 lemons 1 pound precooked crab meat (or 1 block marinated baked tofu, grated) 4 English muffins 10 eggs 2 sticks of butter 3/4 teaspoon Old Bay’s seasoning 1 teaspoon white vinegar (for poaching)
Instructions
Prepare the Crab Meat!
Slice and chop the chives
Juice the lemons
Toss the crab meat with half of the lemon juice, a pinch of salt and pepper, and half of the chives.
*Substitute marinated baked tofu for the crab meat: Grate the baked tofu into small pieces, and prepare as you would the crab meat.
Whip Up Your Hollandaise Sauce
Bring a wide pan with a few inches of water to a rolling boil.
Whisk remaining lemon juice, egg yolks, and three tablespoons of water in a metal bowl.
Melt butter over medium-high heat.
Place the bowl of the lemon/egg mixture over boiling water and then turn off the heat.
Very slowly drizzle the butter into lemon mixture, whisking constantly, then season with 1/2 teaspoon of the old bay seasoning.
Set aside.
Poach or Coddle the Eggs
Turn the pan of water down to a low boil, add 1 teaspoon white vinegar.
Crack the eggs (four at a time) into the pan of water until the whites are cooked, and the yolks are still runny (three to four) minutes, remove with a slotted spoon and let drain on a towel.
Alternatively, we find poaching eggs to be a little fussy, so we use small silicon ramekins as the perfect device for getting perfectly shaped and prepared eggs for a benedict, though the cooking time will be longer between six to eight minutes depending on your preferred yolk style.
Master the Final Assembly
Toast the English muffins while cooking the eggs.
Butter the muffins while hot.
Top each muffin with a scoop of the crab or tofu mixture
Top with one of the finished eggs.
Drizzle Hollandaise sauce over the top.
Sprinkle with the remaining chives and .
Salt and pepper to taste.
Serve this delightful dish with a fresh green or fruit salad. Pair with a mimosa or bloody mary cocktails.
Jack Fish — or Jackfruit — Tacos
Along the warm waters of the Gulf and East Coast, jack fish are a common sport fish. Light in texture and mildly flavored, these make the perfect taco fish. (One of those ideal seaside recipes for snowbirds!)
Jackfruit is a tropical fruit that when ripe looks like a cross between a watermelon and a hand-grenade. When mature, it has an incredible sweet taste that inspired Juicy Fruit gum. (A great gum, but not the ideal for … you know … seaside recipes.) While still green and unripe, Jackfruit produces a texture akin to shredded pork and a taste that is ready to absorb whatever you season it with, just like tofu. Jackfruit has become a popular meat substitute for vegetarians and vegans alike and several companies sell prepared shredded jackfruit in the produce section of your grocery store. We prefer unprepared jackfruit in a can from Trader Joe’s.
Ingredients
1 medium red onion, chopped 1 small container of cremini or “baby bella” mushrooms, sliced 3 or 4 fillets of Jack Fish, or 2 14-ounce cans of Jackfruit 1/2 cup of Stubbs spicy barbeque sauce (or your favorite) 1/2 small purple cabbage 2 ounces spicy ranch dressing Sharp cheddar cheese Corn tortillas
Instructions
Dice red onion and set aside.
Slice mushrooms and set aside.
Shred purple cabbage and set aside.
Shred enough cheese for six to eight tacos.
Prepare the Jack Fish
Over medium heat cook the Jack Fish fillets for two to three minutes per side.
Ensure that the fish flakes easily, but is still very moist.
Set aside but keep warm and covered so they don’t dry out.
Over medium high heat, sauté 2/3 of the onion for three minutes then add mushrooms.
Cook until onions and mushrooms have browned.
Add barbeque sauce to the pan, turn down heat and simmer for an additional minute.
Shred fish separately, add to the pan mix when loading the tacos.
Or Go with the Jackfruit Option
Drain can and pat Jackfruit chunks dry.
Shred the chunks using a fork and a knife.
Cook the shredded Jackfruit in a pan over medium to high heat with cooking oil.
When the fruit has browned, add 2/3 of the chopped onion, after three minutes add the mushrooms.
Cook until onions and mushrooms have browned.
Add barbeque sauce to the pan, turn down heat and simmer for an additional minute.
Final Prep
Heat the tortillas on a dry pan, 30 seconds per side or until very lightly browned, set aside and keep warm.
Dress shredded cabbage with ranch dressing to make a spicy slaw for the top of the tacos.
Load up the tacos with your filling choice. Top with cheddar cheese, spicy slaw, the remaining raw, diced red onion.
Hand and Heat Testing: A Tip for Seaside Recipes
We got this little technique from Weber Grills. Extend your palm over the charcoal at a safe distance. Imagine a soda can is standing on the cooking grate, right over the coals. If your palm was resting on the top of the can, it would be five inches from the cooking grate. That’s where you should measure the heat of charcoal, or cooking coals. Always pull your hand away from the heat before it hurts, and be sure that nothing flammable, such as a sleeve, is dangling from your arm.
If you need to pull your hand away after two to four seconds, the heat is high. Likewise, if you need to pull your hand away after five to seven seconds, the heat is medium. And if you need to pull your hand away after eight to ten seconds, the heat is low.
High (450° to 550°F): 2 to 4 seconds
Medium (350° to 450°F): 5 to 7 seconds
Low (250° to 350°F): 8 to 10 seconds
We hope you enjoy these seaside recipes and that your future coastal adventures inspire you to try some fantastic culinary feats of your own design!


