Blog

  • Grand Design Expands Transcend Lineup for 2025, GVWR Starting Below 5,000 Pounds

    Grand Design Expands Transcend Lineup for 2025, GVWR Starting Below 5,000 Pounds

    With trailer weights starting at under 5,000 pounds, Grand Design wants to make RVing more accessible for those who don’t have a truck. The company announced the new, expanded line of 2025 Transcend travel trailers, now offering three models centered around the original Transcend Xplor for both new and experienced campers. 


    Queen-Size Beds, Air Conditioning, and Slide-Out Options

    Although the trailers come in different sizes, the amenities in each are still full-sized, allowing travelers to take on the open road in comfort and luxury. With single-axle and lighter-weight options, Grand Design says the new designs are not only easier to tow but also makes RVing accessible for everyone. 

    Each trailer comes pre-installed with solar power capacities, with pre-wiring to support up to 600 watts of solar power, along with preparations for both a 30-amp solar controller and 2,000-watt inverter wired on the outlets. Owners can also outfit their trailers with built-in pet food and water bowls to accommodate their animals as they travel.


    Lineup: Transcend One, Transcend Xplor, Transcend

    At the entry level is the Transcend One trailer, a single-axle RV with a GVWR of under 5,000 pounds. These trailers feature a full-size queen bed, air conditioning, and a heated enclosed underbelly with pass-through storage. 

    The Transcend Xplor is the middle-of-the-road option, with a tandem axle and an option for one slide-out. Ranging up to 30 feet and GWVRs under 8,000 pounds, this line of trailers add on small touches that make travel a little more accessible. RVers can look forward to pull-out trash can storage, bigger drawers, and both folding and hanging storage. 

    At the top of the line is the Transcend trailer. These trailers come in with a GVWR between 8,000 and 10,000 pounds, and can feature up to three optional slide-outs. Beyond the regular amenities found in the smaller two trailers, standard features include an outdoor kitchen with refrigerator, laundry chute, and other small touches adding luxury to the camping experience. 

    Beyond the traditional cabinetry, trailers are also outfitted with a JBL sound system with both interior and exterior speakers, along with fold-up tables with additional storage.

  • 3 Smart Ways to Turn Your RV Into a Money-Making Machine

    3 Smart Ways to Turn Your RV Into a Money-Making Machine

    Tapping into your RV’s earning potential can be a fun and rewarding venture.

    The freedom of the open road is one of the greatest appeals of RV living. But how often does your rig sit uninhabited? With a few smart investments, and often little or no hassle, your RV can also generate income.

    Imagine your RV not as a repair-hungry money pit, but a well-oiled, money-making mobile machine. You can offset the costs of ownership, and sometimes even turn a profit (or at least be a fun side hustle). Whatever your RV business goals, here are several smart strategies to help you monetize your RV.


    Rent Out Your RV

    One of the most popular ways to make money with your RV is by renting it out. As AirBnB prices continue to drive higher across the country, RV rentals have seen a surge in demand as travelers look for new outside-the-box travel options. By listing your RV on platforms like Outdoorsy, RVshare, or RVezy, you can connect with potential renters looking for a unique vacation experience. So how do you stand out from the crowd?


    Optimize Your Listing

    Your listing is your most important marketing piece, so make sure it shines. High-quality photos, a detailed description, and a clear sense of style will help you stand out in a crowd of options. Highlight unique features of your RV, like solar panels, luxury interiors, or a rare vintage model. Emphasize both the features and the vibe that it has.

    Set Competitive Pricing

    Research similar RVs in your area to determine a fair rental price. Consider offering discounts for longer rentals or during the off-season to attract more customers.

    Maintain Your RV

    On online marketplaces, ratings are everything. Just a few bad ones, and you’ll be sunk. Without regular maintenance and cleaning, your customers are likely to find plenty to quibble with when leaving those all-important reviews. Plus, a well-maintained RV reduces the likelihood of costly repairs.


    Host Events and Experiences

    With a few tidy updates, your RV could be the perfect venue for hosting small events or pop-up experiences, especially in unique or scenic locations.


    Pop-Up Restaurants or Coffee Shops

    If you have culinary skills, RVs can work great as a mobile kitchen or café. My neighbor pops up around town in a cute, customized travel trailer selling coffee at events around town. Hosting a pop-up in a picturesque location can draw in foodies and tourists alike.

    Mobile Wellness Studio

    If you’re a yoga instructor, massage therapist, or wellness coach, consider offering sessions out of your RV. Park in tranquil spots and offer clients a serene environment for relaxation and rejuvenation.

    Photography Studio

    With the right scrim (the backdrop photographers often use for portraits) RVs can double as a solid mobile studio. Travel to picturesque locations and offer on-the-spot photo shoots, or use it as a base for destination photography services, like pulling up in a parking lot to give an entire business new headshots.

    Mobile Retail Store

    If you have a knack for crafting or selling unique products, consider turning your RV into a mobile retail store. Whether you’re selling handmade goods, vintage clothing, or local produce, a mobile store allows you to reach customers in multiple locations.

    Influencer Advertising

    If you’re constantly on the road, and you want to become an influencer, your RV can serve as a moving billboard. Companies are willing to pay for advertising space on vehicles, especially if you travel to high-traffic areas. The rise of the influencer has been well-documented, but that doesn’t mean it’s easy. Still, successful influencers get to get paid to travel, and the few lucky ones with the biggest reach can pull in up to six figures.


    House-Sitting and Pet-Sitting Services

    The RV serves as a great home base for house- or pet-sitting. Both are a perfect way to get paid to park your RV at a willing client’s house. This can be a win-win situation. You save on parking fees and the homeowner gets the peace of mind of having someone take care of their home or pets without making themselves at home in the house.


    One Last Note

    Turning your RV into a money-making machine is all about creativity, resourcefulness, and a bit of entrepreneurial spirit. Don’t skimp on the marketing, especially when it comes to reviews online. Whether you’re renting out your RV, hosting unique experiences, or transforming it into a mobile business, there are countless ways to generate income while enjoying the freedom of the RV life. Pick one of these soon-to-be-booming businesses, and you can not only offset your RV’s costs but also create a sustainable and potentially lucrative lifestyle.

  • Expion360 Batteries Take Center Stage in K-Z Trailers

    Expion360 Batteries Take Center Stage in K-Z Trailers

    Campers looking for additional power to go will have a new reason to consider adding a new K-Z RV to their garage. The subsidiary of THOR Industries announced they will partner with Expion360 to install new battery technology into their Durango fifth-wheel models.

    Under the new agreement, Expion360 will provide battery technology for K-Z’s line of trailers. The partnership goal is to allow campers to stay off-grid for longer, while keeping their essential electronics powered from anywhere on the road.


    Edge Batteries Feature Solar Integration and Real-Time Battery Management System

    The K-Z RV Boondocker package will now feature an array of three Expion360 Edge 51.2-volt, 60-amp-hour vertical heat conduction (VHC) batteries, with the option to add a fourth battery to their trailer. The advanced battery technology and expert system integration is provided by Wellspring Solar.

    A built-in advanced battery management system protects it from high- or low-voltage surges, short circuits, overcurrent, and high- or low-voltage charging. With Bluetooth connectivity built in, Edge batteries work with the SmartTalk app for battery management. The battery also offers full integration with Victron’s Cerbo GX monitoring system to facilitate easy electrical system communication.


    Large-Capacity Group 27 Batteries Cater to Extended Off-Grid Journeys

    Expion360’s battery systems will also play a prominent part in the Durango “Off the Grid” solar package. RV buyers can choose to upgrade to two Group 27 100-amp-hour VHC heated batteries. Designed for RVs configured for long spans off-grid, the batteries come with a 12-year warranty and their rugged design is meant to work in even the toughest conditions.

    “By partnering with Expion360, we can provide advanced lithium battery options that enhance the off-grid experience,” Brent Froman, general manager of K-Z RV, said in a statement. “We are excited to offer these high-quality power solutions in our Durango and Durango Gold models, as well as in the Durango Half-Ton.”

    The Expion360 Edge batteries will be available in the Durango and Durango Gold trailers, while the Group 27 batteries come in the Durango, Durango Gold, and Durango Half-Ton trailers.

  • Living Vehicle Unveils GT Series Luxury Off-Grid Fifth-Wheel Trailers

    Living Vehicle Unveils GT Series Luxury Off-Grid Fifth-Wheel Trailers

    Santa Barbara-based Living Vehicle has debuted its 2025 GT32 and GT39 trailers, with advanced solar power systems and a focus on creating a “blend of comfort, quality, and independence for discerning travelers.”


    “Luxury Yacht Living for Land”

    The 2025 model year features two options, each branded as their own experience. The smaller GT32 offers the living space and luxury features of a fifth-wheel trailer, but in a smaller package for easier control and towing.

    The ample solar power capacity keeps the lights on when traveling off the grid, ensuring travelers have all the amenities on the home whether they are a full-time traveler or just using the trailer for vacations. In addition to a full kitchen with a cooking island, this trailer comes with a foldable patio deck, a full bathroom with shower, and a space for an optional clothes washer and dryer. A master bedroom with a king-size bed occupies the front of the trailer, while the lounge area at the back can convert to a queen bed.

    The larger GT39 is designed for full-time travelers who prefer to see the world one road at a time. In addition to a larger living space and kitchen, these trailers come equipped with reclining chairs, an 70-inch home theater system installed, and vaulted ceilings. The solar panels can provide 5,000 watts of power, powering all the smart-home systems and the Starlink Wi-Fi that keep travelers connected no matter where they are.

    Both the GT32 and GT39 are available by custom order direct from Living Vehicle.

  • KOA Says Campers Getting Younger, Prioritizing Campground Amenities

    KOA Says Campers Getting Younger, Prioritizing Campground Amenities

    Today’s RV campers are looking for more opportunities to escape the ruckus of daily life, while having the option to connect when they want – not when they are forced to. The new insights come from the Kampgrounds of America (KOA) Camping and Outdoor Hospitality Report for 2024.


    21.6 Million Campers Spend Around a Week Out Per Year

    According to the data collected by the campground and RV resort operator, the love of camping starts at a young age and continues into adulthood. The report shows 60 percent of campers have their first outdoor experience before they turn 18, turning positive memories into a passion as they grow. Today, over 21.6 million households identify as “active campers,” an increase of 68 percent over the past ten years.

    Camping and RVing is also turning into a preferred vacation method for all types of travelers. The study found camping accounted for one in three leisure trips in the U.S., with campers going on one to two trips per year. On average, campers spend around one week at their favorite campsites each year.


    Generational Differences in Travel Accommodations and Preferred Partners

    Going camping is often associated with the older generations who have more leisure time and income to spend on travel. However, KOA found that the younger generations are getting much more active with their camping. Only 52 percent of campers identified as “Gen X” and “Boomers,” while Millennials accounted for 28 percent of travelers.

    Across all generations, spouses and significant others are the preferred partners for camping trips for Millennials, Gen X, and Boomers – Gen Z show no strong preference between partners and friends. Where the generations differ is in their expectations for the camping experience. While Gen Z want to have adventure-based experiences in the outdoors, Millennials want to spend quality time with family and friends. And while Millennials like to go “glamping,” both Gen X and Boomers prefer the luxury of RVs.

    While many campers enjoy “roughing it” off the beaten path, more campers are looking for hotel-like amenities when choosing where to stay. Over half of campers say they begin their trips at a campground or outdoor resort with “abundant services and amenities.” It should come as no surprise that the most popular amenity is a Wi-Fi connection, with nearly half saying it is the “most important” feature of a campground.

    To collect their data, KOA sent out over 4,000 surveys to campers across the United States and Canada, evenly distributed by census region in the U.S. The full report is available to download from the KOA website.

  • The First Step to Find Your Dream RV

    The First Step to Find Your Dream RV

    Seeking to buy your dream RV, but concerned about finances? The first step in cutting RV travel costs is to buy only what YOU actually need. Much like a house, the more square footage, the more expensive it is to purchase, insure, heat/cool, maintain, pay taxes, etc. With a rolling home, you also have to consider the costs associated with storage, annual registration, camping fees, campsite availability, and fuel costs.

    Since 2012 we’ve lived, worked, and traveled full-time in our vintage rig of just 72 square feet, and have explored the continent as well as every national park to which you can drive. While many may think that we are crazy for living in such a small space, we often say that we live small while living large! 

    Along our journey and at our speaking gigs at RV shows around the country, we’ve met hundreds of people who tell us that they bought too big of an RV the first time around. They are looking for that “sweet spot” between enough comfortable space, interior storage, as well as something that is easy to manage — both on the road and financially. 

    So, you might be asking how you can find that “sweet spot.” Well, friend, this article is for you.


    Don’t Skip This First Step

    It may sound obvious, but here it is: STOP before you go shopping. Don’t just buy what your neighbors have or what your brother-in-law raves about! (It’s such a temptation.) Remember: There are thousands of different RVs. So take the time to do your own homework and figure out what YOU need and what YOU can afford. And, be sure to tour several rigs before making a decision. This process will likely save you a bundle of money and much headache, both now and in the future.


    Now, Ask Some Crucial Questions

    • How are you going to use your rig?

      If you are planning to rent an annual campsite at the lake and visit throughout the year, or just head to the local RV park or state park a couple of times per summer, then size, length, and weight doesn’t really matter as much. Conversely, if you plan to drive it longer distances, visit national parks, and national forests that offer more modest-priced campsites — or even live in it full-time — our best suggestion is to purchase a rig under 25 feet. Overall, it will be less expensive and you’ll be able to fit into a wider variety of beautiful, inexpensive campsites. Less than 25 feet is also much easier to drive and will greatly reduce the stress of finding gas stations that can accommodate your rig, not to mention parking at grocery stores, laundromats, and when visiting those old friends that live along your route.


    • How many people are going to live in it regularly?

      One trap that many couples get into with both retirement homes and RVs is that they want something that will accommodate their grown children and grandkids. Many folks seeking to downsize their rig tell us that they bought a big RV to accommodate the extended family, but found that they’ve only joined them a couple of times. Again, buy what YOU need. You can always rent an RV, or vacation home, to accommodate others. In the long run, this act alone will save you tens of thousands of dollars.


    • Can you afford the fuel costs, campsites, storage, taxes/registration, and maintenance and repairs?

      You know that neighbor who has that big rig parked on their property, but never actually moves it? They probably bought too big and have found that it’s less expensive and less stressful to simply not go anywhere. Don’t let this be you.


    Then Imagine Life in That Dream RV

    Play out a couple of dream RV road trips ahead of time. Price out what they will cost in terms of fuel, campsites, and extras. Contact the DMV and find out how much taxes and registration will be for the rig you are interested in purchasing (varies WIDELY by state). If you are unable to store it on your own property, look into storage facilities nearby and price them out. Finally, factor in about 10 percent of the purchase price for annual maintenance and repairs. If all of that adds up to what you can comfortably afford, then you’ve found your rig! 

    In addition to these three very important prepurchase questions, this article (which includes a helpful RV shopping checklist / spreadsheet) will help you keep track of various options, floorplans, and packages included in many modern RV’s as you shop around.

    Once you’ve found your dream RV, give us a shout and tell us how the process was for you. Have fun, be safe, and we’ll see you on the road!

    Enjoying what you’re learning? This article is part of our Cutting RV Travel Costs 101 series.

    The First Step to Find Your Dream RV (Part 1)
    A Few RV Secrets to Help You Save on Camping Fees (Part 2)
    Boondocking Essentials for RV Newbies (Part 3)
    RV Kitchen Must-Haves: How to Make Memorable Meals That Save Cash (Part 4, Coming Soon)
    Going Deep into Your Backyard (Part 5, Coming Soon)

  • What to Look for in a Solar-Ready RV

    What to Look for in a Solar-Ready RV

    So, those solar-powered RV’s caught your eye, huh? (You’re here, so figured they might have.) Well, if you’re looking for the right solar-ready RV model, you’re going to want to get familiar with the terms. Trust us: We know. We’ve been in your shoes. Before hitting the road full-time in 2012, we added a small solar set-up to our vintage camper so that we could save money and camp off-grid without a noisy gas generator.  What we didn’t realize at the time was that we were on the front end of the RV solar revolution that has swept the world!  For the past 12 years, we’ve been teaching RVers how to go solar while we’ve explored North America.

    So, let’s make this intro lesson short and sweet. We’ll go deeper into more solar specifics in future follow-on articles, but here’s what you need to know —and the questions you need to ask — as you get started.


    What solar options are available on RV’s?

    Ranging from the “solar-ready RV” to full-scale solar system packages with all the bells and whistles, the options are many — and can be confusing for newbies. Below are three common options that you’ll find when shopping:


    1. Solar-Ready

    Some RV manufacturers add a special port to the outside of the rig into which you can easily plug a specific brand’s portable solar panel. It’s helpful because the plug directly connects to the house battery, so set-up is simple.  However, a solar-ready RV does NOT mean that the rig comes with any solar components. Typically, in addition to the panels, you will need to purchase a charge controller as well as an inverter if you want to run more than just lights and 12V DC appliances. Most RV’s come with a single, basic 12V lead acid battery, so you may want to upgrade the battery bank to LiFePO4.


    2. Solar Battery Maintainer

    Many modern rigs boast a small wattage solar panel (<50 watts) and charge controller that are designed to simply maintain the RV/van house battery.  While these battery maintainers are NOT robust enough for off-grid RVing, they can be beneficial if you plan to store your rig outside when not in use. These small panels will keep your batteries topped off, so you are always ready to roll on to your next adventure.


    3. Off-Grid Solar Packages

    Some RV manufacturers offer a few models with built-in solar panels integrated into the roof, or as a post-production addition. These systems can provide enough power for average off-grid use of the built-in 12-volt appliances (e.g., lights, slide-outs, water pump, stereo, slides, etc.). However, a few RV manufacturers are now offering robust, large-scale solar packages which include all five of the major solar components. These “off-grid” solar packages range from modest systems on medium-sized travel trailers to huge systems on larger rigs which can add upwards of $15,000 to the RV’s sticker price. The more expensive systems are designed to be able to run the entire RV’s electrical system as well as some of the other “creature comforts” you might want to bring along.  


    Questions to Ask Before Shopping for a Solar-Powered or Solar-Ready RV

    Do you plan to camp off-grid frequently or just the occasional overnight? Do you plan to run additional electric appliances beyond what is preinstalled in the rig?  Like many campers, do you need to be able to work electronically? And how much power will you actually need?  In our next couple of articles, we’ll be discussing how to calculate your energy needs. To get a head start, download our Solar System Sizing worksheet.


    Questions for the RV Dealer

    With the solar-ready RV becoming a popular option, the salesperson should be able to answer these questions, or show you where to find them:

    What brand(s) of solar components are pre-installed in the RV?  RV manufacturers might choose off-brand solar components that are less expensive, and possibly less quality.  Do the research about solar brand(s) so that you know what you are buying. Also, ask about the type and size of the individual solar components, such as:

    • Total solar array wattage and voltage? And also, type (PWM vs MPPT) and size (amps) of solar charge controller
    • Size (total amp hours) and chemistry (lead acid or Lithium Iron Phosphate) of the battery bank?
    • Inverter size, type, and the load (wattage) it can handle?  
    • DC to DC charger size (amps)?
    • Is the converter compatible with Lithium Iron Phosphate batteries?


    Does the RV warranty include the solar components?  Also ask, for how many years? Is it different for the various system components? Does installing additional panels on the roof void the warranty?


    Have we peaked your interest in RV solar?  Hope so. Now, here comes more questions: Which solar components do you need? Can you DIY part or all of a solar powered system? Absolutely! We’ll be discussing these details in the next couple of months, so stay tuned for more resources to build-out a robust solar system that will meet your energy demands no matter what type and size of rig you own or plan to buy.


    What to Look for in a Solar-Ready RV (Part 1)
    5 Solar Components Every RVer Should Know (Part 2)
    RV Solar Explained … with Middle School Math (Part 3)
    Does a DIY RV Solar System Install Make Sense for Me? (Part 4)
    Choosing the Right Solar Powered System for My RV (Part 5, Coming Soon)

  • Affordable Escapes: Top Tips for Budget RV Vacations

    Affordable Escapes: Top Tips for Budget RV Vacations

    RV vacations offer a unique blend of freedom, adventure, and comfort. But if you’re not careful, costs can sneak up in your rearview before you know it. The good news: With smart planning and wise choices, you can enjoy an unforgettable RV vacation without breaking the bank. To help, we’ve put together a list of our top tips for maximizing the adventure ROI on your RV budget, including affordable destinations, money-saving strategies, and tactics for enjoying your trip on a budget.


    Plan Your Route Wisely

    One of the first steps to a budget-friendly RV vacation is planning your route carefully. Consider traveling shorter distances to save on fuel costs. Opt for scenic byways over highways – these routes are not only more picturesque but also often less crowded and cheaper in terms of tolls and fuel consumption.

    Next, plan your stops in advance, research free or low-cost campgrounds, national forests, and Bureau of Land Management (BLM) stop-offs where you can park overnight. Websites like freecampsites.net and Campendium are great resources for finding free or inexpensive camping spots as you get to where you’re going.


    Choose Affordable Destinations

    The U.S. is filled with affordable destinations that are perfect for RV travelers. One of our favorites is a service called Harvest Hosts, which boasts over five thousand locations across the country.

    They’re not free to stay, but with no membership required, the National Parks are a fantastic way to keep costs low. Fees are always extremely affordable, with many of the larger National Parks offering full hookups, and a variety of different size parking spots. You’re also guaranteed to be parked near some mostly untouched nature spots, with some of the best scenery in the world available in our national backyards.


    Travel During the Off-Season

    Timing your RV vacation during the off-season can save a significant amount of money. Campsites and RV parks often offer lower rates during the shoulder seasons (spring and fall) when there are fewer tourists. You’ll also find fewer crowds, which means you can enjoy even the most popular destinations in relative peace.

    Off-season travel can also lead to savings on attractions, dining, and other activities outside of the RV park, as many tourist-friendly locations offer discounts to entice visitors during slower periods.


    Cook Your Own Meals

    One of the biggest advantages of RV travel is having a kitchen on wheels. By cooking your own meals you can avoid the high costs of eating out. Plan your meals ahead of time and shop for groceries in bulk at local supermarkets or farmers’ markets. Look for simple, budget-friendly recipes that can be easily prepared in your RV’s kitchen, and lean into leftovers-friendly meals like pot roasts that can turn into sandwiches, breakfasts that can turn into breakfast tacos, etc.


    Take Advantage of Free Activities

    Many RV destinations offer free or low-cost activities that allow you to explore the area without spending much money. Hiking, swimming, fishing, and biking are just a few examples of free outdoor activities you can enjoy.

    In addition to outdoor activities, look for free or donation-based attractions like museums, local festivals (which have the added benefit of giving you a more insider look at the local culture), and historic sites. Check the local visitor center or tourism website for a calendar of events.


    Use Discount Programs and Memberships

    Consider investing in discount programs and memberships that offer savings on camping fees, fuel, and attractions. Here are a few options: Good Sam Club: Get discounts on fuel, campgrounds, and RV services. The membership pays for itself if you plan to stay at participating RV parks. Passport America: This membership gives you 50% off camping fees at hundreds of campgrounds across the U.S., which can really add up over lengthy stays. National Park Pass: If you plan to visit multiple national parks, the America the Beautiful Pass offers unlimited entry to more than 2,000 federal recreation sites for one annual fee.


    Boondocking: Say Goodbye to the Grid

    Boondocking, or dry camping without hookups, is a great way to save money. Public lands like BLM areas, national forests, and certain state lands often allow free or very low-cost boondocking. You’ll also often avoid distractions like noisy neighbors. The tradeoff is that you won’t have to wait for an open lounge chair at the pool… because there won’t be one. But for those who are boondockers, it’s a pleasant tradeoff.

    To make the most of boondocking, ensure your RV is equipped with the necessary supplies, such as solar panels, a generator, and large water tanks. While boondocking may require a bit more preparation, the savings can be substantial, and you’ll often find yourself in some of the most beautiful, secluded spots.


    Be Energy Efficient

    Saving on energy costs can also help stretch your budget. Use LED lights in your RV, take shorter showers, and run appliances like air conditioners and heaters only when necessary. If you’re staying in one spot for an extended period, consider investing in solar panels to power your RV, which can significantly reduce your reliance on paid utilities.


    Travel with Friends or Family

    Sharing the costs of your RV vacation with friends or family can make the trip more affordable. Splitting expenses like fuel, food, and campground fees can cut your costs in half or more. Plus, traveling with others can enhance the experience, making it more enjoyable and memorable.


    Maintain Your RV

    Regular maintenance of your RV can prevent costly repairs down the road. Before you embark on your trip, ensure your RV is in good working order. Check the tires, engine, plumbing, and electrical systems. Carry a basic tool kit and spare parts for common issues, and learn how to perform simple repairs yourself.

    By following these tips, you can enjoy an amazing RV vacation without spending your whole annual budget. With careful planning and a little creativity, your budget-friendly adventure awaits!

  • DIY RV Fixes Any Newbie Can Do

    DIY RV Fixes Any Newbie Can Do

    Hitting the road in an RV is an adventure you’ll never forget, and in most cases, it will be some of the most fun you will have on the open road or in nature. There is a less memorable aspect to RVing though, and that is the dreaded fixes and repairs that are inevitable. To help you make more memories of the fun kind, here are some fairly easy DIY fixes and preventative measures that will keep you on the road with your headlights on, instead of on the side of the road with your hazards on.

    Oh, and for the record, I am far from an RV tech or repairman. This is just based on my experiences over six years and 100,000 miles of RV life on the road.


    Common Issues RVers Face

    As an RVer, you’ll likely face a few common issues that can be easily fixed or prevented with a bit of know-how. These problems range from minor leaks and blown fuses to tire changes and roof repairs. Addressing these issues promptly is crucial to maintaining the functionality and safety of your RV. By learning how to handle these basic repairs, you can avoid unnecessary service calls and keep your adventure on track, all while saving a lot of money in the process.


    Essential Tools and Supplies for DIY Fixes

    Before diving into the specifics of DIY repairs, it’s crucial to have the right tools and supplies on hand. Here are some must-have items for every RVer:

    • Basic Toolkit. Ensure you have a set of wrenches, screwdrivers, and pliers. These tools will cover a wide range of basic repairs.
    • Multimeter. Useful for diagnosing electrical issues, a multimeter can help you identify problems with your RV’s wiring and electrical components.
    • Duct Tape, Zip Ties, and Sealant. These versatile items can temporarily fix leaks and other minor issues until a more permanent repair can be made.
    • Spare Fuses and Bulbs. Electrical problems are common, and having spare fuses and bulbs can quickly resolve many issues without needing professional help.
    • Tire Pressure Gauge and Air Compressor. Maintaining proper tire pressure is essential for safety and fuel efficiency. A tire pressure gauge and good air compressor help ensure your tires are always at the correct pressure. Just make sure that the air compressor you have is strong enough to fill RV tires, which often require a much higher PSI than regular passenger vehicle tires.


    With these tools and supplies, you’ll be prepared to handle a variety of common RV issues. One final tip I can give before diving into a few specific DIYs is that while on the road, my wife and I try to take care of repairs in the parking lot of whatever stores we are buying parts at. If the space is there for you to make the repair comfortably, just realize that Murphy’s law is a real thing, and you will likely have to make another trip into a store to properly fix a problem. It’s easier to just walk back into a store instead of having to find another one to pull into along the way.


    Step-by-Step Instructions for Simple Repairs

    Fixing a Leaky Faucet

    One of the most common issues you will come across while RVing is a leaky faucet, and in most cases, it is relatively simple to fix. Here’s a step-by-step guide:

    1. Identify the Leak Source: Determine if the leak is coming from the faucet handle, spout, or connections underneath the sink.
    2. Gather Necessary Tools: You’ll need a wrench, screwdriver, and possibly replacement parts like washers, O-rings, clamps, or a hose.
    3. Turn Off Water Supply: Ensure the water supply or pump is turned off to avoid any mess. A bucket or something to catch trapped water is usually a smart idea as well.
    4. Disassemble the Faucet: Use the screwdriver and wrench to carefully remove the faucet or other component once you have determined the issue. In some cases, you will have to remove a few parts to get to the specific piece that needs to be repaired.
    5. Replace Damaged Parts: Check for worn-out washers, O-rings, or hoses, and replace them as needed.
    6. Reassemble and Test: Put the faucet back together, turn on the water supply, and test to ensure the leak is fixed.


    Replacing a Tire on an RV

    Changing a tire on an RV is slightly different from a regular vehicle due to the size and weight. Here’s how to do it safely:

    1. Proper Weight Ratings for Jacks. Ensure your jack can handle the weight of your RV. Check the weight rating before purchasing or using a jack. You should also know what the weight rating for your RV is, as it is essential for many aspects of RV travel.
    2. Check for a Spare Tire. Many RVs do not come with a spare tire, so your first step is to ensure whether or not you have one before hitting the road. If you do, make sure it is in good condition before setting out on your trip.
    3. Proper Tire Inflation Levels. Use your tire pressure gauge to check that all tires, including the spare, are inflated to the manufacturer’s recommended levels. Doing this regularly helps prevent blowouts or other issues.
    4. Safety First. Park on a level surface and use wheel chocks to stabilize the RV. If you have stabilizers on your RV that can be easily and safely deployed while changing your tire, that is a bonus. You should also make sure to turn on your hazard lights and place a cone if you have one.
    5. Loosen Lug Nuts. Before lifting the RV, slightly loosen the lug nuts on the wheel that needs to be replaced.
    6. Lift the RV with a Jack. Position the jack under a sturdy part of the RV’s frame and lift the vehicle until the tire is off the ground.
    7. Remove the Old Tire and Install the New One.  Remove the lug nuts and old tire, then place the spare tire on the wheel studs. Tighten the lug nuts in a star pattern by hand until the tire feels securely in place.
    8. Lower the RV and Tighten Lug Nuts. Carefully lower the RV and then fully tighten the lug nuts in a similar star pattern with the respective wrench to ensure proper tightening.


    Replacing a Blown Fuse

    Electrical issues are common in RVs, but replacing a blown fuse is straightforward:

    1. Locate the Fuse Box. The fuse box is usually found near the RV’s control panel.
    2. Determine the Faulty Fuse. Identify the blown fuse by checking for a broken filament or discoloration. This is where a simple multimeter comes in handy to diagnose and confirm.
    3. Replace the Fuse. Remove the faulty fuse and replace it with one of the same amperage. Avoid using a fuse with a higher or lower amperage rating, as this can cause electrical damage, or another blown fuse.


    Patching a Roof Leak

    A roof leak can cause significant damage if not addressed promptly, and the roof is something that I actually suggest you get professionally fixed if you are not confident in your DIY skills. That being said, a temporary patch can save your vacation until a professional can take a look. Here’s how to patch it:

    1. Identify the Leak Location. Look for signs of water damage or moisture inside the RV to pinpoint the leak.
    2. Clean the Area. Clean the area around the leak with soap and water, and let it dry completely.
    3. Apply Sealant and Patch. Use a roof sealant to cover the leak area, then apply a patch over it. Press firmly to ensure it adheres well.
    4. Allow to Dry and Test. Let the sealant dry completely before testing the repair by spraying water over the patched area.
    5. Duct Tape Isn’t Great, but It Can Help. If you don’t have sealant or a patch but you do find yourself with a leak, duct tape can sometimes be a temporary solution. Be sure that the tape will not further damage your roof, paint, or leaky area before applying, but I personally feel that in the case of a leak, that risk is worth it if bad weather is coming.

      *A good idea, if possible, is to check a weather app on your phone. You may be able to simply wait it out if the weather looks OK for the rest of your trip.


    Safety Tips and Precautions

    • Turn Off Power. Always unplug from shore power and turn off the power supply before attempting any electrical repairs to avoid shock or injury.
    • Wear Protective Gear. Use gloves, safety glasses, and other protective gear as needed to prevent injuries.
    • Ensure Proper Ventilation. When working with sealants or other chemicals, ensure the area is well-ventilated to avoid inhaling fumes.
    • Double-Check Work. After completing any repair, double-check your work to ensure everything is secure and functioning correctly. This is especially true if you are on the road and not at home with time and resources readily available for those dreaded multiple trips to the hardware store that I mentioned above.


    Additional Resources

    Just because you’re doing it yourself doesn’t mean you have to do it alone. I have three sources that I regularly use for help.

    • Online Forums and Communities. You would be surprised how a simple Google search for your specific problem can come back with forums or websites where people are discussing your problem and how to fix it.
    • Video Tutorials and Online Courses. YouTube searches can sometimes offer detailed video tutorials on various RV repairs. This is usually my favorite method, because I get a visual aide to reference.
    • Call a Professional. Whether it is a local professional that you may have found in a search or someone you may personally know, sometimes calling someone with more knowledge can lead to a simple cheap fix. This has happened to my wife and I while on the road, and we’ve had professionals walk us through a few possibilities over the phone that ended up saving us a lot of time and money. You’d be surprised how many people, even those that make a living off these kinds of repairs, will be willing to give a little free advice over the phone.


    Understanding and performing basic DIY repairs and maintenance can greatly enhance your RVing experience, giving you the confidence to handle common issues and keep your adventure on track. Practice these skills, learn from each experience, and soon you’ll be tackling more complex repairs with ease. Happy RVing, and hopefully we’ll see you on the road.

  • Replacing or Fixing an RV Toilet: A Step-by-Step Guide

    Replacing or Fixing an RV Toilet: A Step-by-Step Guide

    Ah, the joys of RV life – the open road, the freedom to roam, the adventures waiting around every bend, and the occasional spray of toilet water to the face! Let’s be honest, not every part of RV living is glamorous. Take, for example, the humble RV toilet. It’s a crucial component of your home on wheels, but one that often gets overlooked until it’s too late.

    If you’ve found yourself in need of fixing or replacing your RV toilet, fear not! This guide will walk you through the process step-by-step, with a personal experience that even I had to laugh at – well, I laughed days later, not in the moment.


    My Frozen RV Toilet Fiasco

    This is my somewhat long story and is mostly for laughs, so if you wish to skip to the how-to section, click here.

    Let me set the scene: It’s Idaho in the winter, and before you ask who goes camping in Idaho in the winter, that would be us. We were working on a contract that had us stay at an RV resort with hotel rooms. The temperature was going to drop into the negatives with windchill, so we stayed in a cozy hotel room, thinking that we would be fine leaving the heat on overnight. That was my first mistake. The following is what transpired.

    My breath fogs in the air as I step outside my hotel room to slip and slide my way over the ice and snow in the parking lot towards my RV. I’m bundled up and look like the Michelin man as I waddle over and into the less-than-freezing inside of my home on wheels where I realize that I may have set the heat a little low trying to conserve power and gas. I turn on the water pump, the motor churns to life, and … sprinkler sounds come from the bathroom. Oops, I warmed the inside of the RV, but I left that bathroom in the back a little too exposed to the weather.

    I open the bathroom door, water is shooting out from behind our RV toilet, and I know it’s up to me to fix it. After I shut off the water pump and arm myself with tools, I venture into the belly of the beast. As I begin disconnecting the toilet, disaster strikes. A specific connector, apparently not built to withstand arctic conditions, snaps clean off. I spout a few four-letter words, waddle back to the hotel room, and inform my wife, “We have to find an RV parts store.”

    We spent the next 30 minutes looking for somewhere that would have our specific toilet and the specific part I needed. The closest place was a Camping World about an hour away. When we arrived, they had the part ready, I purchased it and immediately went to work in the parking lot. After about 30 or 40 minutes of uncomfortably working on the toilet, I smiled and said, “Wow, that wasn’t too bad.” Of course, that’s when the fun really started. I asked my wife to turn on the water pump, and after a few seconds of seemingly successful silence, I leaned in, only to catch a jet of freezing cold water sprayed directly into my face.

    Luckily the water was coming from the outside connection and not a backfire, if you catch my drift. It turns out that trying to lazily skip a few steps wasn’t the best idea. Instead of taking the toilet out completely to work on the problem, I tried to work directly on the issue that needed fixing. After a few more four letter words – which my wife said were pointless, but they definitely made me feel a little better at the time – I inspected everything further and thought that maybe some other connectors and washers would be a good idea. I was confident that a stop at the hardware store for a few items and proper installation would do the trick.

    Since we were trying to make it pretty far on our travel day, we drove another two hours south to a Home Depot, where I proceeded take out the whole toilet to try and do it right. I went into the store and purchased everything I thought I would need and started taking out the toilet. It took me about 45 minutes out in the cold to take out the toilet, replace some connections, and add a little insulation around the tubing for future protection. When I put everything back together, I turned on the water, and sure enough, I got sprayed right in the face again. It turns out that in my haste to finally finish this project, I didn’t properly connect the new piece I purchased in the first place.

    At that point the four-letter words were really flowing, but I set out to start from the beginning again. After getting the toilet out, I of course fumbled one of the unique screws that holds it in place right down the poop-chute, and I nearly lost my mind. My wife, somewhere between aggravation and laughter, calmed me down, and then set out to help me in my final attempt after I took about 20 minutes to find a screw that would actually fit our toilet. Together, we were finally able to properly install the toilet and the replacement part.

    It turns out that doing things slowly, thoroughly, and completely from the beginning, is always the best way to do things. It also shows that while I try to do things myself, getting help from others is good practice too. And finally, as much as I hate to admit it, sometimes my wife does know best. I won’t tell her it’s not more than Google, even though I feel like she may think so, but she is brilliant and super handy too. I love her, and she’s the best partner I can ever have for all of my crazy life adventures.

    Now, for those that want to do it right the first time around, below are the tools and steps you should take to properly fix or replace your RV toilet.


    Tools and Materials Needed

    Before diving into the replacement process, gather the following tools and materials:

    • adjustable wrench
    • screwdriver set
    • plumber’s tape (Teflon tape)
    • replacement part or new RV toilet
    • rubber gloves
    • towels or rags
    • bucket

    Having these items on hand will ensure you’re prepared for the job without unnecessary interruptions.


    Step-by-Step Instructions

    Before beginning the installation, the most important aspect of this project is comparing your toilet and the specs of your RV bathroom with a possible replacement part or new RV toilet. You don’t want to start the project only to realize that what you purchased is not compatible.


    Step 1: Turn Off the Water Supply

    Begin by turning off the water supply to your RV. This will prevent any unexpected sprays of water (trust me, you’ll want to avoid this). Locate the water pump switch and ensure it’s off, or turn off the main water supply if you’re hooked up to an external source.

    Step 2: Drain the Toilet

    Flush the toilet to drain as much water as possible. Use towels or rags to soak up any remaining water in the bowl. This will minimize spills and make the process cleaner.

    Step 3: Disconnect the Water Line

    Use a wrench to disconnect the water line from the back of the toilet. Be prepared for a small amount of water to spill out. Have your bucket and towels ready to catch any drips.

    Step 4: Remove the Old Toilet

    Unscrew the bolts at the base of the toilet using a wrench or screwdriver. These bolts can sometimes be a bit stubborn, so applying some WD-40 or other lubricant and letting it sit for a few minutes may help. Lift the old toilet off the flange and set it aside. You might need an extra hand to help maneuver it out of the tight space.

    Step 5: Prepare the Flange

    Clean the flange area thoroughly with a rag. Remove any old wax or gasket material to ensure a good seal with the new toilet. Ensure the surface is smooth and free of debris. If the flange is damaged, this is the time to replace it to avoid future leaks.

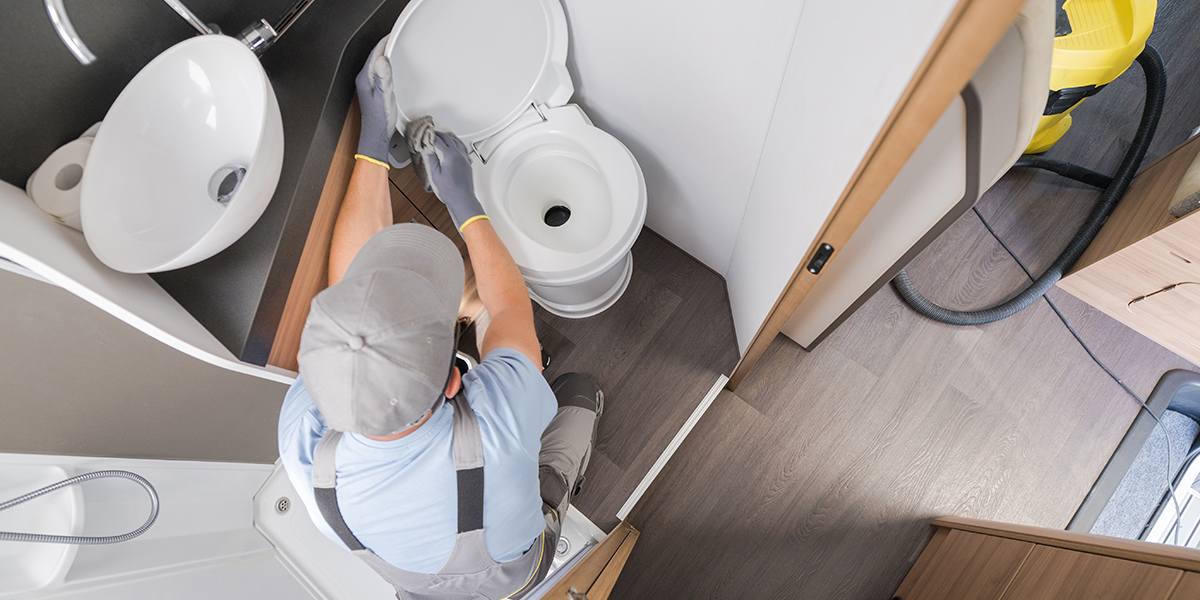
    Step 6: Install the New Toilet or Replacement Part

    Place the new toilet onto the flange, aligning the bolt holes. Secure it with the provided bolts, tightening them evenly to avoid cracking the base. It’s important to tighten the bolts just enough to secure the toilet without over-tightening, which can cause damage.

    Step 7: Reconnect the Water Line

    Attach the water line to the new toilet, ensuring it’s snug and secure. Use plumber’s tape (Teflon tape) on the threads to prevent leaks. Double-check that the connection is tight but not overly tight, to avoid damaging the fittings.

    Step 8: Turn On the Water Supply

    Turn the water supply back on and check for leaks. If everything looks good, flush the toilet a few times to ensure proper operation. Monitor for any slow leaks over the next few hours to catch any issues early.


    Common Challenges

    Replacing an RV toilet isn’t always smooth sailing, as you can picture if you read my story. Here are some common challenges you might face, along with tips to overcome them:

    Leaky Connections

    Double-check that all connections are tight and secure. Use plumber’s tape to seal threads. If you notice any leaks, tighten the connections slightly more and ensure the plumber’s tape is correctly applied.

    Stubborn Bolts

    If bolts are rusted or difficult to remove, apply a lubricant or penetrating oil and let it sit for a few minutes before attempting to loosen them. A little patience with your elbow grease can go a long way.

    Misaligned Flange

    Ensure the flange is clean and properly aligned before securing the new toilet. If it’s damaged, consider replacing the flange as well. This can prevent future leaks and ensure a secure fit.


    Maintenance Tips

    To keep your new RV toilet in top condition, follow these maintenance tips:

    Regular Cleaning

    Clean the toilet regularly with RV-friendly cleaners to prevent buildup and odors. Avoid harsh chemicals that can damage the seals and components.

    Check for Leaks

    Periodically inspect the water connections for leaks and tighten as needed. Early detection can prevent water damage and save you from more extensive repairs.

    Winterize Properly

    If you’ll be camping in cold weather, take steps to winterize your RV to prevent freeze damage. Drain the water lines, add antifreeze as necessary, and insulate exposed pipes and connectors. If you are RVing in cold weather, be sure that your pipes, tanks, and bathroom have proper ventilation and heating to prevent freezing.


    Conclusion

    Replacing an RV toilet might not be the most glamorous task, but with the right tools, materials, patience, and in some cases, a good sense of humor, it can be a manageable experience for most DIYers. Whether you’re dealing with a frozen water fiasco or just looking to upgrade, this guide has you covered. Happy RVing, and may your travels be filled with adventure and well-functioning toilets!