Blog

  • Top Tips For Selling Your RV

    Top Tips For Selling Your RV

    Online research is crucial to many buyers today, and if selling your RV is a top priority for you, posting it on RV Trader is a great place to start to reach those buyers. We have millions of visitors actively looking for their next RV on our site each month – so you’re sure to get plenty of eager eyes on your unit. Check out our top tips for making sure your RV Trader listing stands out from the rest.

    1. Take High-Quality Photos

    Photos have the power to draw buyers in – so make sure yours are the best they can be. Buyers want to see authentic photos when they are searching for listings, so do your best to avoid stock photography. We suggest including a wide variety of photos on your listing of both the inside and outside of the RV. Take your listing photos in natural daylight so they are not washed out and make sure to use a camera that takes top-notch photos buyers want to click on.

    2. Clean Your Unit Thoroughly

    Make sure the RV you’re selling is spotless, both inside and out. Buyers want to see their potential RV in tip-top condition, so you should give the unit a detailed wash and declutter the interior before you take photos or invite potential buyers over to tour/test drive the unit.

    3. Be Honest About Your Unit

    You’ll want to photograph and describe any and all damage your toy hauler or other RV has right off the bat. It’s important to be open and honest with buyers so you don’t lose credibility and, potentially, the sale. Buyers appreciate honesty – so keep that in mind when creating your listing.

    4. Include a Price

    Including a price in your listing is crucial. Buyers want to know this information upfront to determine if your unit fits into their budget – and we can all relate to that! It’s been proven that units listed with a price get 8X more clicks and 3X more connections on RV Trader than listings that don’t. This simple addition can make a big difference.

    5. Put Yourself in the Buyer’s Shoes

    When crafting a listing, or even giving a tour of your Class A RV or other RV, it’s important to put yourself in the buyer’s shoes – which should be easy since you were once a buyer. Ask yourself, “What did I want to know before purchasing my RV?” or “What advice/knowledge can I share since I’ve been through the process before?” Providing this type of information is extremely helpful for potential buyers – especially if they are new or just getting into the RV lifestyle.

    6. Write a Detailed Listing Description

    While descriptions can be tedious to write – they are so important, particularly for the first-time buyer. Buyers need your help deciphering how this particular RV is going to fit into their lifestyle, and you have the opportunity to be the expert. We recommend highlighting all the key features of your unit, how many it sleeps, its length, and how you’ve used the unit previously. The more details, the better!

    7. Consider Getting an Inspection

    Another way to get your listing to stand out in a competitive marketplace is to get a pre-purchase inspection on your RV before listing it. When selling on RVTrader.com, you can choose to have a certified inspector do an on-site inspection of your RV with RV Trader Assurance powered by Lemon Squad. This quick and easy inspection delivers a report typically the following business day. An RV Trader Inspection Badge will be displayed on your listing, catching a prospective buyer’s attention and letting them know that you can provide a detailed inspection report of your for-sale RV.

    8. Respond to Potential Buyers in a Timely Fashion

    We live in a world where instant gratification is the norm, so you’ll want to keep that in mind when RV inquiries come rolling in. We encourage you to check your messages regularly so you can respond to an interested buyer quickly after being contacted. Buyers can move fast so they will likely move along to another listing if you don’t respond in a timely fashion.

    9. Include Relevant Keywords

    Make sure to include keywords that are relevant to your specific unit – that way as people are searching online, your unit pops up easily. For example, the word “towable” is a top search word.

    We hope that these nine tips have helped you realize that selling your RV doesn’t have to be difficult. If you follow these tips, you’ll have an even higher chance of getting more eyes on your listing! Check out our RV Seller’s Guide for additional resources to help you through the selling process. And if you’re still undecided about listing your RV on the market or not, read through these benefits of selling your used RV

  • Believe it or Not – These Small Businesses All Operate Out of RVs

    Believe it or Not – These Small Businesses All Operate Out of RVs

    Long gone are the days of small businesses sticking to brick and mortar storefronts. Many creative entrepreneurs have decided to take their businesses out on the road… in their RVs! We’ve compiled a list of a few genius businesses that are all fully functioning out of campers, trailers, and motorhomes. These businesses will delight, surprise, and might even inspire you.
    Check out a few of our favorite mobile businesses below.

    J.D. Luxe Fashion

     
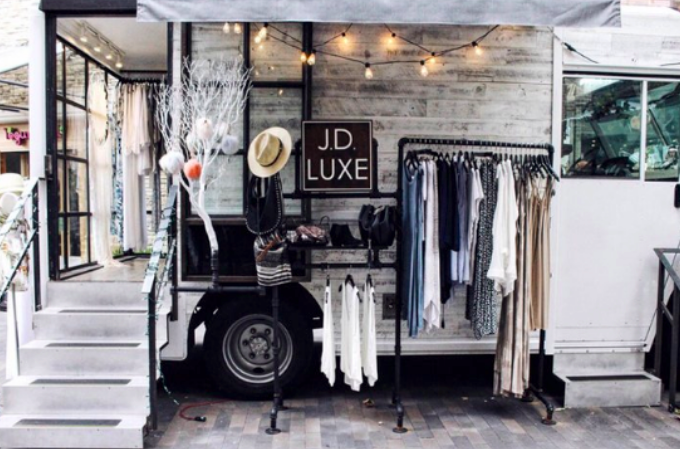
    Image: J.D. Luxe Fashion

    Brick and mortar boutiques will become a thing of the past with designers like J.D. Luxe Fashion going mobile. Their flagship “truck and mortar” store opened its doors in 2011 in beautiful Woodland Hills, CA to offer customers a one-of-a-kind shopping experience.

    Now you don’t need to visit the closest shopping mall to find the hottest trends in fashion. This mobile boutique offers California locals a unique (and chic) shopping experience on wheels. While they do run storefront locations, J.D. Luxe swept up media attention on the streets of Los Angeles and at festivals like Coachella. Their eye for design, the mobility of their store, and online shop makes J.D. Luxe Fashion a competition for standalone fashion entrepreneurs everywhere!

    It’s a Dog’s Life Spaw

     
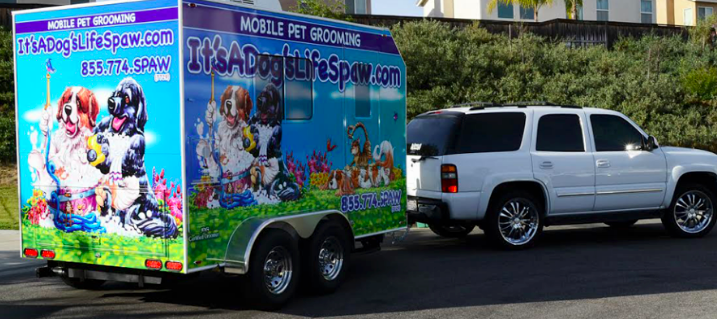
    Image: It’s a Dog’s Life Spaw

    We’d be remiss if we didn’t include a business having something to do with animals in our RV businesses piece, and we didn’t have to look far – It’s a Dogs Life Spaw made us fall in love with their mission of providing a traveling, tail-wagging worthy grooming experience for West Coast pups! Kristi, creator of the “Spaw,” has loved animals as long as she can remember. No matter what the situation, every time she saw a stray dog, she brought it home with her. Over the course of her lifetime, she’s owned and raised a number of other pets, including horses, and exotic species.

    It didn’t take her long to realize that her passions were driving her to commit to a future of full-time employment with pets. More than anything, Kristi loves spending time with individual pets, getting to know their unique personalities, characteristics, and tendencies. Her website reflects her feelings that “All pets are truly a special soul that deserves nothing but the best.”

    Having graduated from a licensed academy of pet grooming and styling from Amber Lewin, a master certified groomer, Kristi is well-taught in not only styling, but also CPR and first aid. She presents with IPG (International Professional Groomer) certification, and notes that her philosophy is to “treat all her clients as if they were her own pet.”

    The Spaw itself is state-of-the-art, and comes fully equipped with warm water, climate-controlled mani areas, and top-of-line amenities with zero cages or crates. It’s designed to provide not only a bathing experience, but a relaxation, stress-relieving (“Spaw”) experience for the animals, too – so the open, comfortable environment makes for just that.
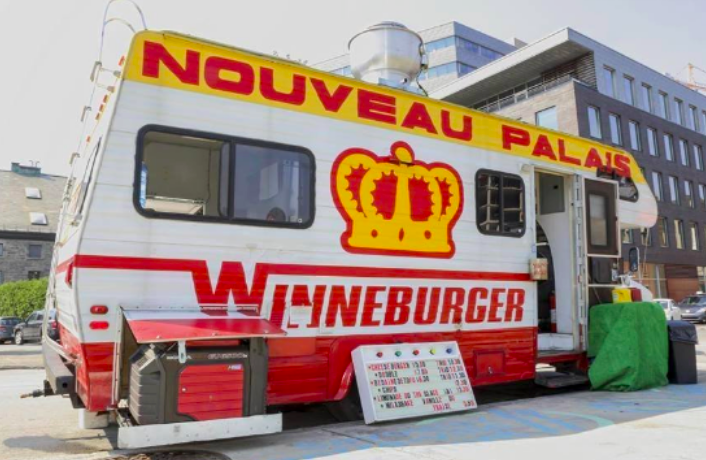
    The Winneburger

     
    Image: Winneburger

    What do you get when you mix burgers with classic Winnebago vibes? Winneburger, of course. Based out of Montreal, the Winneburger is a fully-equipped traveling kitchen, operated by the popular local restaurant Nouveau Palais. Functioning out of a 1980s revamped Winnebago, it is designed to blend vintage vibes and decor with modern, freshly produced grub.

    Always including a veggie-friendly option with their meals, their goal is to provide all customers with a memorable, unique cuisine experience. Owners Gita Seaton, Mary Martha Campbell, and Jacques Seguin are the seasoned chefs and restaurant business experts behind the small business and noted a few go-to items on the Winneburger’s menu, including kettle chips, homemade lemonade and iced tea, and ‘old-fashioned’ milkshakes.

    Their famed, sweet challah buns make their burgers famous, and nothing compares to these key dishes, such as the Mushroom Burger (imagine a breaded, fried Portabello cap- stuffed to the brim with cheese, then placed on a challah bun) with all the fixings.

    Silvercloud Trailer Events

     
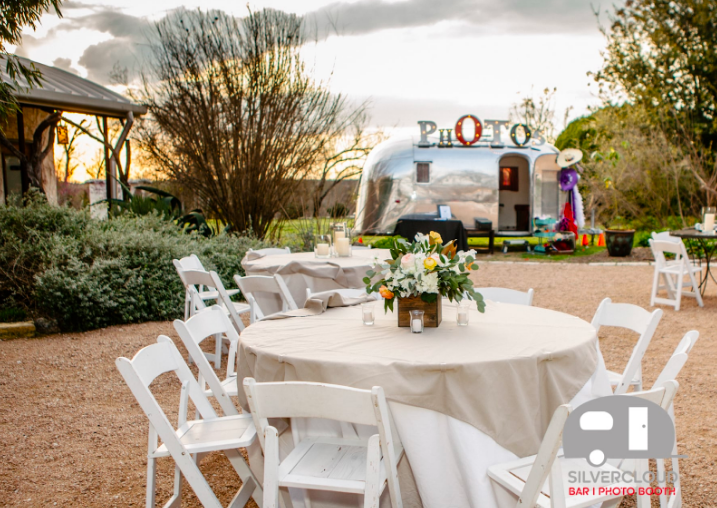
    Image: Silvercloud Trailer Events

    In need of a photographer for your event? Why not mix it up and rent out the Airstream Photo Booth curated by creative entrepreneurs Yvonne and Chris Johnson?

    Based out of the Austin, TX area, Yvonne and Chris are both experienced in the wedding photography industry, and noticed a popular trend developing in the industry: rentable photo booths. Hoping to offer an individualized spin on this trend, they aligned this interest with Texas’ popular affinity for Airstreams. Switching up the traditional backdrop of large events, regardless of whether it be a wedding or festival, the Airstream Photo Booth experience comes fully equipped with fun, engaging props for dress-up, and the company offers both a full-size Airstream and smaller sized ‘Bambi’ trailer for smaller-scale events.
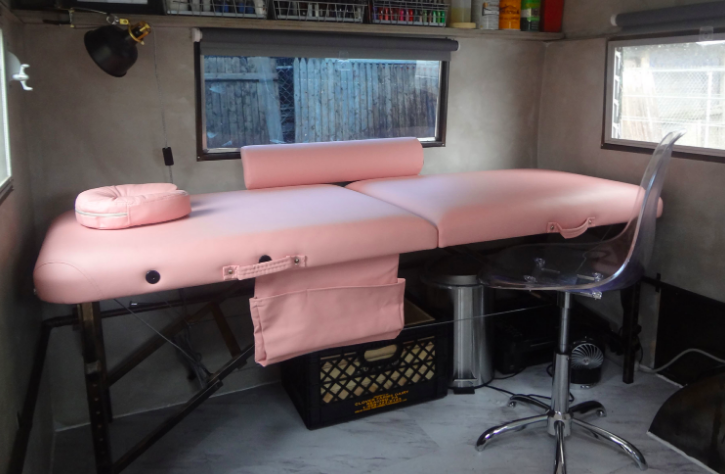
    Ink Minx 

    Image: Ink Minx

    Tattoo culture is often a male-dominated space, but Shanzey Afzal had a plan to create change. Shanzey is a 26-year-old tattoo artist who converted a 1963 Shasta trailer into a mobile tattoo studio called Ink Minx. The mobile tattoo studio isn’t your average parlor, it caters to a specific audience – women. Shanzey was inspired at a young age by henna tattooing, which is a tradition from her Pakistani culture. The inspiration turned into something more and she began a tattoo apprenticeship at age 21, becoming a licensed artist soon after.

    As she observed the tattoo industry during her apprenticeship, she came to find that it wasn’t always an inclusive place for women so she made it her mission to create an inclusive and safe space for women to express their creativity and participate in tattoo culture. Ink Minx might be located in a small trailer, but it is packed with a lot of heart. The trailer includes just the tattoo basics like one tattoo table, a counter station, fold-out desks, and a few other odds and ends required to get the job done.

    The pink interior gives off a feminine and welcoming vibe to anyone about to make a tattoo commitment. One of the main reasons Ink Minx is a mobile unit is that Shanzey’s mission is to empower women across the country. Shanzey has recently traveled up and down the East Coast to tattoo women and plans on adding additional stops (including music festivals) in the near future.
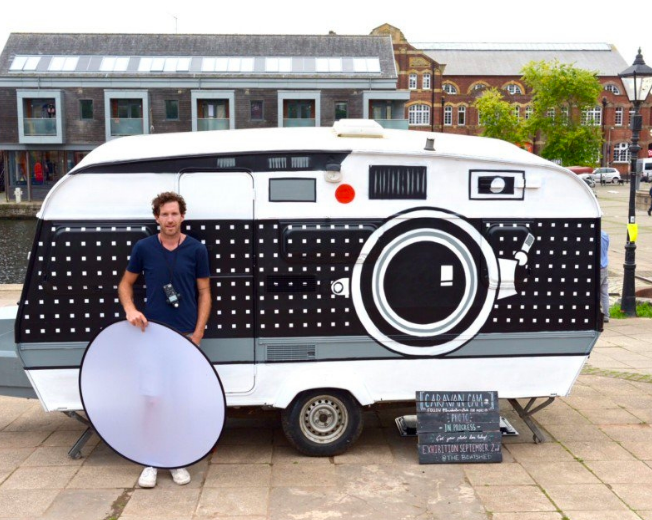
    The Caravan Camera 

    Image: Home Crux

    Brendan Barry attended art school in England, but found out pretty early on that he quite frankly “wasn’t very good at art”. He began getting into photography and years later received his master’s degree and later started teaching the subject.

    Barry has built a variety of handmade cameras in the past but started thinking outside of the box – or should we say camera. He was inspired to make a camera where people would be physically invited into the process of photography. That’s when the Caravan Camera was born.

    The Caravan Camera is an RV converted into a working camera obscura. From buying the unit to having it fully completed took roughly 2-3 weeks. Individuals can stand outside of the RV to get their photograph taken by the caravan. The inside of the camera also hosts a darkroom where the film is then developed.

    Barry has grand plans for the Caravan Camera, including taking it to schools, hospitals, and community groups to excite and engage people in the process of photography. He plans on building a bigger camera in the future that will be wheelchair accessible so a variety of people can appreciate the art of photography.

    Andrea Denniston Ceramics 

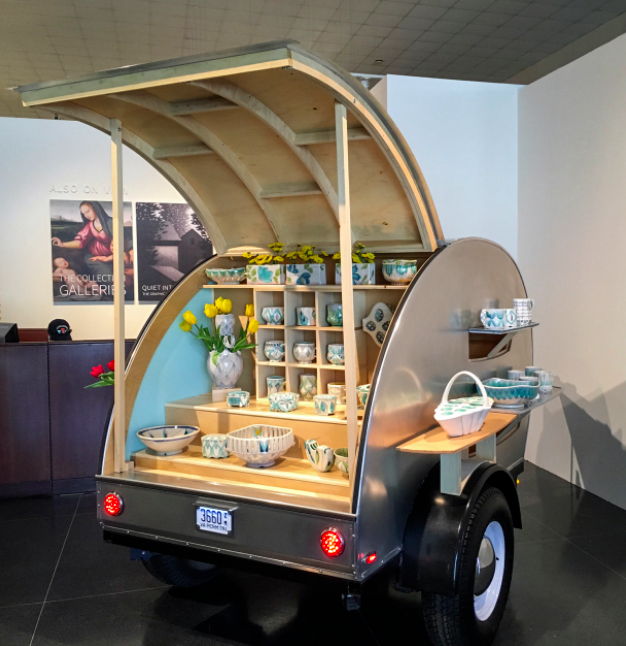
    Image: Andrea Denniston Ceramics

    Andrea Denniston is a studio potter based in Virginia who decided to get creative with her art show display. She entered the craft show world and wanted to find a way to make the most of her allotted booth space, that’s when she began researching trailers. During the summer of 2015, she designed a chassis and commissioned outside assistance to make her dream mobile display come to life. Her mobile gallery is a 4×6 foot teardrop trailer that is cute as a button, yet still very practical for her needs.

    Denniston loves pottery and that love shines through each of her creations. Her goal is to make pottery that will find its way into someones home and works to create unique and engaging objects. She enjoys working with a bright color palette and her mobile gallery highlights her work in a way that’s incredibly pleasing to the eye.

    The display has a hatchback style opening on the back of the trailer complete with a variety of shelves to securely hold and protect her stunning porcelain creations. Due to its small size, the trailer can be easily towed to various craft shows where Denniston displays her work. There is not a lot of interior room to spare, but when fully set up, the trailer even has space for a packaging station.

    Denniston’s husband Seth, who is also a potter, occasionally uses the trailer to display his gas reduction stoneware. He runs a business called Poor Farm Pottery.


    These are just a few stories of courageous entrepreneurs that have made it big with their RV businesses. So many small business owners are now operating “storefronts” out of their campers and motorhomes – we’re excited to see what they come up with next! What are some other small businesses you know of that are operated out of RVs or trailers? Would you ever consider developing a small business startup in your own camper? Let us know in the comments below!

  • Top Dog-Friendly RV Parks & Campgrounds

    Top Dog-Friendly RV Parks & Campgrounds

    If you’re anything like us, we can’t imagine leaving home for our next adventure without our dogs. Our four-legged friends are considered part of the family and we often ask ourselves, “what did we do to deserve dogs?” With SO many RVers out there, we know we aren’t alone. So to make sure you never have to leave home without little Fido in tow, RV Trader has compiled a list of top dog-friendly RV parks and campgrounds that will be sure to be a tail-wagging good time for both you and your pet!

    1. Four Paws Kingdom

    Four Paws Kingdom is located in Rutherfordton, North Carolina and, as its name suggests, is truly a kingdom for dogs. This campground is in the foothills of the Blue Ridge Mountains and is the first and only campground in the U.S. dedicated to dogs. Four Paws Kingdom includes a fenced in swimming pond, multiple dog parks, trails, a dog bathhouse, and even a grooming salon! There are also tons of benefits for you dog owners out there like RV hook up sites, Wi-Fi, cable TV, and so much more.

    2. Normandy Farms

    Normandy Farms is located in Foxboro, Massachusetts and is a luxurious campground located deep in the woods between Boston and Cape Cod. This resort takes dog friendliness to the next level by providing a 1.5-acre dog park, agility equipment, a dog washing station, dog walking services, and they even provide kennels services for your furry friends. They do have a few pet specific restrictions, but overall this campground is extremely dog friendly if you meet those requirements. Normandy Farms is stunning and hosts a variety of activities for guests. The grounds and facilities are top-notch and have plenty of room for RVs of all sizes, including Class A motorhomes.

    3. Lake George RV Park

    Lake George RV Park is located in Lake George, New York and is thrilled to welcome pets on their grounds. The park includes a two-acre off-leash dog park for dogs to run freely and get out any pent up energy after long days of travel. The “Bark Park” also includes a pet vending machine stocked with toys and treats – this is what doggie dreams are made of. Wait there’s more! The park also includes a dog splash pad to cool off on hot days and agility/turf areas for play. Dogs are also allowed in the indoor areas of the park including their main lodge, general store, and cafe. You won’t have to leave your dog anywhere when you visit this RV park!

    4. Garden of the Gods RV Resort

    Garden of the Gods RV Resort is located in Colorado Springs, Colorado and is truly camping at its best. You’ll have to pick your jaw off of the floor when you take in the surrounding views. But how does this park cater to your pups? Glad you asked. Garden of the Gods RV Resort is a pet-friendly park that includes an off-leash Bark Park for your dogs to run wild in. They’ll be able to interact with other dogs and get out all of their energy. This resort has plenty of RV campsites and offers standard, deluxe, and premium sites for RVers. This resort sounds like a win-win for both you and your pet.

    5. Escondido RV Resort

    Located 30 miles away from sunny San Diego, California, Escondido RV Resort boasts resort-style amenities for you and your dog to enjoy. The 10-acre RV park features scenic views, over 100 full-hookup sites, and a fenced dog park. Let your pet stretch their legs and run around this one-third-acre park. On a hot day, your pet can cool down and make a splash in the fire hydrant water feature. There are even dog toys and training tools available on-site.

    6. KOA

    There are hundreds of KOA campground locations across the country and they are all pet-friendly! KOAs have special KampK9 areas of their grounds where dogs can roam around off-leash, and they often include washing stations. Many KOAs also have dedicated areas for large and small dogs so your dog can play safely.

    There you have it! Our list of top pet-friendly RV parks and campgrounds. With these options, you’ll never have to leave your precious pooch at home. Bring Fido is another great resource to check out so you can see nearby pet-friendly locations.

    For more tips on traveling with your dog, visit RV Trader’s Pet Resource Page. And, if you’re shopping for a camper with room for your four-legged friend, browse the nationwide inventory of new and used RVs for sale on RVTrader.com.

  • Tips for Buying a Vintage Camper

    Tips for Buying a Vintage Camper

    Vintage campers have the ability to transport us back in time, have an undeniable charm, and are all the rage right now – which is why so many consumers are interested in purchasing them. But the real question is – is a retro trailer the right choice for you? Before you claim a little piece of history, there are a few things to consider when buying vintage. We’ll share a few questions to ask yourself and simple tips you need to know before buying that diamond in the rough.

    Determine usage level

    Before you buy, it’s important to ask yourself how you’ll be using your vintage camper. Are you planning on taking short weekend getaways or cross country road trips? You’ll want to determine what you’ll be using your camper for so you can decide on proper size, quality, and length to best fit your RVing needs. If you’re planning on parking your unit at specific campgrounds or RV parks, you’ll need to see if they have any restrictions on vintage units.

    Gauge your budget

    It’s time to empty out the piggy bank to see what finances you are working with before buying a vintage camper. If you are buying a full restored camper, you might be looking at a higher price up front but this could minimize future repairs in the long run. On the other hand, buying an older model can definitely be a more cost-effective option. But if you plan on renovating your camper, you’ll need to be prepared for any surprises that come up in the process.

    Keep an eye out for water damage

    We’ll say it louder for the people in the back. LOOK FOR WATER DAMAGE. When buying a vintage camper, you need to inspect the unit very carefully because the sad reality is, most vintage models have water damage that can be easily hidden. If there’s too much water damage, there’s a chance the whole unit will need a complete renovation. Anyone else hear a cha-ching? Fixing water damage can cost A LOT of money so here are the big things to look out for:

    • Ripples on the interior walls of the camper
    • Water stains
    • Repainted walls (some sellers will try to mask the water damage by painting)
    • Floor leaks/rotting
    • Window and ceiling vent leaks

    To DIY or to not DIY?

    This is an important question to ask yourself before you consider buying a vintage RV. There are many vintage RVs on the market that have already been completely renovated and restored, so if you’re looking eliminate the DIY work, those units might be your best option. If you’re toying with the idea of buying a true vintage camper, you’ll want to assess your ability level and the time, money, and energy you want to spend on fixing up an older model. Renovations give you the ability to give your camper a custom feel, but it’s important to keep in mind that they also take time and effort to restore.

    Check for any electrical damage

    Electrical damage can be a dealbreaker when it comes to buying a vintage camper because to get to the root of the electrical issue, you will typically need to remove all of the interior walls. Unless you’re extremely handy, you will most likely have to bring in a professional. That’s why it is a good rule of thumb to make sure all the electrical systems are in good working order before making your purchase. It’s also a good idea to double check that the propane systems are working properly as well.

    Fully examine the exterior of the unit

    Before purchasing a vintage unit, you’ll want to take a look around the exterior of the unit to make sure it is in good shape. Check the panels and glass to make sure there are no cracks. A few dents might not be a dealbreaker, but if the exterior of the camper is in bad shape that means there is a higher chance of leaks down the road.

    Know your towing capacity

    It might sound obvious, but if you’re planning on buying a towable vintage unit, you need to make sure you have a vehicle that can actually tow your trailer. Vintage campers come in a variety of sizes, lengths, and weights, so you’ll need to keep that in mind when starting your search. You will also need to find out the towing capacity required and the weight of the specific unit you’re interested in to make sure it’s a fit for your current vehicle.

    Make sure to keep our tips in mind if you’re on the hunt for a “seasoned” model. Vintage campers can be so much fun to own and the renovation process can be exciting, but it’s important to know everything that comes along with purchasing a vintage trailer. If you’re looking for a retro beauty of your own, check out our listings on RV Trader!

  • FMCA Tech Tip: Low-Voltage RV Wiring Repairs

    FMCA Tech Tip: Low-Voltage RV Wiring Repairs

    Low-voltage wiring repairs to your RV can be tackled by RV owners who have some basic knowledge and a few specialized tools. Learn how to perform simple electrical wiring repairs to your RV, thanks to the experts at FMCA.

    Overview

    Wiring is the backbone of an RV’s electrical system. Wires must be the proper size to handle the rated current flow for each device. If a wire is too small in diameter or makes too long of a run, the powered device will starve for voltage or current, and both the wiring and the device will overheat.

    Think of wiring as you would a plumbing system. As the flow rate of water increases, so must the diameter of the water pipe to overcome the restriction of a smaller pipe. As the pipe length increases, a larger diameter may be required to compensate for the loss in pressure as a result of friction within the pipe. Electrical wiring operates on the same principle, so it’s important to use the proper wire gauge for the designated load. A circuit that runs fine on a 16-gauge wire may not be suitable if more devices are added to that wire. A larger wire gauge may be needed to handle the increased loads.

    The wire gauge is not dependent on the voltage but on current flow, which is measured in amperes. A 15-amp circuit requires a 14-gauge wire, but if that load increases to 20 amps, a larger diameter, 12-gauge wire is needed. When choosing a wire size for a particular application, it’s important to determine the total current draw for that circuit and compare that with a wire-gauge chart.

    Stranded wire, rather than solid wire, is used for low-voltage DC wiring in RVs. A big advantage of stranded wire is its flexibility. It also holds up better when subjected to vibration.

    It’s important to understand that the insulation surrounding the conductor is sensitive to voltage. The insulation in low-voltage wiring is rated at a maximum of 50 volts and should never be used for high-voltage applications. Wiring specifically designed for higher voltage should be used exclusively on 120-volt-AC circuits.

    Most low-voltage wiring insulation consists of two varieties, GPT and GXL. GPT wiring has a PVC jacket that is good for interior wiring and is rated to 176 degrees Fahrenheit. GXL wiring costs a bit more, because it has a cross-linked polyethylene jacket and is rated for 257 degrees Fahrenheit. GXL is required for use in hotter locations, such as engine compartments, but can be used anywhere.

    Wire insulation prevents electricity from jumping out of the conductor to the surrounding environment. Insulation also provides some protection to the conductor. Eventually, though, a wire that is subject to vibration and is in contact with another object can rub through its insulation and may short to another conductor. If the short occurs to ground, the breaker or fuse should trip, but if it shorts to another hot circuit, you may experience any number of electrical anomalies. If the conductor shorts to the chassis or other metal component, the result may be a hot-skin condition, which in a high-voltage instance can be a serious, even fatal, hazard.

    To prevent abrasive wear, wiring should be placed inside a protective wiring loom. The most common is corrugated split-nylon loom, which is available in various sizes. Rated at up to 300 degrees Fahrenheit, the loom protects the wire from damage caused by abrasion, chemicals, and heat. The split in the loom allows for easy access when inserting wires. The loom is easy to cut to the desired length with a utility knife. Nylon cable ties should be used to fasten the loom to the RV at suitable points.

    Overcurrent Protection

    Wires heat up as current flow increases. If a short circuit develops, the amperage spikes and the wire gets so hot that it burns off its insulation. That can start a fire, which in the worst case could consume an RV. That’s why overcurrent protection is needed for every circuit. Such protection can be in the form of a fuse or a circuit breaker. Fuses are disposable, so once they blow, they must be replaced.

    Circuit breakers are more costly, but for critical circuits they can be reset and used again. Type I circuit breakers automatically reset once they cool and are the most common. Type III circuit breakers have a small reset button that must be manually pushed to restore power to the circuit. Remember that the portion of wire between the battery and the fuse or circuit breaker is unprotected, so it’s important to position the circuit breaker as close to the power source as possible to achieve the best possible protection. Circuit breakers must be matched to the wire gauge as well. Adding a larger fuse or breaker to a wire that isn’t designed to carry that much current defeats the purpose of the protection.

    Connections

    Proper connections must be made to securely attach wiring to the destination equipment or device. Simply wrapping a wire around a screw head invites failure. When a screw connection is needed, a loop-end wiring terminal should be attached to the end of the wire so that it can be securely fastened to the screw. Most auto parts stores carry an assortment of wire terminal ends that contain loop-end terminals. Stores also sell butt-end and flat-blade connectors, which are used to join two wires.

    A PVC or nylon insulation collar surrounds the crimp barrel of each connector and is color-coded to identify the size of wire each terminal requires. A red collar signifies a terminal designed for 18-gauge or 20-gauge wire. A blue collar is designed for 14-gauge or 16-gauge wire, while yellow is rated for 10-gauge or 12-gauge wire. Selecting the correct terminal for a particular wire size ensures a tight connection that won’t detach.

    You’ll need to use a crimping tool, but be careful, because some of the inexpensive ones do a poor job and the connection may pull apart. I suggest a crimp tool such as the Paladin Tools PA1308 or the S&G Tool Aid 18900. These tools, which have a die with three barrel sizes, perform a complete roll crimp on the fitting, rather than a single indent, producing crimps that won’t pull apart.

    Many connections require running a wire to ground. Loose, damaged, or missing ground connections are some of the most prevalent issues when chasing down an electrical problem. Such ground connections attach to the vehicle’s frame to complete the circuit. Often, the connections are in a location that is subject to corrosion. As a preventive measure, protect the connection with battery terminal sealant. A ground connection should be to clean, bare metal. Remove paint that could hinder the connection, and use a star lock washer to help bite into the frame and make better contact with the terminal ring. If you use a bolt rather than a screw, a nylon lock nut or lock washer will prevent the nut from vibrating loose.

    Soldering wires together makes a solid connection. However, battery and inverter cables pass large amounts of current, which can melt the solder. Such high-capacity connections should have crimped connectors. Crimping tools for large connectors are expensive, so your best option may be to find a truck or RV service center that can perform the crimps for you.

    Corrosion Protection

    When electrical current passes through two dissimilar metals, galvanic corrosion can occur. When moisture attacks connections, rust can form. Salt water and acidic vapor from nearby batteries hasten these forms of corrosion and inhibit the ability of the connection to pass current.

    When making a soldered splice of two wires, it’s important to seal the connection and protect it from corrosion. Polyolefin shrink tubing is ideal; it forms a seal that protects the connection from the elements. Shrink tubing is placed over the wires prior to soldering and then slides over the connection after it has been soldered. Then, a hair dryer or heat gun warms the tubing and shrinks it to seal the wire.

    Shrink tubing also can be used to seal the barrel ends of ring-style terminals to prevent corrosion from rotting the wire inside the barrel. This is especially important for battery terminal connections. Large-diameter shrink tubing for these cables is available in both red and black to identify positive and negative cables. When making a connection in a clean environment, such as behind a vehicle’s instrument panel, standard insulated butt connectors or flat-blade connectors generally are adequate.

    Top-post batteries can receive further protection against corrosion. For example, to each post, add a felt washer that contains NOCO Company’s NCP2 corrosion preventative compound. NCP2 also is available in spray cans and can be useful for coating ground connections or terminal studs in areas that are exposed to the elements.

    By investing a little time learning some electrical basics and having a few small tools, you’ll be able to handle most of your wiring repairs.

    FMCA RV Club brings you this monthly tech tip to Enhance Your RV Lifestyle. FMCA delivers RV know-how to its members. Join today for just $50 — a savings of $10 just for RV Trader readers. Learn more at https://join.fmca.com/trader18.

    This information is for educational purposes. FMCA shall not be responsible nor retain liability for RVer’s use of the provided information. Prior to making any RV service decision, you are advised to consult with an RV professional.

  • Winnebago: New Uses For An Old Favorite

    Winnebago: New Uses For An Old Favorite

    For many years, the Winnebago Adventurer was not only the flagship gas-powered model for the brand, it was one of the most-recognized nameplates in RVing.

    Then, for a brief period, the model took a hiatus from the Winnebago lineup. “Over the years, the product moved further upmarket, and we felt like we needed to hit ‘pause’ for a bit,” noted Niles Whitehouse, Product Manager for Winnebago’s Class A gas lineup.

    The Adventurer Returns

    Now the Adventurer is back at a lower price point, with five floorplans ranging from 29 to 37 feet and a pair of available options that distinguish it from most other RVs on the road today.

    The first is the All-Weather Upgrade Package, which adds a second high-efficiency air conditioner with heat pump as well as a 5,500-watt Cummins Onan® Marquis Gold™ gas generator, 50-amp. power cord and automatic changeover switch.

    “The Adventurer uses our trademark Thermo-Panel construction, so it’s already very well-insulated. The All-Weather Package adds some extra oomph to the cooling, so folks will be comfortable just about anywhere you can take an RV,” said Whitehouse. “And of course, when it’s cool out, the electric fireplace (in the 35F and 36Z floorplans) will take the chill out of the air.”

    Wheelchair Accessible


    The second option is actually a series of modifications that turn the Adventurer into a fully accessible home on wheels for wheelchair users.

    Part of Winnebago’s Accessibility Enhanced model lineup, the Adventurer 30T AE includes a platform wheelchair lift on the passenger side, plus a powered roll-up lift door to make independent entry and exit simple and easy. Inside, the hallway and bath areas have been expanded to accommodate wheelchairs, there’s a roll-in shower with assist bar — even the appliances and switches have been relocated to make RV travel and living easier.

    Winnebago has been modifying their motorhomes to make them wheelchair-accessible for more than three decades. But according to Jamie Sorenson, the company’s Director of Specialty Vehicles, the new Accessibility Enhanced Adventurer is part of a whole new approach.

    “In the past, we would start by taking a fully built coach just off the line, and extensively modifying and customizing it afterward. Now, we are building three models — the Adventurer 30T, the Intent 30R, and the Forza 34T — as Accessibility Enhanced models right from the start. That saves time and materials, and allows us to price them pretty attractively.

    “We’re doing this both for long-time RVers who may be facing some new mobility issues, as well as for wheelchair users who may not be RVers currently, but who want to maximize their comfort and flexibility as they travel.”

    The three Accessibility Enhanced models will make their debut at the Tampa RV show, after which they will be available through select Winnebago dealers.

  • A Guide for Great Listing Photos

    A Guide for Great Listing Photos

    It’s no secret that the buying process is changing, and with technology on the rise, online research is becoming increasingly important to buyers before they make a purchase – large or small. That’s why taking high-quality photos is crucial to get more eyes on your listing when selling your RV. Interested in upping your photo game? We’ve got 8 easy tips to make sure your listing photos are painting a clear picture to potential buyers.

    Make it Shine

    We know cleaning an RV can take time depending on the size, but a deep cleaning can have the potential to make or break a sale. It’s important to know that buyers want to see their potential unit in tip-top shape not just before making a purchase, but before even coming to see it in person. New or used, you’ll want to make sure the outside of the unit is washed, and that the inside of the unit has had a full detailing.

    Use the Right Camera

    Consumers are likely to move along to the next listing if your photos are grainy or blurry. So our question to you is, are you using a high-quality camera to take your listing photos? You’ll want to make sure that you have a fairly newer camera to ensure that your photos are crystal clear. Keep in mind, most smartphones have incredible cameras and can be great options for taking photos. If you want to take your photos to the next level, consider buying an updated point and shoot camera. They are very simple to use and take extremely clear photos.

    Shoot at the Right Time of Day

    Ask any photographer and they’ll tell you, lighting is everything when it comes to taking photos. That’s why it’s so important to keep in mind the time of day you’re taking your listing photos. We recommend avoiding taking photos midday when the sun is at its brightest and lighting can come across as harsh. Shooting during the morning or late afternoon is ideal for capturing “warmer”, less washed out photos. As long as it’s not raining, cloudy days can also be great photoshoot days – just make sure it’s not too dark outside! While taking photos inside of the unit, highlight the natural light that the unit provides by opening up all of the windows while shooting. If there are darker areas inside, we suggest turning on the cabin lights as needed – avoid flash if at all possible.

    Keep in Mind Positioning and Location

    When taking listing photos, you’ll want to keep in mind where you’ve positioned and parked the RV. Make sure that the unit you are trying to sell is the focal point of your photo. While inside the unit, stand in corners and point the camera outward while taking photos to make the unit feel larger and longer.

    Take a Few Test Photos

    It’s important to take your time while shooting your listing photos, as they are a crucial part of your listing. Take a few test photos of your unit to make sure the lighting is right, the images are clear, and that you are satisfied with the outcome. If you aren’t pleased with the photos you can take a step back and see what might need to change to enhance your photo (positioning, lighting, etc.).

    Have a Variety of Photos

    Consumers want to see photos and LOTS of them. Potential buyers want to see the entirety of the unit even before coming to see the unit – they want to picture themselves in their new RV on the road to their next destination. To paint your buyer a clear picture, we suggest taking a few full shots of the outside of the unit (showing the whole RV) as well as detailed, close-up shots. When taking indoor shots, we suggest showing all aspects of the unit. We recommend having a full outdoor RV shot as your main listing photo to grab the customer’s attention right off the bat, then they can explore more photo options as desired.

    Be Honest and Authentic

    It’s extremely important to be honest and authentic with your customers. Don’t hide the imperfections of the unit you are trying to sell. If the unit has a few dings or scratches, or if there’s a tear in upholstery, consumers deserve to know. It’s also a good idea to stay away from using stock photos of your unit – consumers appreciate original photos and want to see exactly what their potential unit looks like.

    Highlight Special Features

    Does the unit you’re selling have any special features like extra storage, great natural lighting, or new technology? Make sure you are highlighting them in both your listing photos AND descriptions. As we mentioned earlier, consumers want to picture themselves in their new RV, and showing them unique features will having a higher chance of piquing their interest.

    We hope that these 8 tips have helped you realize taking listing photos doesn’t have to be difficult. Taking the right photo can take some practice, but your buyer will thank you in the end when selling your RV.

  • FMCA Tech Tip: Charging RV Batteries

    FMCA Tech Tip: Charging RV Batteries

    Is your RV battery fully charged? Learn how to check, thanks to FMCA and the “RV Doctor” Gary Bunzer.

    About RV Batteries

    Batteries used in RVs are lead acid batteries, which means they have several cells connected in series. Lead acid batteries do not physically make electricity; instead, they store electricity. The size of the lead plates and the amount of electrolyte the battery contains determines the amount of charge a battery can store.

    Batteries are the heart of any RV. They provide power for lighting, fans, water pumps, and other 12-volt accessories. Eventually, though, batteries discharge. How long they hold a charge depends on how much they’ve been used and their condition. Boondocking, in particular, places demands on batteries and requires a bit of power management to ensure they retain their charge long enough to allow plenty of use between recharge cycles.

    How to Tell When a Lead-Acid Battery Is Fully Charged

    • Monitor the specific gravity of the electrolyte in each cell as the battery accepts the current from the charger.
    • As the battery charges, the specific gravity will continue to rise in each cell. At some point, the specific gravity will stop its ascent and remain stable at one reading (hopefully around 1.260).
    • When the specific gravity remains at its highest reading (regardless of the value of that reading) for a period of two to three hours, the battery is fully charged. It simply cannot accept any more current.


    Note: If it plateaus at a much lower reading than 1.260, further troubleshooting is in order; it may be time to replace that battery.

    Further Reading

    Inexpensive digital voltmeters can help RVers avoid costly repairs. A DC meter indicates whether the RV batteries are properly charged, and such information can prolong battery life. Read more about these devices: https://familyrvingmag.com/2018/03/01/rv-voltmeter-installation/

    FMCA RV Club brings you this monthly tech tip to Enhance Your RV Lifestyle. FMCA delivers RV know-how to its members. Join today for just $50 — a savings of $10 just for RV Trader readers. Learn more at https://join.fmca.com/trader18.

    An important safety note: Whenever you’re working with RV batteries, make sure to wear gloves and safety glasses to prevent injury.

    This information is for educational purposes. FMCA shall not be responsible nor retain liability for RVer’s use of the provided information. Prior to making any RV service decision, you are advised to consult with an RV professional.

  • Snowy Destinations

    Snowy Destinations

    Whether you live in a naturally snowy climate or just pine for one, these destinations are great spots to truly enjoy the winter weather. The three spots we picked out all have a unique charm to them – but are not the big resorts you’ve likely heard so much about.

    Mammoth, CA

    Mammoth is a great destination for skiers and non-skiers alike. The mountain itself has more open terrain to explore than any other ski resort in the country – which is impressive. And, if that wasn’t great enough – it is also known for being uncharacteristically sunny throughout the year – with more than 300 days of sunshine on average.

    If you aren’t up for skiing, you can check out the Village at Mammoth Mountain – which is full of cute shops and restaurants – or ride the Gondola up to the mountain’s summit for some breathtaking views of the snow-covered surroundings.

    If you’re looking for a day trip – check out June Mountain Lake – which is possibly more beautiful in the winter than it is during the summer.

    Midway, UT

    Make sure you pack your bathing suit…is typically a recommendation you would expect to find in an article about the best snowy destinations – but you’ll definitely need one for this stop. The Homestead Crater is a hot spring found inside a 55-foot tall limestone rock and was slowly formed by the melting snow. The coolest – and possibly creepiest – part is that the crater is completely dark. They do have some lights, but overall, it’s dark water. To get a better view – you can even look into scuba diving there. Afterward, hike to the top of the limestone rock to see a view of all Herber Valley – which includes Herber City, Midway, and Daniel – and take a look down on the hot spring and swimmers below.

    Steamboat Springs, CO

    Steamboard Springs, in our opinion, has one of the cutest ski villages around. This particular town is bustling throughout the year with great events and festivals, including a Hot Air Balloon Rodeo.

    In the winter, Steamboat is known for their “champagne powder” – the term coined to describe their light, fluffy snow. After hitting the slopes – should you choose to – the Yampa River Core Trail is a great pastime. It runs from one side of Steamboat to the other along the frozen river. As you walk along the trail – it kind of feels like you’re walking through a winter wonderland.

    Wondering where Steamboat Springs got its name? From the hot springs that are found throughout the surrounding area, of course! There are two famous ones – the Old Town Hot Springs and the Strawberry Park Hot Springs. Both are relatively close to downtown Steamboat – and would be great to relax in after a busy day in the wintery weather.

    Winter weather doesn’t last that long – so make sure to plan a trip to enjoy these snowy destinations that are guaranteed to make you feel like you’ve stepped into a real-life snow globe.

  • Tech Tip: RV Furnace Maintenance

    Tech Tip: RV Furnace Maintenance

    RV owners — especially those who embrace winter travel — should be proactive in preparing the forced-air heating system when the thermometer dips. Know how with these tips from FMCA and the “RV Doctor” Gary Bunzer.

    About RV Furnaces

    An RV forced-air furnace is a sealed combustion system, so it is relatively easy for owners to perform a few maintenance procedures to ensure that warm air will circulate when needed. This is not to say the need for professional attention is eliminated altogether. As with any propane-burning appliance, it is still vital the delivery line pressure be measured and adjusted, the regulator be tested, and a deeper cleaning be performed periodically. Also, it is imperative the complete propane piping system be tested for leaks at least once per camping season.

    There are, however, a few simple steps all RV owners can follow to avoid shop labor costs. I’ve always maintained the four crucial areas regarding the RV forced-air furnace are as follows:

    • Cleanliness of the furnace
    • Proper routing of the ductwork
    • Return airflow
    • DC voltage supply

    All RVers should carry a decent digital multimeter (DMM), a few hand tools, and standard cleaning supplies so these four areas can be addressed before the onslaught of winter.

    Furnace Cleanliness

    • Vacuum and wipe down all portions of the furnace you can easily access. Simply keeping the unit free of accumulated dust and dirt will help ensure proper operation.
    • Vacuum in and around all areas of the furnace compartment, including the floor ducts. In some cases, it may be possible to remove a front panel to gain access to the interior portions of the furnace enclosure. In other cases, access may be gained through a panel from outside the RV. Use a soft, damp cloth to wipe down all metal components.
    • Take time to fully inspect the intake and exhaust vents on the exterior of the motorhome. The fireside stories you’ve heard of wasps, spiders, mud daubers, and birds possibly building a nest inside that intake/exhaust assembly are true. Obstructions in the intake tube will cause an overly rich mixture at the burner, resulting in incomplete combustion. Obstructions in the exhaust tube can be a fire hazard. Neither situation is good for you, the furnace, or the motorhome.

    Ductwork Routing

    Some RVs have flexible runs of ducting; others are built with rigid in-floor ductwork. Most flex ducts are routed above the floor, inside cabinets, under sofas, etc.

    Inspect the routing of every run, since they’re usually easily accessible. Look for extended runs and collapsed or pinched ducts. Longer-than-necessary branch ducts sometimes can be shortened to eliminate heat buildup. Excessive heat can cause the furnace to short cycle. Try to vacuum or wipe away dirt or dust inside each duct as far as you can reach.

    Inspect all adjustable heat outlet registers, making sure most of them are fully open. The number of ducts routed throughout the RV is determined by the BTU rating of the furnace. In order for the furnace to operate properly, a certain number of ducts must be connected to its manifold. If too many of those ducts are closed (or not enough ducts are installed), the chance of a short-cycling sequence increases.

    Return Airflow

    For proper operation, all forced-air furnaces require a specific amount of fresh air be returned to the furnace enclosure. This is accomplished through a grille or a set of louvers mounted somewhere within the RV’s living space. Do not block or modify this grille in any manner. Be sure the return grille and the area immediately behind it are free and clear of obstacles.

    DC Voltage Supply

    The proper amount of DC voltage is crucial to the safe and efficient operation of the forced-air furnace.

    Most modern furnaces operate at a voltage input between 10.5 and 13.5 volts DC. Of course, 10.5 volts is basically a dead battery (100 percent depth of discharge), so more than likely, the conscientious RVer will keep the battery bank at a higher level of charge. I stress the 50 percent rule; never discharge to below 50 percent of capacity, unless necessary. But it’s not uncommon for a somewhat-depleted battery to provide less-than-sufficient voltage, especially during a dry camping endeavor. Low voltage causes the blower wheel to spin slower, perhaps too slow to properly close the sail switch. The sail switch initiates the heating cycle by powering the circuit board, which in turn opens the gas valve and creates the spark that ignites the main burner.

    On the flip side, too-high voltage coming into the furnace also can cause problems. Never power the furnace directly from a battery-charging device, converter, or off-line power supply. The incoming voltage must be “filtered” somewhat. This is accomplished by connecting the furnace to a battery circuit within the RV. Maintaining a clean, properly charged battery bank is essential for optimum operation of the furnace.

    Summary

    Serious and seasoned RV owners understand the importance of proper preventive maintenance. Following these few quick and easy procedures will give your heating system an advantage in the cooler months.

    FMCA RV Club brings you this monthly tech tip to Enhance Your RV Lifestyle. FMCA delivers RV know-how to its members. Join today for just $50 — a savings of $10 just for RV Trader readers. Learn more at https://join.fmca.com/trader18.

    An important safety note: RV owners should never remove any component on the sealed system that is held in place with a gasket. Breaking the seal on any gasket potentially can cause a dangerous carbon monoxide leak.


    This information is for educational purposes. FMCA shall not be responsible nor retain liability for RVer’s use of the provided information. Prior to making any RV service decision, you are advised to consult with an RV professional.